Tutorial 2017
This
tutorial is written by
Denise D. on 26th April, 2019.
from
my own ideas.
Any
resemblance to other tutorials is
co-incidental and unintentional.
You
may share my tutorials with other
groups.
All I ask is that you advise me
and
credit for the tutorial is given to me and linked to
http://escapingtopsp2.altervista.org/Home/homeb.html
Please
do not upload any of my completed Tutorial images onto sites
such as Fotki, Pinterest, Photobucket or similar
WHIPPED
CREAM

http://escapingtopsp2.altervista.org/WhippedCream/WhippedCream.html

Click on the Box to download Supplies
.gif) Click on Arrow to follow Tutorial
Click on Arrow to follow Tutorial
Supplies
Images:
Narah_0558_Flowers_May2010.pspimage
You can join this Group at:
https://ar.groups.yahoo.com/neo/groups/TUBESpack/info
Net Lace.pspimage
bld_chantillylace_pagespray2mask
Strass-Rose-2-TCH.pspimage
This image was obtained from the
Internet
If you are the owner of this
image, please contact me
so that credit can be given to
you
Textures:
Mypaper.jpg
Patterns:
or25
Mask:
Narah_mask_0567
You
can join this Group at:
https://ar.groups.yahoo.com/neo/groups/TUBESpack/info
Brushes:
floralbrushes6
003
BrushTip_floralbrushes6
003
Copy of brushes
Signature.png
Selections:
D.D.Whipped Cream
D.D.WhippedCream2
Plugins:
Alien Skin Eye Candy 3.0
OR
Alien Skin Eye Candy 4000
Simple
&<Bkg Kaleidoscope> (Import into Filters Unlimited 2.0)
MuRa's Meister
MuRa's Seamless
Found here:
http://www.saturnelladesign.fr/pages/filtres.htm
http://www.maidiregrafica.eu/paginafiltri/filtri.html
Notes:
This Tutorial was created in PSP
X9.... other
versions may need adjustment
Some of the graphics may be from Free
to Use sites or Share
Groups.
If you are the creator of one of these
please let me know
so that appropriate credit can be given.
No infringement of
copyright is intended or intentional.
Before opening PSP, download plugins
and install
Some
helpful information:
You can change the blend mode, opacity and drop shadow, as
well as colourise
the materials,
according to the tubes/colours you are using.
When applying the Resize with the All Layers option checked, this will
be
informed in the tutorial,
otherwise, apply the resize with this option unchecked.
Remember always to save your work.
Whenever you reduce an image, apply Adjust/Sharpness/Sharpen, to
maintain the
sharpness of the image.
Some tools or features have other names in earlier versions of the PSP.

Please
Note: Offset
settings provided in this tutorial may vary according to size of your
image.
Please
adjust to suit.
The
settings remain the same throughout this Tutorial unless otherwise
stated.
Set your Foreground colour to #f6f8e7
Set your Background colour to #fffac1
Step One:
Place Pattern in PSP Pattern Folder
Place Texture in PSP
Texture Folder
Place Mask in PSP Mask
Folder
Place Selections in PSP
Selection Folder
Install Brushes OR
File/Export/Custom Brush
Open graphics in PSP, duplicate (Shift
D) and close the original.
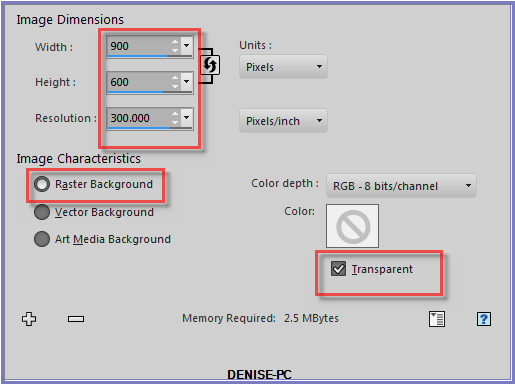
File/New/New Image 900 pixels x 600
pixels as follows:
Change
Foreground Colour to
Foreground/Background/Rectangular Gradient as follows:
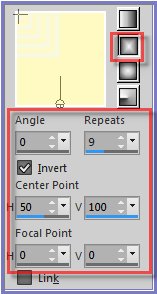
Flood Fill with Gradient
Step Two:
Layers/Duplicate
Image/Mirror/Horizontal OR Image/Mirror
Image/Mirror/Vertical OR Image/Flip
Change Opacity to 50%
Layers/Merge/Merge Down
Effects/Edge
Effects/Enhance More
Repeat Once
Effects/Plugins/Simple
Diamonds
Effects/Reflection Effects/Feedback as follows:
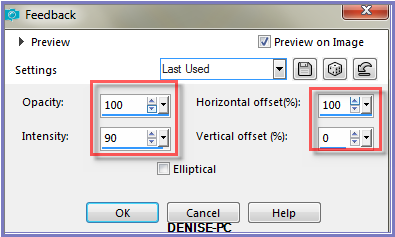
Step Three:
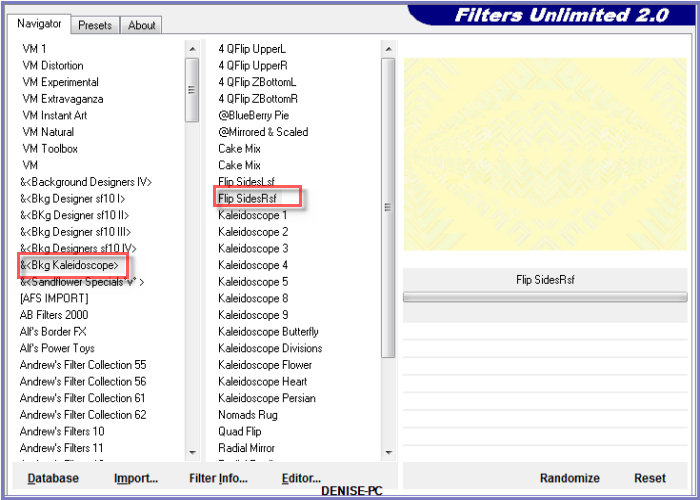
Effects/Plugins/Filters Unlimited 2.0/&<Bkg
Kaleidoscope>/Flip SidesRsf as follows:
Adjust/Sharpness/Sharpen More
Step Four:
Layers/New Raster Layer
Change Gradient to the following settings:
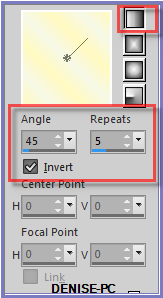
Flood fill with Gradient
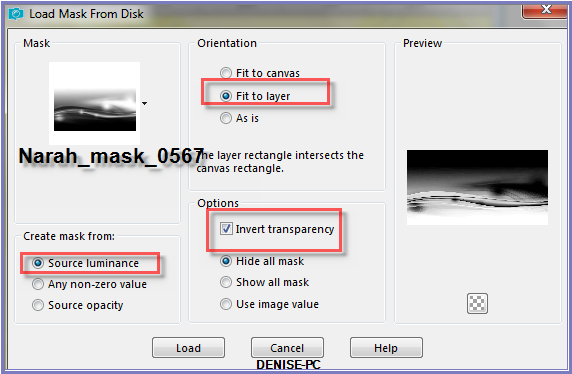
Layers/Load/Save
Mask/Load Mask Narah_mask_0567 from DIsk as follows:
Adjust/Sharpness/Sharpen More
Layers/Merge/Merge Group
Effects/Plugins/MuRa's Seamless/Emboss at Alpha/Default Settings
Step Five:
Select Raster 1
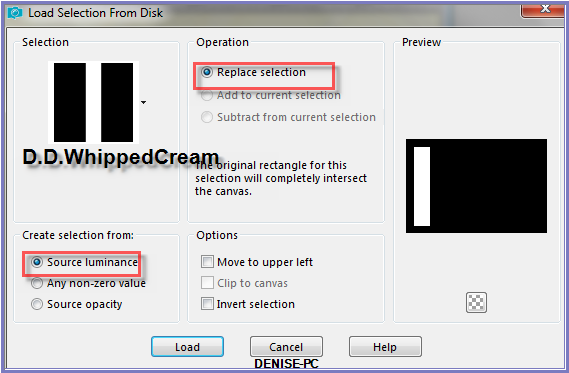
Selections/Load/Save Selection/Load Selections D.D.WhippedCream from
Disk as follows:
Promote Selection to Layer
Layers/Arrange/Bring to Top
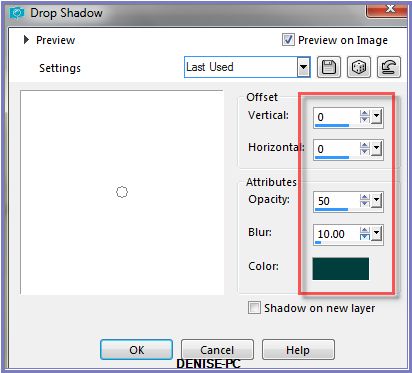
Effects/3D
Effects/Drop Shadow as follows:
Step Six:
Selections/Modify/Contract 10 pixels
Layers/New Raster Layer
Change
Background Colour to Pattern or25 as follows:
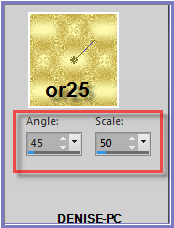
Flood fill with Pattern
Effects/3D
Effects/Drop Shadow
Selections/Modify/Contract 5 pixels
Edit/Clear
Layers/New Raster Layer
Flood Fill with Foreground Colour
Effects/Texture Effects/Weave as follows:
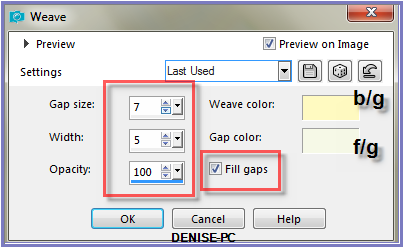
Adjust/Sharpness/Sharpen
Adjust/Brightness And Contrast/Fill/Light/Clarity as follows:
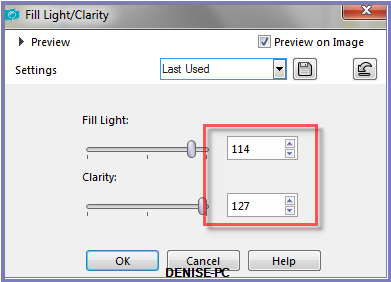
Effects/3D Effects/Drop Shadow
Selections/Select None
Step Seven:
Swap Foreground and Background Colours as follows:
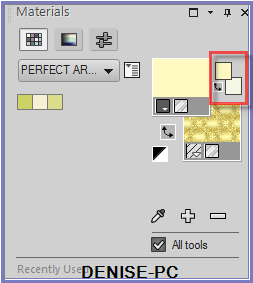
Layers/New
Raster Layer
Paint Brush Tool/floralbrushes6 003 with the following settings:


(If you are
unable to install brushes, please use the copies of the images included
in the supplies folder)
Using the right
side of the Mouse (background pattern) click four times in the top box
as shown below.
Change Rotation Setting to 135 and click four times with the right side
of the mouse in the bottom box.
Deselect Paint Brush Tool
Adjust/Sharpness/Sharpen
Effects/Plugins/MuRa's Seamless/Emboss at Alpha/Default Settings
Effects/Plugins/Eye
Candy 3.0/Drop Shadow as follows:
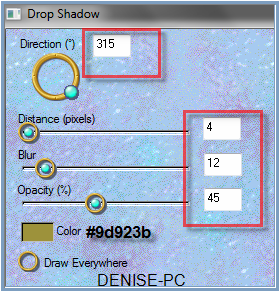
OR
Effects/Plugins/Eye Candy 4000/Shadowlab as follows:
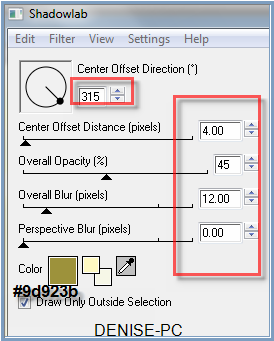
Here is your
result:

Step Eight:
Close Off Group Raster 2 and Raster 1
Layers/Merge/Merge Visible
Open Group Raster 2 and Raster 1
Layers/Duplicate
Image/Mirror/Horizontal Or Image/Mirror
Maximise Net Lace.pspimage
Edit/Copy Edit/Paste as New Layer
Layers/Arrange/Move Down
Repeat Move Down once
Effects/Image Effects/Offset as follows:
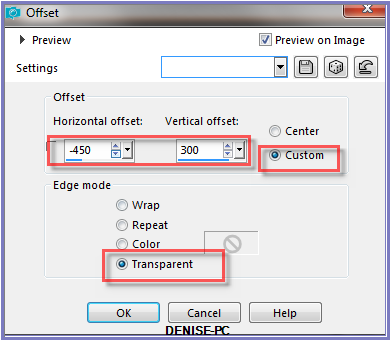
Effects/Plugins/Simple/Top Left Mirror
Change Blend Mode to Luminance Legacy
Step Nine:
Maximise bld_chantillylace_pagespray2mask.pspimage
Edit/Copy Edit/Paste as New Layer
Effects/Image Effects/Offset as follows:
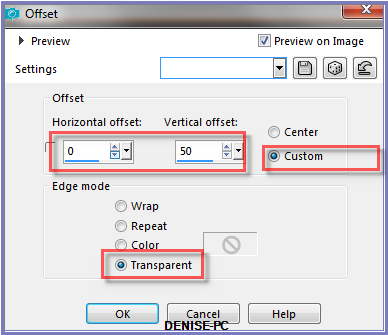
Change Blend Mode to Luminance Legacy
Change Opacity to 70%
Maximise Narah_0558_Flowers_May2010.pspimage
Edit/Copy Edit/Paste as New Layer
Effects/Image Effects/Offset as follows:
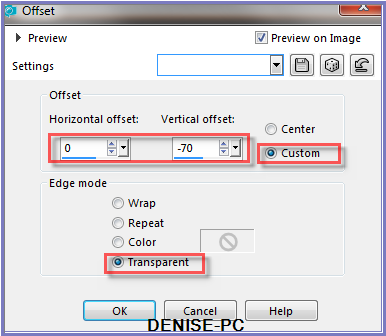
Change Opacity to 95%
Adjust/Brightness and Contrast/Fill Light/Clarity
Step Ten:
Image/Add Borders/5 pixels/White
Magic Wand with the following settings:

Select with Magic Wand
Flood Fill with Background Pattern
Effects/Plugins/Eye Candy 3.0/Drop Shadow BUT change Colour to Black
OR
Effects/Plugins/Eye Candy 4000/Shadowlab BUT change Colour to Black
Repeat Drop Shadow/Shadowlab/Direction 135
Selections/Select None
Step Eleven:
Swap Foreground and Background Colours back to right places
Image/Add Borders/15 pixels/Foreground Colour
Select with Magic Wand
Effects/Texture Effects/Texture Mypaper as follows:
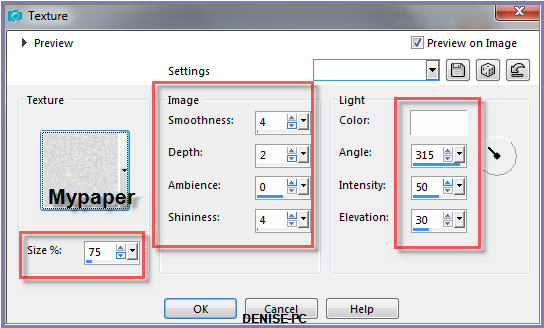
Selections/Select None
Image/Add Borders/5 pixels/White
Select with Magic Wand
Flood Fill with Background Pattern
Effect/Plugins/Eye Candy 3.0/Drop Shadow
Or
Effects/Plugins/Eye Candy 4000/Shadowlab
Repeat Drop Shadow/Shadowlab/Direction 315
Select None
Image/Add Borders/35 pixels/Foreground Colour
Select with Magic Wand
Effects/Texture Effects/Texture
Selections/Select None
Step Twelve:
Maximise Net
Lace.pspimage
Selections/Load Save Selection/Load Selection D.D.WhippedCream2 from
Disk
Edit/Copy
Selections/Select None
Back to orginal work
Edit/Paste as New Layer
Effects/Image
Effects/Offset as follows:
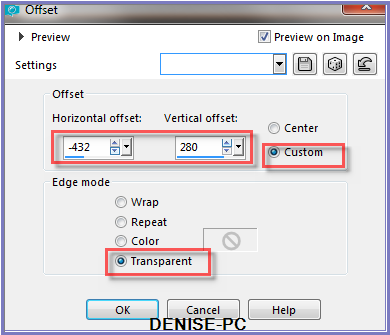
Change Blend
Mode to Luminance Legacy
Effects/Plugins/Simple/Top Left Mirror
Step Thirteen:
Image/Add Borders/5 pixels/White
Select with Magic Wand
Flood Fill with Background Pattern
Effect/Plugins/Eye Candy 3.0/Drop Shadow
Or
Effects/Plugins/Eye Candy 4000/Shadowlab
Repeat Drop Shadow/Shadowlab/Direction 135
Selections/Select None
Maximise Strass-Rose-2-TCH.pspimage
Edit/Copy Edit/Paste as New Layer
Effects/Image Effects/Offset as follows:
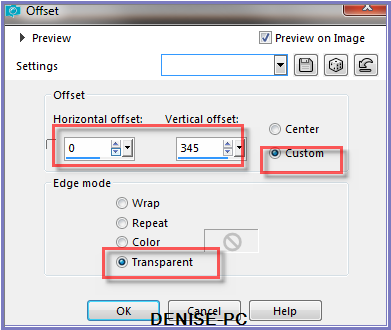
Adjust/Sharpness/Sharpen More
Effects/3D Effects/Drop Shadow
Layers/Duplicate
Image/Mirror/Vertical OR Image/Flip
Step Fourteen:
Maximise Signature.png
Edit/Copy Edit/Paste as New Layer
Place at bottom of Layer
Layers/New Raster Layer
Add
your Watermark
Layers/Merge
All Flatten
Image/Resize/900
pixels wide - height will adjust itself
File/Export/JPEG
Optimiser/Compression Value 20
I hope you have enjoyed
this tutorial
A
big thank you to the ladies who test my Tutorials
TESTERS'
RESULTS

SHIRLEY NZ

FRAN
FOR
OTHER VERSIONS OF THE TUTORIAL
PLEASE
GO TO:
Escapingtopsp2.altervista.org/WhippedCream/WhippedCreamMembersVersions.html

| | | |