Tutorial 2017
This
tutorial is written by
Denise D. on 24th August, 2014
from
my own ideas.
Any
resemblance to other tutorials is
co-incidental and unintentional.
You
may share my tutorials with other
groups.
All I ask is that you advise me
and
credit for the tutorial is given to me and linked to
http://escapingtopsp2.altervista.org/Home/homeb.html
Please
do not upload any of my completed Tutorial images onto sites
such as Fotki, Pinterest, Photobucket or similar
WATCHING
AND WAITING

Thank you Inge-Lore for this German Translation
http://escapingtopsp2.altervista.org/WatchingAndWaiting/WatchingAndWaiting.html
To follow Tutorial, hold down pencil - left click to move it


Click on the Box to download Supplies
To print click on Printer

Supplies
Montana Kates April
Series Misc Animals 2 - 2.pspimage
You can join this Group
at:
https://groups.yahoo.com/neo/groups/montanakates-mists-only/info
29285.jpeg
D.D.
Basket.pspimage
Font:
Storybook.TTF
Signature
Plugins:
Eye Candy 3.0
Eye Candy 4000
Graphics Plus
MuRa's Seamless
Neology (import into Filters Unlimited 2.0
Found here:
 and and 
Notes:
This Tutorial was originally created
in PSP
X5 but reworked in Corel 2019
.... other
versions may need adjustment
Some of the graphics may be from Free
to Use sites or Share
Groups.
If you are the creator of one of these
please let me know
so that appropriate credit can be given.
No infringement of
copyright is intended or intentional.
Before opening PSP, download plugins
and install
Some
helpful information:
You can change the blend mode, opacity and drop shadow, as
well as colourise
the materials,
according to the tubes/colours you are using.
When applying the Resize with the All Layers option checked, this will
be
informed in the tutorial,
otherwise, apply the resize with this option unchecked.
Remember always to save your work.
Whenever you reduce an image, apply Adjust/Sharpness/Sharpen, to
maintain the
sharpness of the image.
Some tools or features have other names in earlier versions of the PSP.
http://escapingtopsp2.altervista.org/Home/homeb.html

Please
Note: Offset
settings provided in this tutorial may vary according to size of your
image.
Please
adjust to suit.
The
settings remain the same throughout this Tutorial unless otherwise
stated.
Set your Foreground colour to #9e9349
Set your Background colour to #7185ba
Step One:
Place Pattern in PSP Pattern Folder
Place Mask in PSP Mask
Folder
Export Brush to PSP
Brush Folder
Open graphics in PSP, duplicate (Shift
D) and close the original.
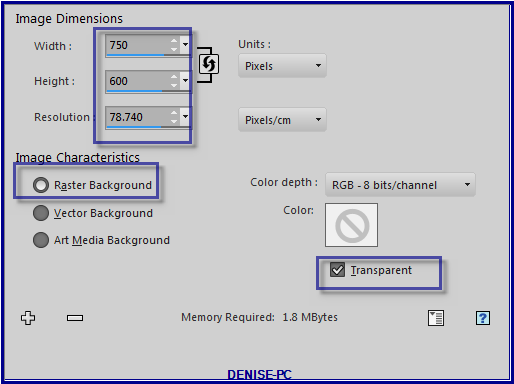
File/New/New Image 750 pixels x 600
pixels as follows:
Selections/Select
All
Maximise 29285.jpeg
Edit/Copy Edit/Paste into Selection
Selections/Select None
Step Two:
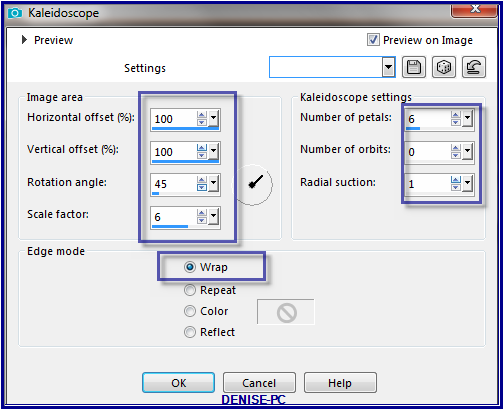
Effects/Reflection Effects/Kaleidoscope as follows:
Change Opacity to 80%
Layers/New Raster Layer
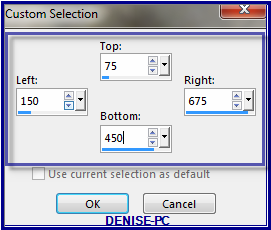
Selection Tools/Custom Selection with the following settings:
Edit/Paste into Selection
(your background image should still be active)
Step Three:
Selections/Modify/Select Selection Borders as follows:
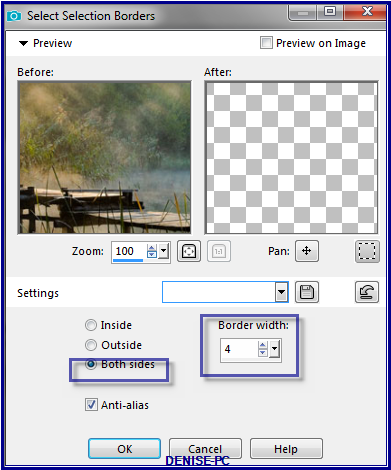
Layers/New Raster Layer
Change Foreground Colour to Foreground/Background/Linear Gradient as
follows:
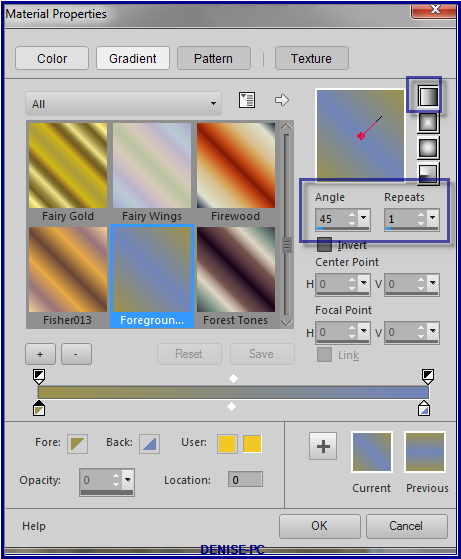
Adjust/Add/Remove Noise/Add Noise with the following settings:
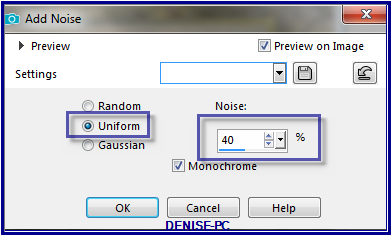
Effects/Plugins/Graphics Plus/Cross Shadow/Default settings
Selections/Select None
Effects/Plugins/Eye Candy 3.0/Drop Shadow as follows:
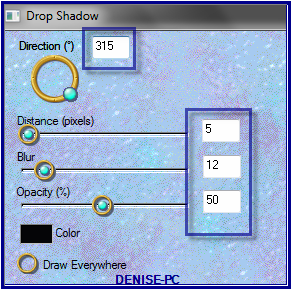
OR
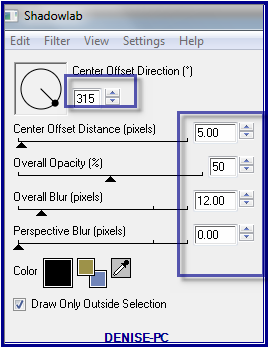
Effects/Plugins/Eye Candy 4000/Shadowlab as follows:
Step Four:
Maximise
Montana Kates April Series Misc Animals 2 - 2.pspimage
Edit/Copy Edit/Paste as New Layer
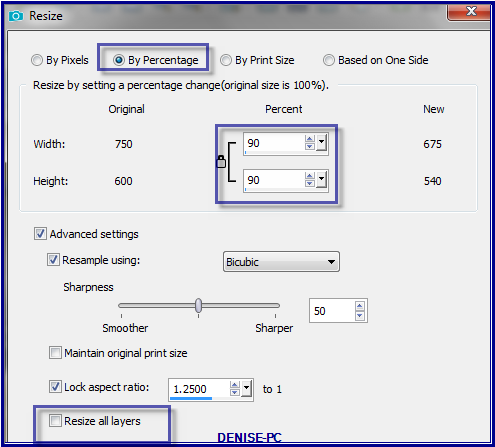
Image/Resize/90% as follows:
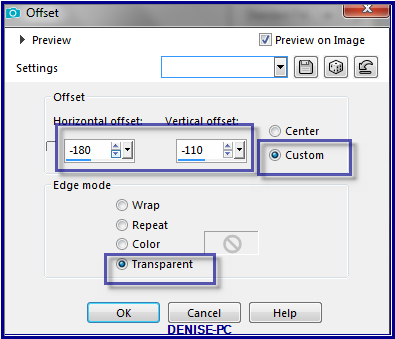
Effects/Image Effects/Offset as follows:
Change Opacity to 85%
Step Five:
Text Tool with the following settings:


Settings may vary according to your version of PSP
Write
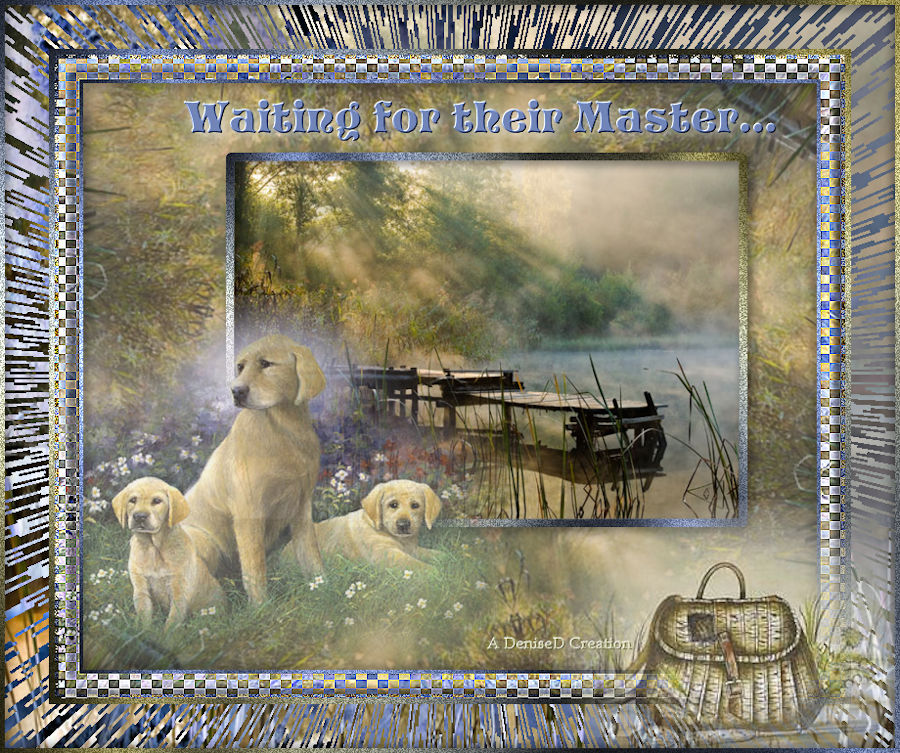
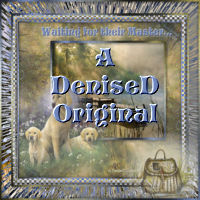
Waiting for their Master…
(or words of your choice)
Convert to Raster Layer
Place towards the top of the Layer
See my image for placement
Effects/Plugins/MuRa's Seamless/Emboss at Alpha/Default Settings
Effects/Plugins/Eye Candy 3.0/Drop Shadow BUT change colour to White
Or
Effects/Plugins/Eye Candy 4000/Shadowlab BUT change the colour to White
Step Six:
Image/Add Borders/4 pixels/Background Colour
Magic Wand with the following settings:

Select Border with Magic Wand
Adjust/Add/Remove Noise/Add Nose
Effects/Plugins/Graphics Plus/Cross Shadow
Effects/Plugins/Eye
Candy 3.0/Drop Shadow BUT change colour to Black
Or
Effects/Plugins/Eye Candy 4000/Shadowlab BUT change the colour to Black
Repeat Drop Shadow/Shadowlab/Direction 135
Selections/Select
None
Edit/Copy
Image/Add Borders/25 pixels/White
Select with Magic Wand
Edit/Paste into Selection
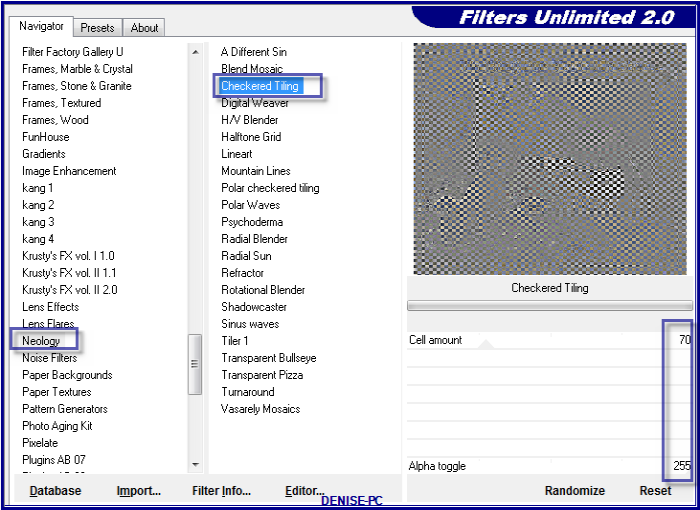
Effects/Plugins/Filters Unlimited 2.0/Neology/Checkered Tiling as
follows:
Effects/Edge Effects/Enhance
Effects/3D Effects/Inner Bevel as follows:
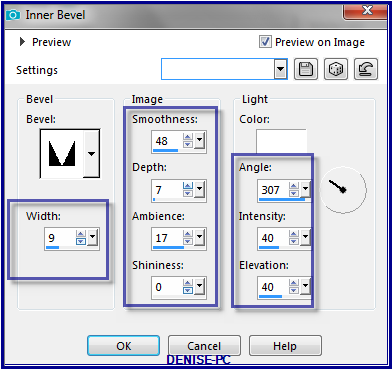
Selections/Select None
Step Seven:
Image/Add
Borders/6 pixels/White
Select with Magic Wand
Flood fill with Foreground Gradient
Adjust/Add/Remove
Noise/Add Nose
Effects/Plugins/Graphics Plus/Cross Shadow
Selections/Select None
Image/Add Borders/45 pixels/White
Select with Magic Wand
Maximise Background 29285
Edit/Copy Edit/Paste into Selection
Effects/Plugins/Filters Unlimited 2.0/Neology/Psychoderma as follows:
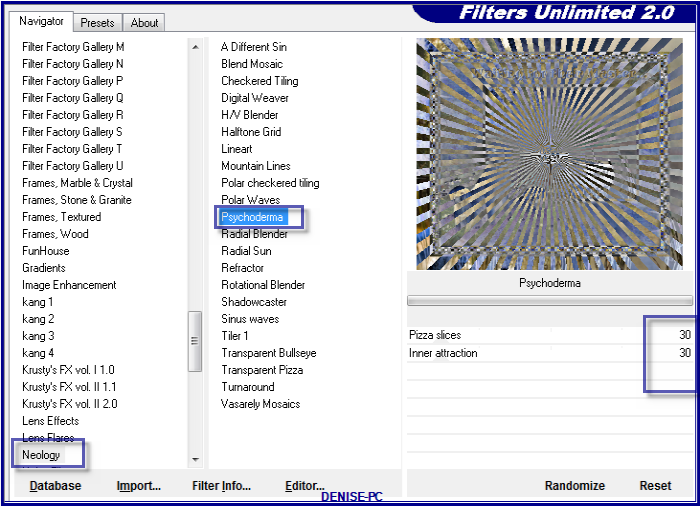
Step Eight:
Maximise D.D.
Basket.pspimage
Edit/Copy Edit/Paste as New Layer
Image/Resize/130%
Adjust/Sharpness/Sharpen
Effects/Image Effects/Offset as follows:
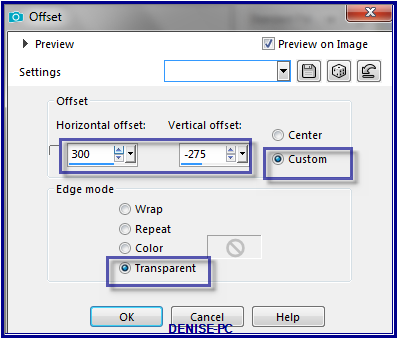
Image/Add Borders/5 pixels/White
Select with Magic Wand
Flood fill with Gradient
Adjust/Add/Remove Noise/Add Noise
Effects/Plugins/Graphics Plus/Cross Shadow
Effects/Plugins/Eye Candy 3.0/Drop Shadow
OR
Effects/Plugins/Eye Candy 4000/Shadowlab
Selections/Select None
Step Nine:
Maximise Signature.png
Edit/Copy Edit/Paste as New Layer
Place at bottom of Layer
Layers/New
Raster Layer
Add
your Watermark
Layers/Merge
All Flatten
Image/Resize/900
pixels wide - height will adjust itself
File/Export/JPEG
Optimiser/Compression Value 20
I hope you have enjoyed
this tutorial
A
big thank you to the ladies who test my Tutorials
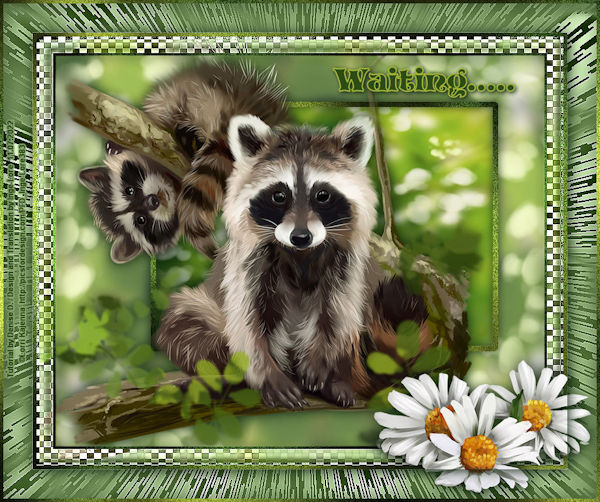
INGE-LORE
| | | |