TUTORIAL TEMPLATE
This tutorial is written by
Denise D. on 24th February, 2014
from
my own ideas.
Any
resemblance to other tutorials is
co-incidental and unintentional.
You
may share my tutorials with other
groups.
All I ask is that you advise me
and
credit for the tutorial is given to me and linked to
http://escapingtopsp2.altervista.org/Home/homeb.html
Please
do not upload any of my completed Tutorial images onto sites
such as Fotki, Pinterest, Photobucket or similar
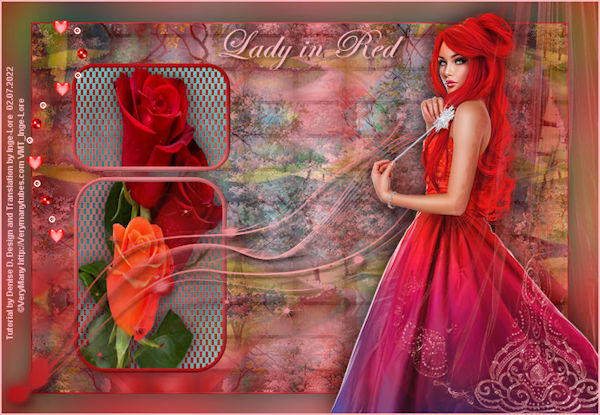
LADY
IN RED
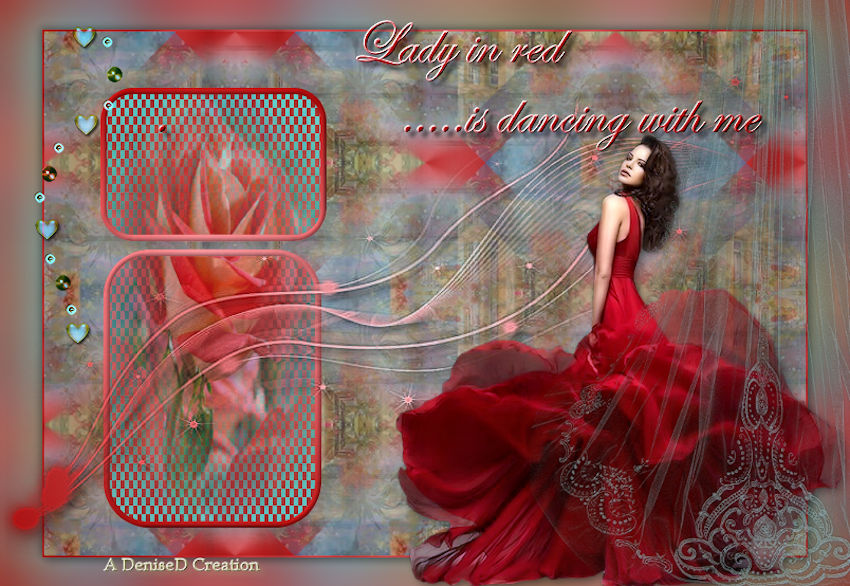
http://escapingtopsp2.altervista.org/LadyInRed/LadyInRed.html

Thank you Inge-Lore for this German translation
To follow Tutorial, hold down pencil - left click to move it


Click on the Box to download Supplies
To print click on Printer

S.D.
Mist Jan 112 - 14.pspimage
You
can join this Group at:
https://groups.yahoo.com/neo/groups/SorensenDesignsMistsandTubes/info
lunaflores861B.pspimage
Gabry-woman 671.pspimage
You can obtained these images at:
https://groups.google.com/forum/#!forum/psppartagetubesimagesconseils
12930422452_divers_nikita.pspimage
You can join this Group at:
http://www.reveries.fr/accueil.php
deco_coeurs.psp
Obtained through Group Shares.
If this image was created by you,
please let me know
so that appropriate credit can be
given.
Selections:
D.D.LadyInRed
Signature
Mask:
Narahs_Mask_Abstract150
You can join this group at:
https://ar.groups.yahoo.com/neo/groups/TUBESpack/info
Font:
ITCEDSCR.TTF
Plugins:
Simple
Eye Candy 3.0
Eye Candy 4000
Neology
(Import
into Filteres Unlimited 2.0)
MuRa's Seamless
Found here:
 AND AND 
Notes:
This Tutorial was created in PSP
X5..... other versions may need adjust
If you are the creator of one of these
please let me know
so that appropriate credit can be given.
No infringement of
copyright is intended or intentional.
Before opening PSP, download plugins
and install
Place Mask in PSP Mask Folder
Place Selection in PSP Selection Folder
Open graphics in PSP, duplicate (Shift
D) and close the original.
Some
helpful information:
You can change the blend mode, opacity and drop shadow, as
well as colourise
the materials,
according to the tubes/colours you are using.
When applying the Resize with the All Layers option checked, this will
be
informed in the tutorial,
otherwise, apply the resize with this option unchecked.
Remember always to save your work.
Whenever you reduce an image, apply Adjust/Sharpness/Sharpen, to
maintain the
sharpness of the image.
Some tools or features have other names in earlier versions of the PSP.
http://escapingtopsp2.altervista.org/Home/homeb.html

The
settings remain the same throughout this Tutorial unless otherwise
stated.
Set your Foreground colour to #fdb5bc
Set your Background colour to #a60407
Step One:
File/New/New Image 800 pixels x 550
pixels as follows:
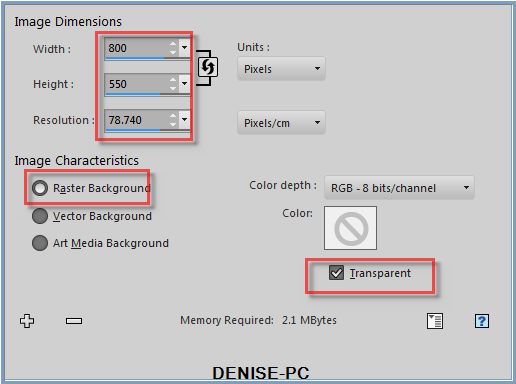 Change Foreground Colour to
Foreground/Background Gradient as follows:
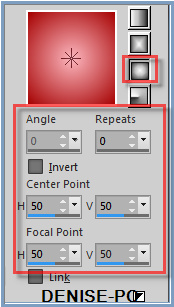 Flood Fill with Gradient
Selections/Select All
Maximise
S.D. Mist Jan 112 - 14.pspimage
Edit/Copy
Edit/Paste Into Selection
Selections/Select
None
Step
Two:
Effects/Plugins/Simple/Blintz
Layers/Duplicate
Image/Flip
Change Opacity to 50%
Layers/Merge/Merge Down
Effects/Image Effects/Image Effects/Seamless
Tiling/Default Settings
Effects/Plugins/Simple/Zoom Out and
Flip
Step
Three:
Image/Add Borders/2 pixels/White
Magic Wand with the following settings:
 Select Border
Flood Fill with Gradient
Selections/Select None
Layers/Duplicate
Image/Resize/90% as follows:
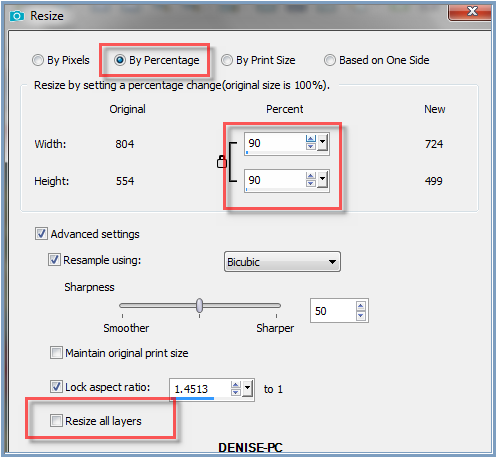 Select Background Layer
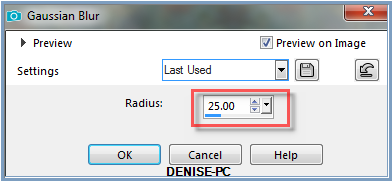
Adjust/Blur/Gaussian Blur as follows:
 Step
Four:
Select Copy of Background
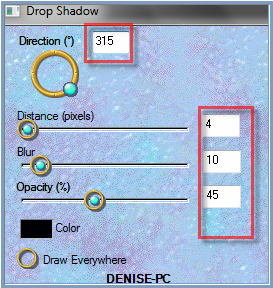
Effects/Plugins/Eye Candy 3.0/Drop
Shadow as follows:
 OR
OR
Effects/Plugins/Eye Candy 4000/Shadowlab as follows:
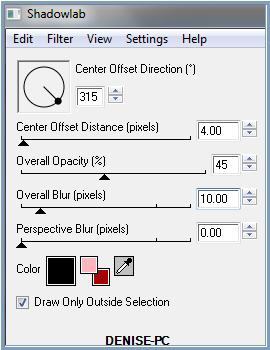 Repeat Drop Shadow/Shadowlab/
Direction 135
Step
Five:
Layers/New
Raster Layer
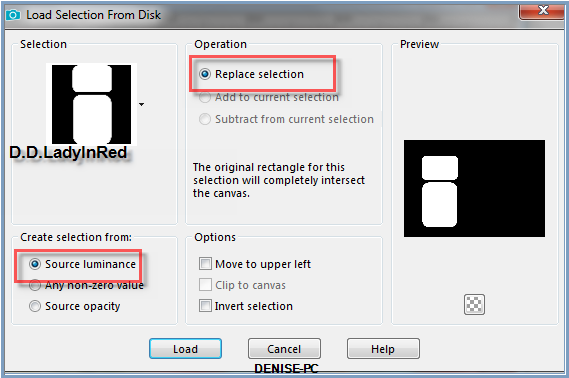
Selections/Load/Save
Selection/Load Selection D.D.LadyinRed from Disk as follows:
 Flood
Fill with Gradient
Effects/Plugins/Filters
Unlimited 2.0/Neology/Checkered Tiling as follows:
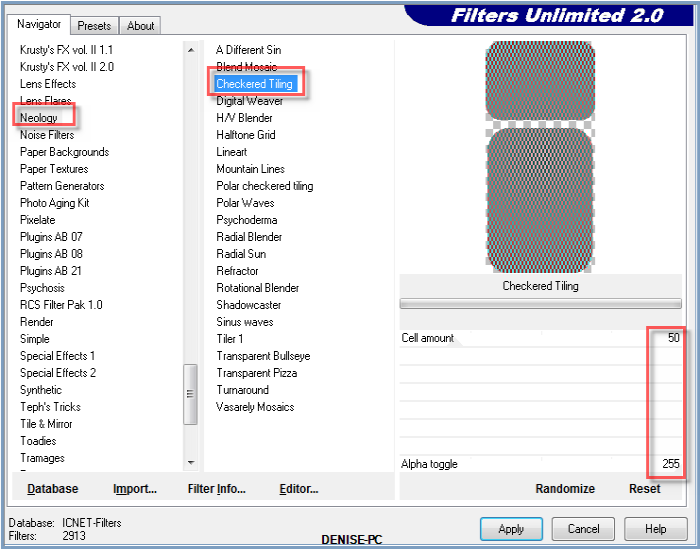 Change
Opacity to 80%
Step
Six:
Maximise lunaflores861B.pspimage
Edit/Copy
Edit/Paste into Selection
Selections/Modify/Select
Selection Borders as follows:
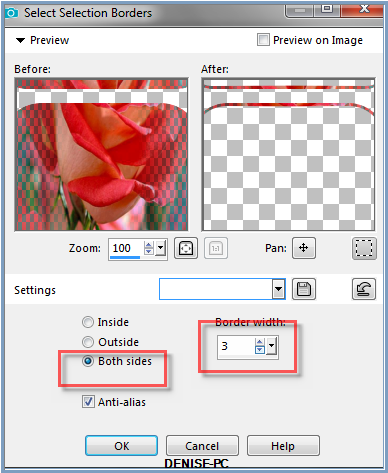 Layers/New
Raster Layer
Flood
Fill with Gradient
Effects/3D Effects/Inner Bevel as follows:
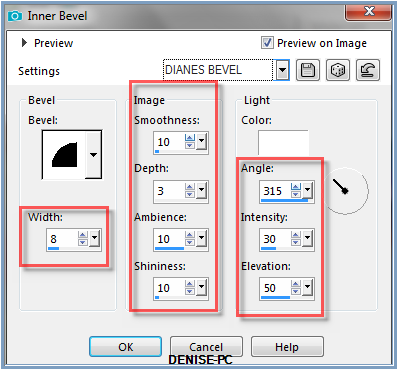
Selections/Select None
Step Seven:
Layers/New
Raster Layer
Flood
Fill with Gradient
Layers/Load/Save
Mask/Load Mask Narah_Mask_Abstract 150 from Disk as follows:
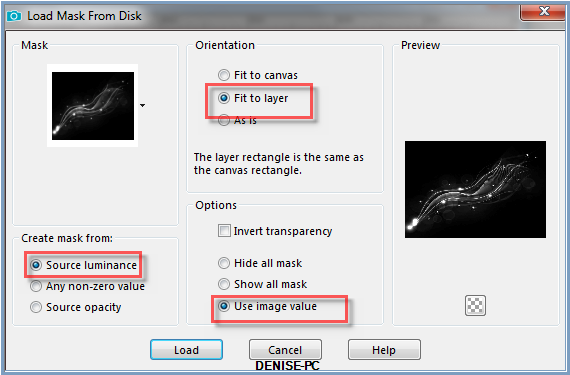 Layers/Merge/Merge
Group
Effects/Edge
Effects/Enhance
Effects/3D
Effects/Drop Shadow as follows:
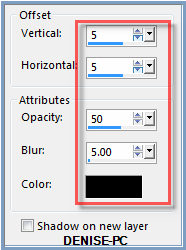 Step Eight:
Maximise
Gabry-woman 671.pspimage
Edit/Copy
Edit/Paste as New Layer
Image/Resize/70%
Adjust/Sharpness/Sharpen
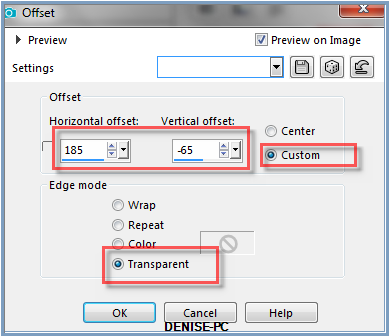
Image
Effects/Offset as follows:
 Effects/Plugins/Eye
Candy 3.0/Drop Shadow Direction 315
OR
Effects/Plugins/Eye Candy
4000/Shadowlab/Direction 135
Step Nine:
Maximise
12930422452_divers_nikita.pspimage
Edit/Copy
Edit/Paste as New Layer
Image/Resize
78%
Adjust/Sharpness/Sharpen
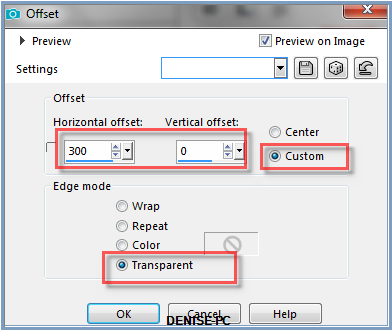
Effects/Image
Effects/Offset as follows:
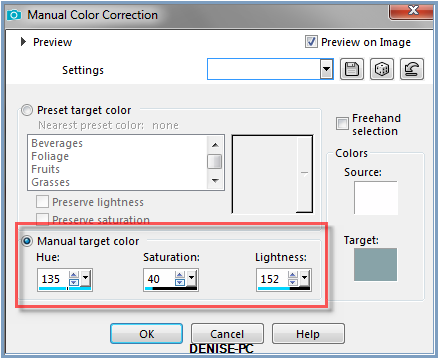
 Manual
Colour Correction Tool as follows:
Please go to the following link to see how to install this tool:
https://app.box.com/s/a6jfqy0ycvuka532zvnjyoomz573uqd6
Step Ten:
Select Pick/Deform
Tool as follows:
 Move
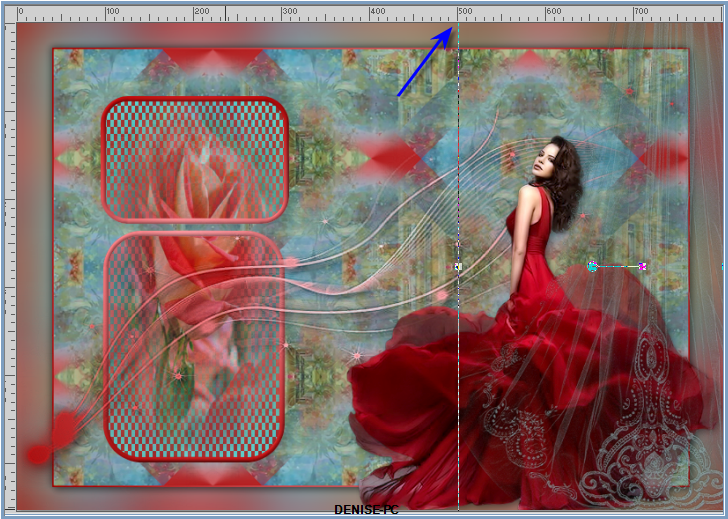
the veil over to 500 pixels as shown below:
 Deselect
Deform/Pick Tool
Step Eleven:
Select Background Layer
Layers/New
Raster Layer
Flood
Fill with Gradient
Image/Resize/90%
Effects/Plugins/VM
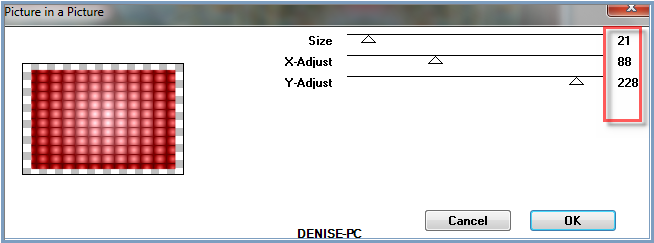
Extravaganza/Picture in a Picture as follows:
 Select
Copy of Background
Change
Opacity to 80%
Layers/Merge/Merge
All Flatten
Step
Twelve:
Select
Text Tool with following settings (or text of your choice)
Select
Copy of Background
Change
Opacity to 80%
Layers/Merge/Merge
All Flatten
Step
Twelve:
Select
Text Tool with following settings (or text of your choice)


Write:
The
lady in red (enter)
is dancing with me... (enter)
See
my image for placement
Convert
to Raster Layer
EffectsPlugins/MuRa's
Seamless/Emboss at Alpha/Default settings
Effects/Plugins/Eye Candy 3.0/Drop
Shadow
OR
Effects/Plugins/Eye Candy 4000/Shadowlab
Step Thirteen:
Maximise
deco_coeurs.psp
Edit/Copy
Edit/Paste as New Layer
Effects/Image
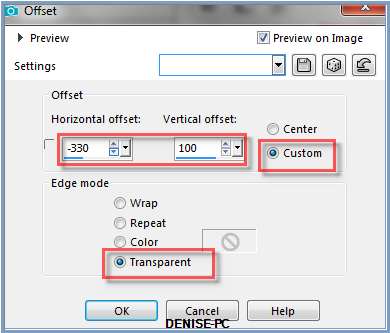
Effects/Offset as follows:
 Manual
Colour Correction as follows:
 Change
the Blend Mode to Hard Light or Mode of you own choice
Step Fourteen:
Maximise Signature.png
Edit/Copy Edit/Paste as New Layer
Place at bottom of Layer
Layers/New Raster Layer
Add
your Watermark
Layers/Merge
All Flatten
File/Export/JPEG
Optimiser/Compression Value 20
I hope you
have enjoyed this tutorial
A big thank you to the
ladies who test my Tutorials
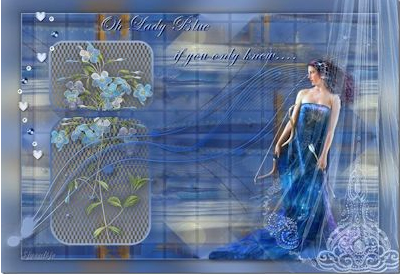
SJOERTDJE
LILLIAN
INGE-LORE

| | | |