Tutorial 2017
This tutorial is written by
Denise D. on 20th March 2017
from
my own ideas.
Any
resemblance to other tutorials is
co-incidental and unintentional.
You
may share my tutorials with other
groups.
All I ask is that you advise me and
credit for the tutorial is given to me and linked to
http://escapingtopsp2.altervista.org/Home/homeb.html
Please
do not upload any of my completed Tutorial images onto sites
such as Fotki, Pinterest, Photobucket or similar
GARDENER'S DELIGHT
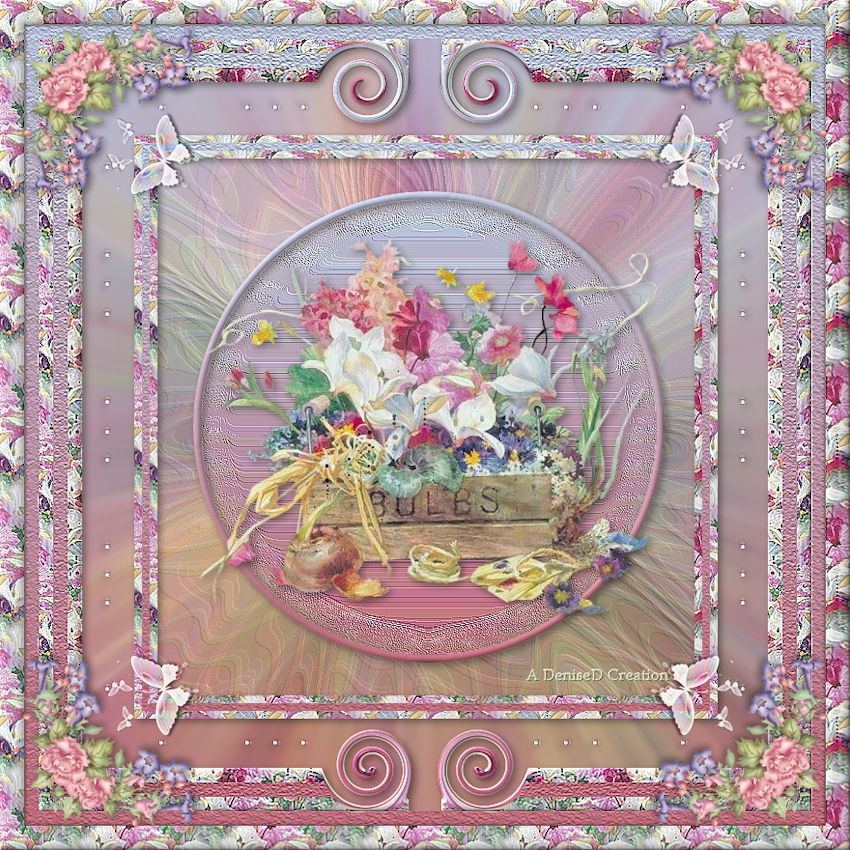
http://escapingtopsp2.altervista.org/GardenersDelight/GardenersDelight.html

Thank you Franie Margot for this French Translation

Click
on the Box to download Supplies
Supplies
Images:
tFloralCrate(h).tub
bluefay_butterflies.pspimage
Strass-Rose-2-TCH.pspimage
am-corner55.psp
DeniseD Signature.png
These images were obtained from the
Internet
If you are the owner of this
image, please contact me
so that credit can be given to
you
Selection:
D.D.GardenersDelight
D.D.GardenersDelight2
D.D.GardenersDelight3
D.D.GardenersDelight4
Texture:
hatch fine lump.bmp
Patterns:
D.D.GardenersDelight
Plugins:
Eye
Candy 3 OR Eye Candy 4000
Simple
Found here:
http://www.saturnelladesign.fr/pages/filtres.htm
http://janaly.com/Filtres/Filtre.html
http://www.maidiregrafica.eu/paginafiltri/filtri.html
Notes:
This Tutorial was created in PSP
X9.... other
versions may need adjustment
Some of the graphics may be from Free
to Use sites or Share
Groups.
If you are the creator of one of these
please let me know
so that appropriate credit can be given.
No infringement of
copyright is intended or intentional.
Some
helpful information:
You can change the blend mode, opacity and drop shadow, as
well as colourise
the materials,
according to the tubes/colours you are using.
When applying the Resize with the All Layers option checked, this will
be
informed in the tutorial,
otherwise, apply the resize with this option unchecked.
Remember always to save your work.
Whenever you reduce an image, apply Adjust/Sharpness/Sharpen, to
maintain the
sharpness of the image.
Some tools or features have other names in earlier versions of the PSP.

Before opening PSP, download plugins
and install
Place Pattern in PSP Pattern Folder
Place Texture in PSP Texture Folder
Place Selections in PSP Selections Folder
Open graphics in PSP, duplicate (Shift
D) and close the original.
Please
Note: Offset
settings provided in this tutorial may vary according to size of your
image.
Please
adjust to suit.
The
settings remain the same throughout this Tutorial unless otherwise
stated.
Set your Foreground colour to #ba6a79
Set your Background colour to #9da9c5
Step One:
File/New/New Image 800 pixels x 800
pixels as follows:
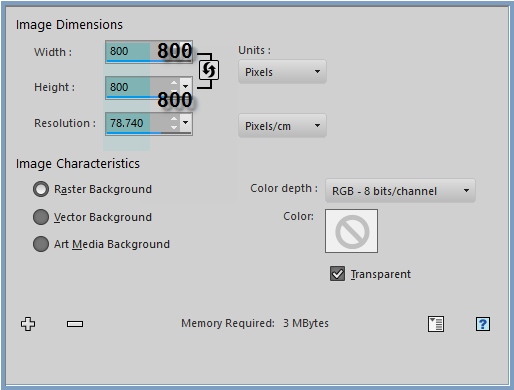
Change
Foreground Colour to Foreground/Background/Linear Gradient as follows:
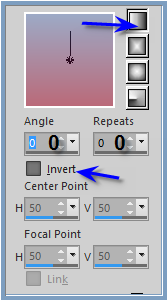
Flood Fill with Gradient
Step Two:
Selections/Select All
Maximise tFloralCrate(h).tub
Edit/Copy
Edit/Paste into Selection
Adjust/Blur/Radial Blur as follows:
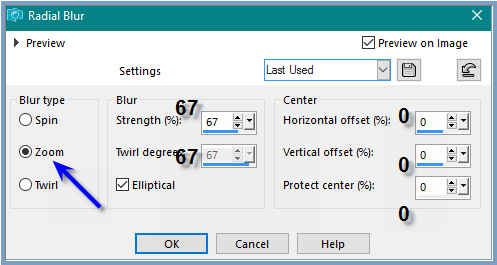
Selections/Select None
Layers/New Raster Layer
Change Background Colour to
Pattern D.D.GardenersDelight as follows:
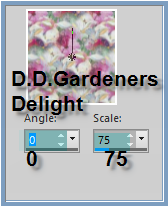
Flood Fill with Pattern
Effects/Edge
Effects/Enhance
Step
Three:
Selection/Select All
Selections/Modify/Contract
15 pixels
Layers/New Raster Layer
Flood Fill with Gradient
Effects/Texture
Effects/Texture/hatch fine lump as follows:
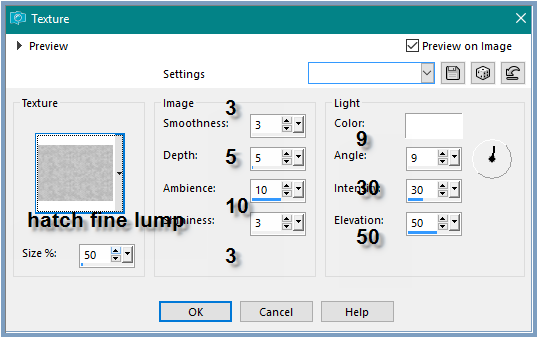
Effects/Edge Effects/Enhance
Selections/Modify/Contract 15 pixels
Edit/Clear
Select Raster 2
Selections/Modify/Contract 15 pixels
Edit/Clear
Selection/None
Select Raster 3
Layers/Merge/Merge Down
Step Four:
Selections/Load/Save
Selection/Load Selection D.D.GardenersDelight from Disk as follows:
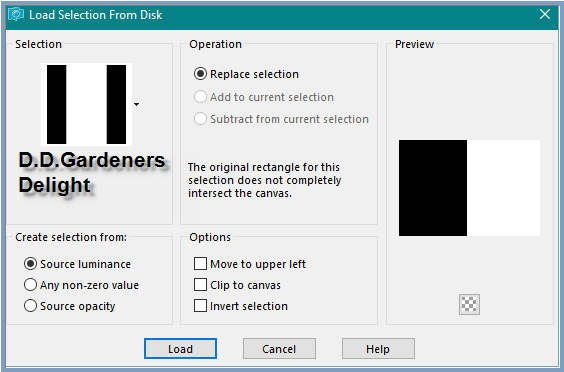 Hit the Delete Button
Selections/Select None
Brush Tool/Warp Brush with the following settings:

Starting at the point shown below, (see edge of circle) hold down the
Warp Brush with the left hand side of
the Mouse till the desired effect is achieved.
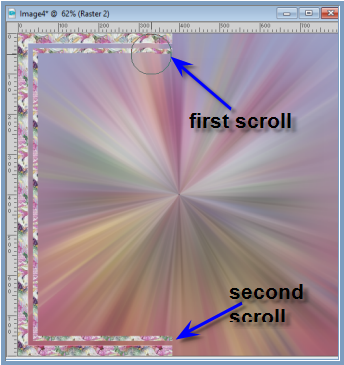
Click on the tick to complete the process
Change the Warp Brush to this setting and repeat process at the bottom
of the border

Deselect Warp Brush
Step Five:
Layers/Duplicate
Image/Mirror/Horizontal OR Image/Mirror
Layers/Merge/Merge Down
Effects/3D Effects/Inner Bevel as follows:
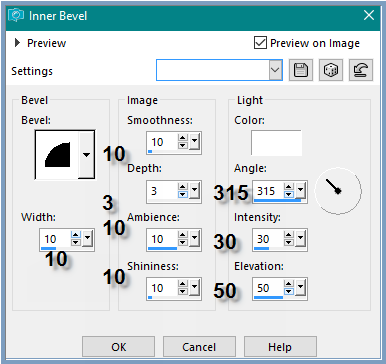
Adjust/Sharpness/Sharpen More
Effects/Plugins/Eye Candy 3/Drop
Shadow as follows:
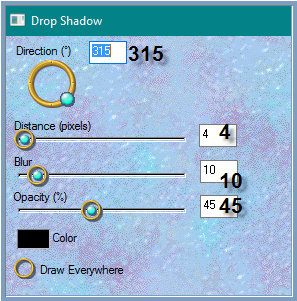
OR
Effects/Plugins/Eye Candy 4000/Shadowlab as follows:
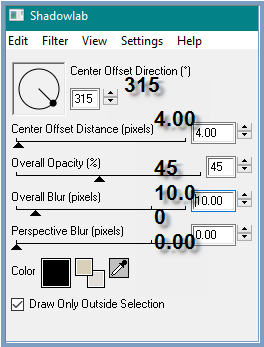
Step Six:
Select Raster 1
Layer/New Raster Layer
Selections/Load/Save Selection/Load Selection D.D.GardenersDelight2
from Disk
Flood Fill with Pattern
Effects/Edge Effects/Enhance
Selections/Modify/Contract 8 pixels
Edit/Clear
Layers/New Raster Layer
Flood Fill with Gradient
Effects/Texture
Effects/Texture/hatch fine lump
Effects/Edge Effects/Enhance
Selections Modify/Contract 8
pixels
Edit/Clear
Layers/New Raster Layer
Flood Fill with Pattern
Effects/Edge Effects/Enhance
Selections/Modify/Contract 8 pixels
Edit/Clear
Layers/Merge/Merge Down
Selections/Select None
Effects/Plugins/Eye Candy 3/Drop
Shadow OR Effects/Plugins/Eye
Candy4000/Shadowlab
Step Seven:
Select Raster 1
Selections/Load/Save Selection D.D.GardenersDelight3 from Disk
Effect/Texture Effects/Soft Plastic as follows:
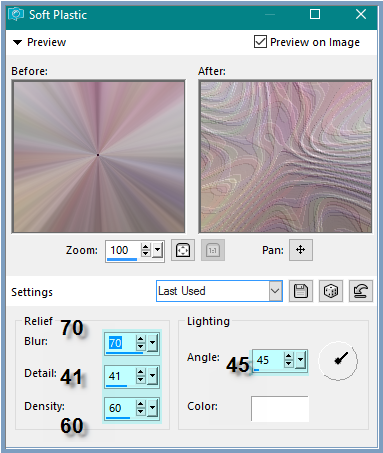
Selections/Select None
Step Seven:
Layers/New Raster Layer
Selections/Load/Save Selection D.D.GardenersDelight4
Flood Fill with Gradient
Effects/Texture Effects/Soft Plastic
Effects/Edge Effects/Enhance
Selections/Modify/Select Selection Borders/8 pixels/Outside
Layers/New Raster Layer
Flood Fill with Gradient
Effects/3D Effects/Inner Bevel
Effects/Plugins/Eye Candy 3/Drop
Shadow OR Effects/Plugins/Eye
Candy4000/Shadowlab
Selections/Select None
Maximise tFloralCrate(h).tub
Edit/Copy
Edit/Paste as New Layer
Effects/Plugins/Eye Candy 3/Drop Shadow OR Effects/Plugins/Eye
Candy4000/Shadowlab
Step Eight:
Maximise bluefay_butterflies.pspimage
Edit/Copy
Edit/Paste as New Layer
Layers/Arrange/Bring to Top
Effects/Image Effects/Offset as follows:
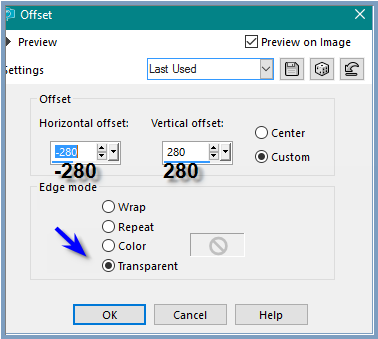
Change Blend Mode to Luminance
Effects/Plugins/Simple/Top Left Mirror
Step Nine:
Maximise Strass-Rose-2-TCH.pspimage
Edit/Copy
Edit/Paste as New Layer
Effects/Edge Effects/Enhance More
Effects/Image Effects/Offset as follows:
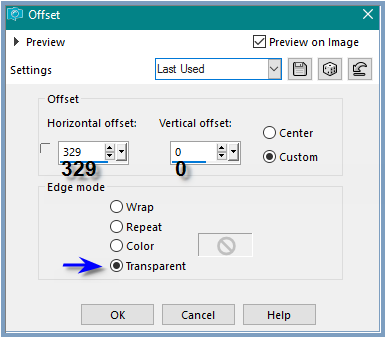
Effects/Plugins/Eye Candy 3/Drop Shadow OR Effects/Plugins/Eye
Candy4000/Shadowlab
Layers/Duplicate
Image/Mirror/Horizontal OR Image/Mirror
Layers/Duplicate
Image/Free Rotate/90 degrees/Right
see my placement at the top of the frame
Eraser Tool
rub out the dots as shown below:

Layers/Duplicate
Image/Mirror/Vertical OR Image/Flip
Step Ten:
Image/Add Borders/15 pixels/White
Select with Magic Wand
with the following settings:

Flood Fill with Gradient
Effects/Texture Effects/Texture/hatch fine lump
Effects/Edge Effects/Enhance
Selections/Select None
Image/Add Borders/25 pixels/White
Select with Magic Wand
Flood Fill with Pattern
Effects/Edge Effects/Enhance
Effects/3D Effects/Inner Bevel
Selections/Invert
Effects/3D Effects/Cut Out as follows:
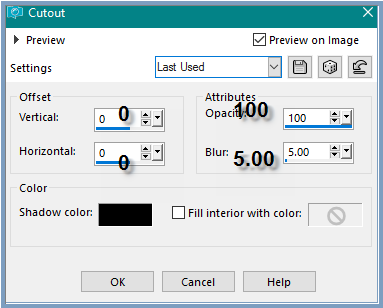
Selections/Select None
Step Eleven:
Maximise am-corner55.psp
Edit/Copy Edit/Paste as New Layer
Effects/Image Effects/Offset as follows:
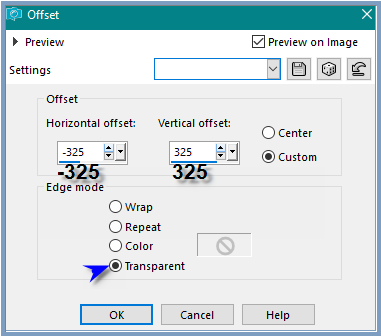
Effects/Plugins/Eye
Candy 3/Drop Shadow OR Effects/Plugins/Eye Candy4000/Shadowlab
Effects/Plugins/Simple/Top Left Mirror
Maximise DeniseD Signature.png
Edit/Copy Edit/Paste as New Layer
Place at bottom of Layer
Layers/New Raster Layer
Add
your Watermark
Layers/Merge
All Flatten
Image/Resize/850
pixels wide - height will adjust itself
File/Export/JPEG
Optimiser/Compression Value 20
I hope you have enjoyed
this tutorial
A
big thank you to the ladies who test my Tutorials
TESTERS'
RESULTS

ALICE T.
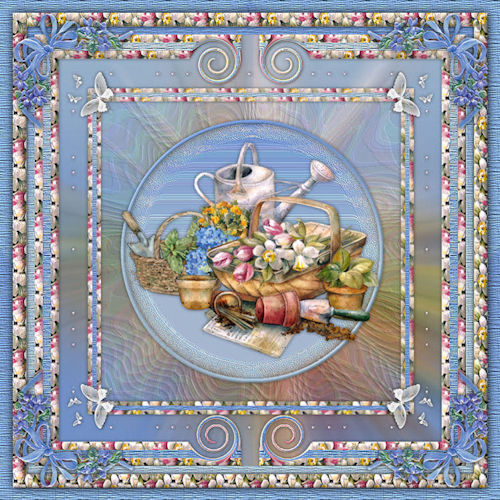
BETTY
ELIZABETH
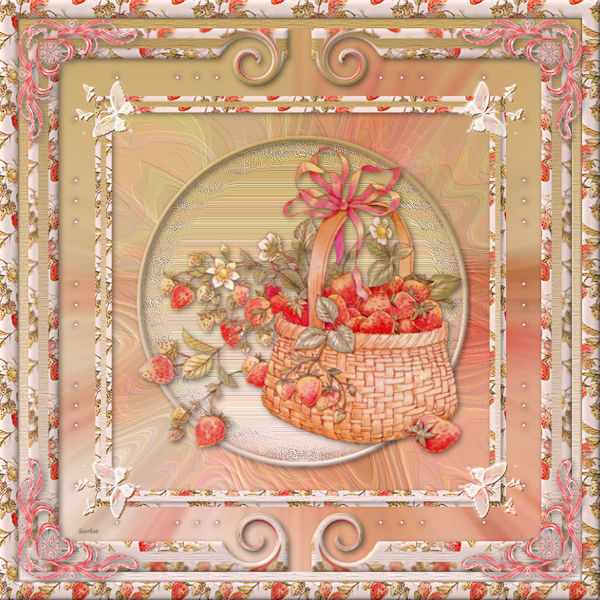
SHIRLEY NZ
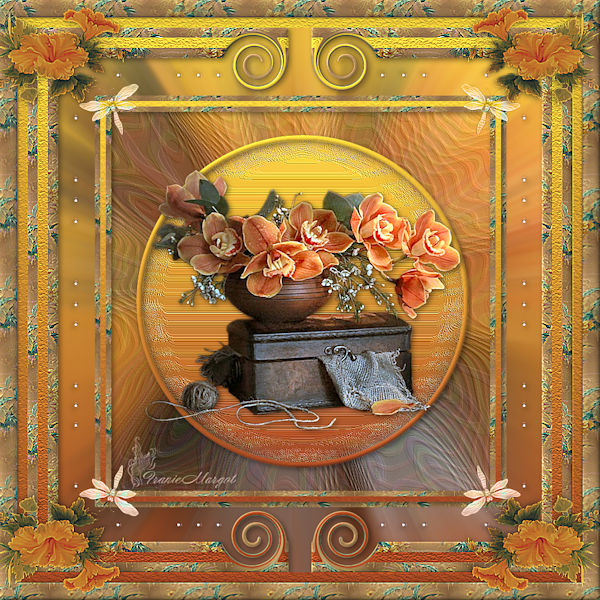
FRANIE MARGOT
| | | |