Tutorial 2017
This
tutorial is written by
Denise D. on 22nd January, 2018
from
my own ideas.
Any
resemblance to other tutorials is
co-incidental and unintentional.
You
may share my tutorials with other
groups.
All I ask is that you advise me
and
credit for the tutorial is given to me and linked to
http://escapingtopsp2.altervista.org/Home/homeb.html
Please
do not upload any of my completed Tutorial images onto sites
such as Fotki, Pinterest, Photobucket or similar
ENFANT
WITH BIRD
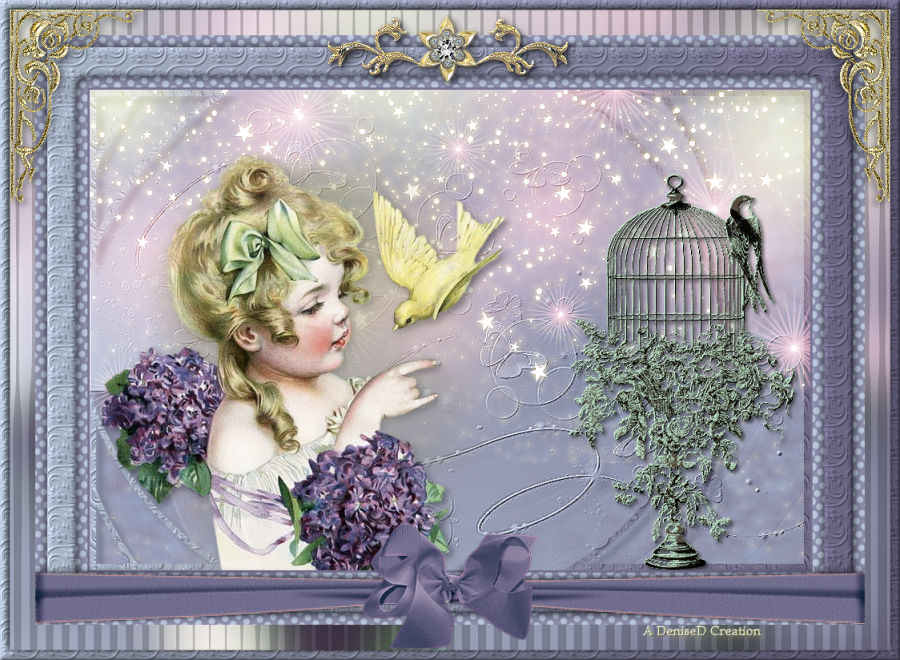
http://escapingtopsp2.altervista.org/EnfantAndBird/EnfantAndBird.html
Use this pencil to follow the steps
hold down left click to grab and move it


Click on the Box to download Supplies
To print click on Printer

Supplies
Images:
enfant et oiseau retro.pspimage
You can join this Group at:
http://www.monpetitjardin-moi.fr.nf/
JanalySeparateur15.pspimage
You can join this Group at:
http://janaly.com/
Pixidust_Stars_29.07.2017.pspimage
Tubed by Sibre (I don't have a link for this creator)
Ribbon.png
SE_Bows_7
winni.afcn41.6.pspimage
antique birdcage.png
DeniseD Signature.png
This image was obtained from the Internet
If you are the owner of this
image, please contact me
so that credit can be given to
you
Textures:
fancy
Mask:
creation.tine.masque_119
You can join this Group at:
http://espace.tine.free.fr/masques/masques.htm
Selections:
D.D.EnfantandBird
Plugins:
Alien Skin Eye Candy 3.0
OR
Alien Skin Eye Candy 4000
MuRa's Seamless
MuRa's Meister
Found here:
http://www.saturnelladesign.fr/pages/filtres.htm
http://www.maidiregrafica.eu/paginafiltri/filtri.html
Notes:
This Tutorial was created in PSP
X9.... other
versions may need adjustment
Some of the graphics may be from Free
to Use sites or Share
Groups.
If you are the creator of one of these
please let me know
so that appropriate credit can be given.
No infringement of
copyright is intended or intentional.
Some
helpful information:
You can change the blend mode, opacity and drop shadow, as
well as colourise
the materials,
according to the tubes/colours you are using.
When applying the Resize with the All Layers option checked, this will
be
informed in the tutorial,
otherwise, apply the resize with this option unchecked.
Remember always to save your work.
Whenever you reduce an image, apply Adjust/Sharpness/Sharpen, to
maintain the
sharpness of the image.

Before opening PSP, download plugins
and install
Please
Note: Offset
settings provided in this tutorial may vary according to size of your
image.
Please
adjust to suit.
The
settings remain the same throughout this Tutorial unless otherwise
stated.
Set your Foreground colour to #777292
Set your Background colour to #bbc8dd
Step One:
Place Texture in PSP Texture Folder
Place Mask in PSP Mask
Folder
Place Selection in PSP
Selection Folder
Open graphics in PSP, duplicate (Shift
D) and close the original.
File/New/New Image 900 pixels x 600
pixels as follows:
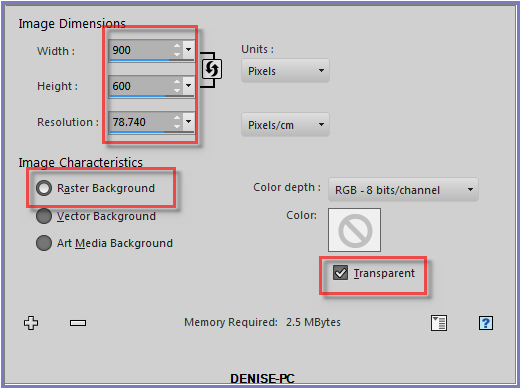
Change
Foreground Colour to
Foreground/Background/Linear Gradient as follows:
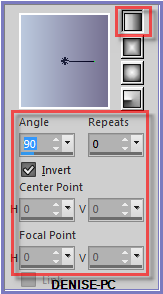
Effects/Plugins/MuRa's Meister/Cloud as follows;
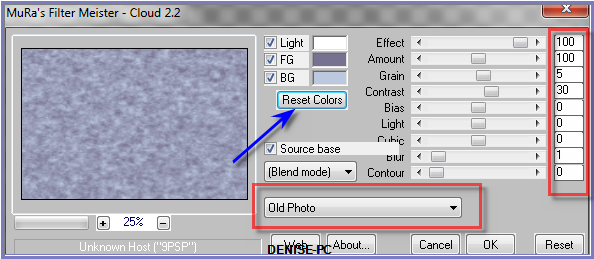
Effects/Edge Effects/Enhance More
Step Two:
Layers/Duplicate
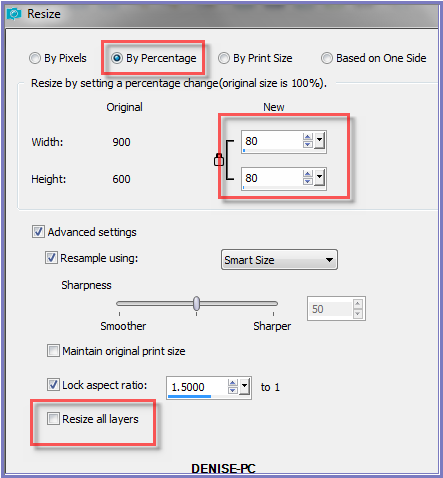
Image/Resize/80 % as follows:
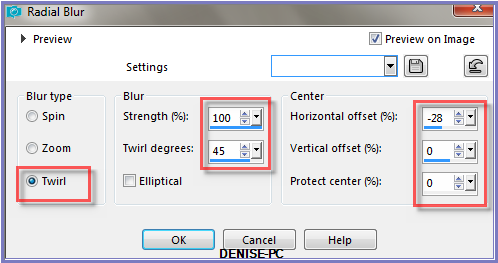
Adjust/Blur/Radial Blur/Twirl as follows:
Effects/Edge Effects/Enhance More
Change Blend Mode to Luminance
Step Three:
Layers/New
Raster Layer
Flood Fill with Gradient
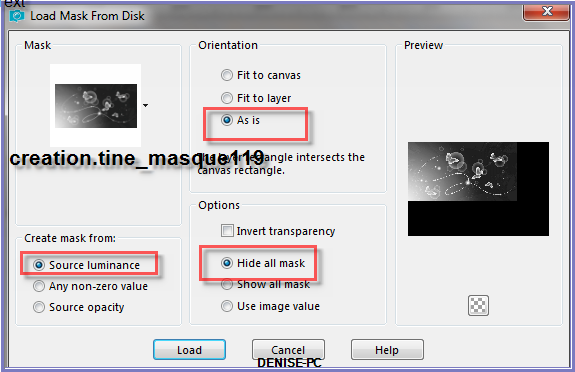
Layers/Load/Save Mask/Load Mask creation.tine.masque_119 from
Disk as follows:
Effects/Edge Effects/Enhance More
Layers/Merge/Merge Group
Effects/Plugins/MuRa's Seamless/Emboss at Alpha/Default Settings
Layers/Duplicate
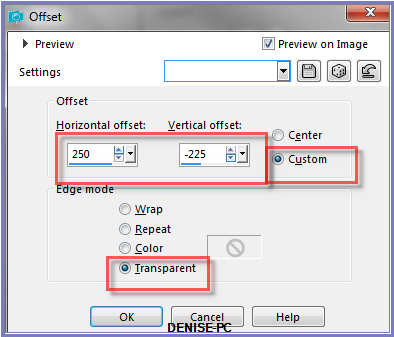
Effects/Image Effects/Offset as follows:
Step Four:
Layers/Merge/Merge Down
Effects/Plugins/Eye Candy 3.0/Drop Shadow as follows:
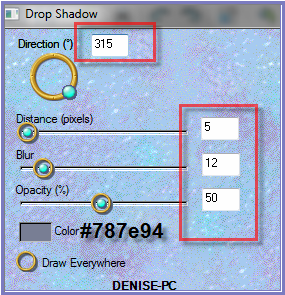
OR
Effects/Plugins/Eye Candy 4000/Shadowlab as follows:
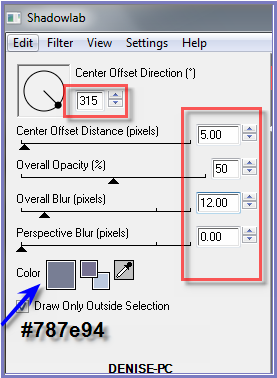
Repeat Drop Shadow/Shadowlab/Direction 135
Step Five:
Layers/New Raster Layer
Selections/Load/Save Selection/Load Selection D.D.EnfantandBird from
Disk as follows:
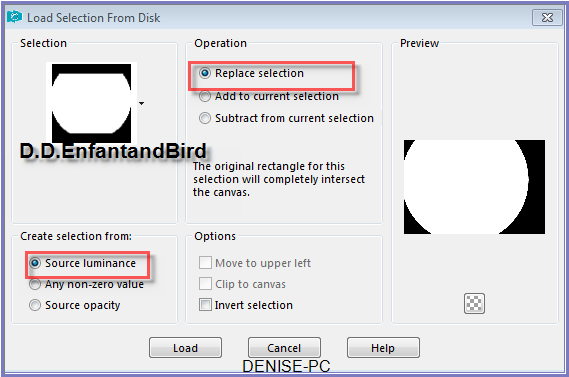
Selections/Invert
Flood Fill with Gradient
Effects/Texture
Effects/Texture/fancy as follows:
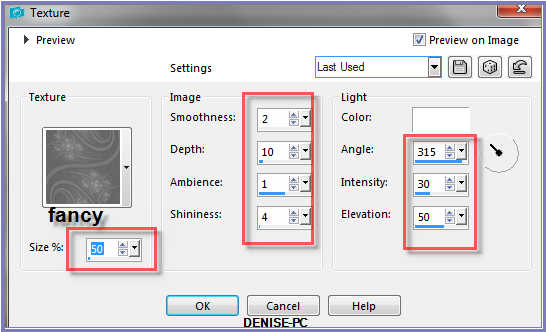
Selections/Modify/Contract 8 pixels
Edit/Clear
Selections/Select None
Layers/Duplicate
Image/Mirror/Vertical OR Image/Flip
Layers/Merge/Merge Down
Effects/Plugins/Eye Candy 3.0/Drop Shadow
OR
Effects/Plugins/Eye Candy 4000/Shadowlab
Step Six:
Maximise
Pixidust_Stars_29.07.2017
Edit/Copy Edit/Paste as New Layer
Change Blend Mode to Screen
Maximise enfant et oiseau retro.pspimage
Edit/Copy Edit/Paste as New Layer
Adjust/Sharpness/Sharpen
Effects/Image Effects/Offset as follows:
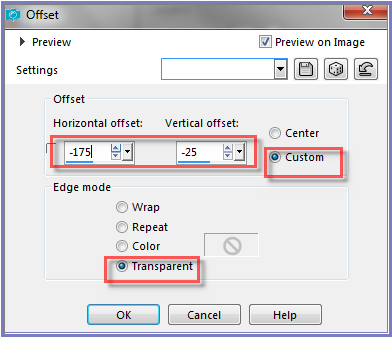
Effects/Plugins/Eye
Candy 3.0/Drop Shadow BUT change colour to Black
OR
Effects/Plugins/Eye Candy 4000/Shadowlab BUT change colour to Black
Step Seven:
Maximise Antique Birdcage.png
Edit/Copy Edit/Paste as New Layer
Effects/Image Effects/Offset as follows:
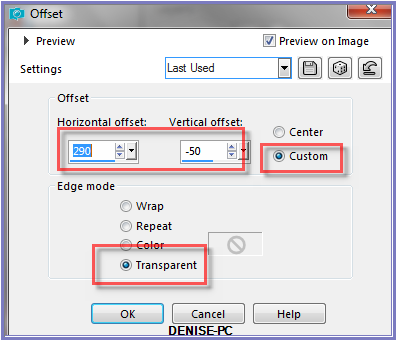
Effects/3D Effects/Drop Shadow as follows:
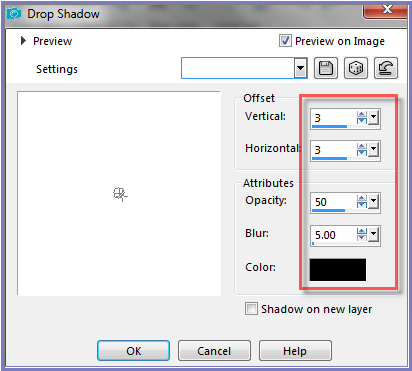
Step Eight:
Layers/Merge/Merge All Flatten
Edit/Copy Edit/Paste as New Image
Minimise for now
Image/Add Borders/3 pixels/Foreground Colour
Image/Add Borders/65 pixels/Background Colour
Magic
Wand with the following settings:

Select border with Magic Wand
Effects/Artistic Effects/Halftone as follows:
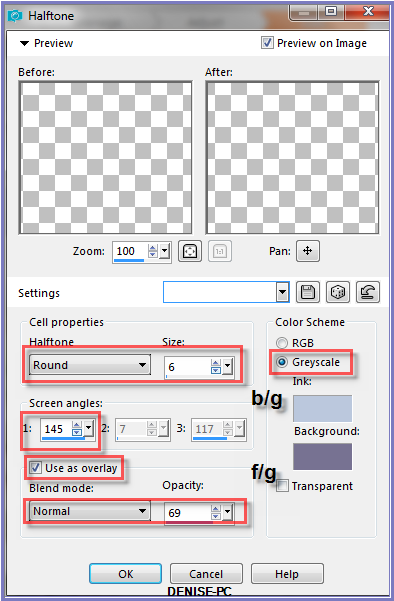
Effects/Edge Effects/Enhance
Step Nine:
Selections/Modify/Contract 15 pixels
Layers/New Raster Layer
Flood Fill with Gradient
Effects/Texture Effects/Texture/fancy
Effects/3D Effects/Inner Bevel as follows:
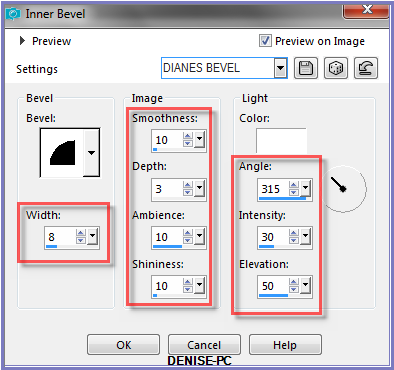
Effects/Plugins/Eye Candy 3.0/Drop Shadow
OR
Effects/Plugins/Eye Candy 4000/Shadowlab
Repeat Drop Shadow/Shadowlab/Direction 315
Selections/Select None
Step Ten:
Maximise Ribbon.png
Edit/Copy Edit/Paste as New Layer
Effects/Image Effects/Offset as follows:
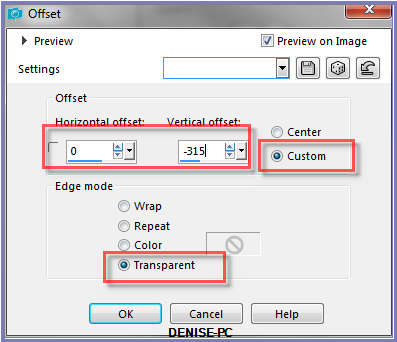
Manual Color Correction Tool with the following settings:
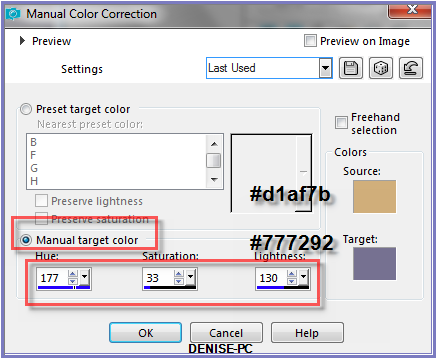
Step Eleven:
Effects/Plugins/Eye
Candy 3.0/Drop Shadow
OR
Effects/Plugins/Eye Candy 4000/Shadowlab
Layers/Merge/Merge All Flatten
Promote
Background Layer
Image/Canvas Size as follows:
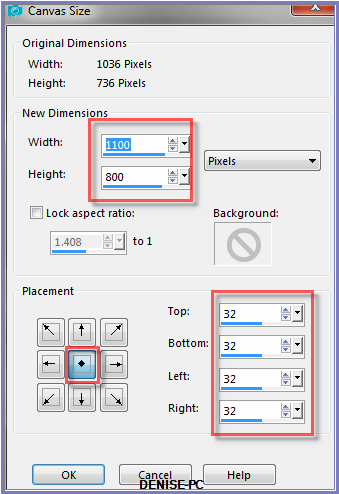
Layers/New Raster Layer
Layers/Arrange/Move Down
Selections/Select All
Maximise copy of image made previously
Edit/Copy
Edit/Paste into Selection
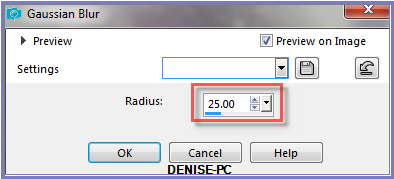
Adjust/Blur/Gaussian Blur as follows:
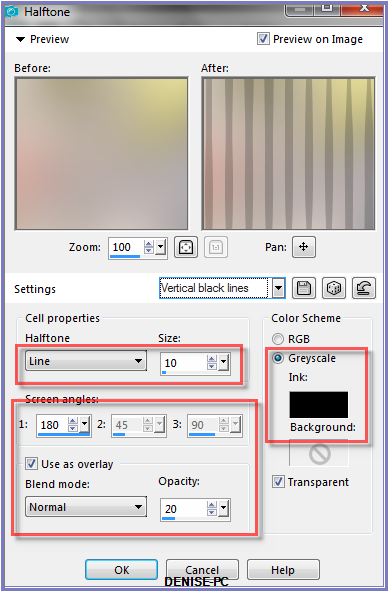
Effects/Artistic Effects/Halftone/Vertical Black Lines Preset OR
Adjust/Sharpness/Sharpen
Selections/Select None
Step Twelve
Maximise
SE_Bows_7.pspimage
Edit/Copy Edit/Paste as New Layer
Layers/Arrange/Bring to Top
Image/Resize/85%
Adjust/Sharpness/Sharpen
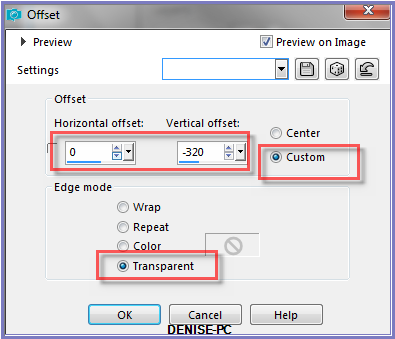
Effects/Image Effects/Offset as follows:
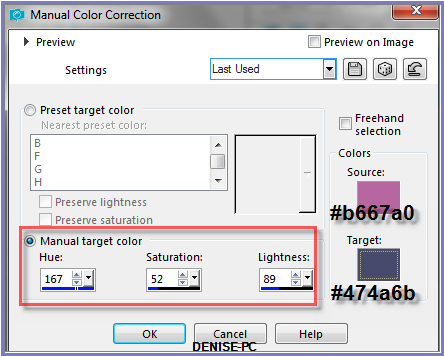
Manual Color CorrectionTool with the following settings:
Effects/Plugins/Eye
Candy 3.0/Drop Shadow
OR
Effects/Plugins/Eye Candy 4000/Shadowlab
Step Thirteen:
Image/Add
Borders/12 pixels/White
Select with Magic Wand
Flood Fill with Gradient
Effects/Texture Effects/Texture/fancy
Effects/3D Effects/Inner Bevel
Selections/Invert
Effects/Plugins/Eye
Candy 3.0/Drop Shadow
OR
Effects/Plugins/Eye Candy 4000/Shadowlab
Repeat Drop Shadow/Shadowlab/Direction 135
Selections/Select None
Maximise
winni.afcn41.6
Edit/Copy Edit/Paste as New Layer
Effects/Image Effects/Offset as follows:
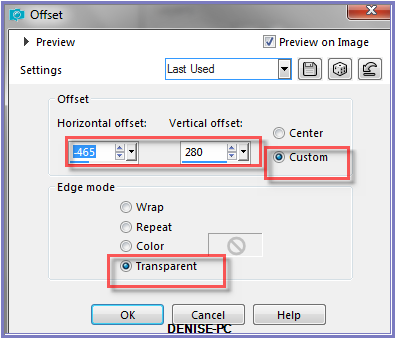
Effects/Plugins/Eye
Candy 3.0/Drop Shadow
OR
Effects/Plugins/Eye Candy 4000/Shadowlab
Layers/Duplicate
Image/Mirror/Horizontal OR Image/Mirror
Step Twelve:
Maximise JanalySeparateur15.pspimage
Edit/Copy Edit/Paste as New Layer
Effects/Image Effects/Offset as follows:
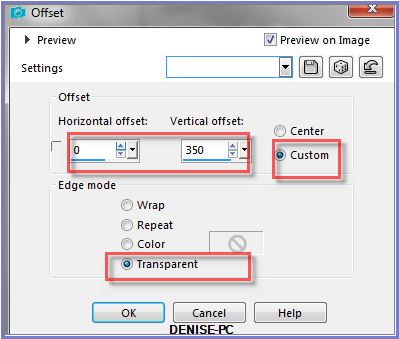
Effects/Plugins/Eye
Candy 3.0/Drop Shadow
OR
Effects/Plugins/Eye Candy 4000/Shadowlab
Maximise
DeniseD Signature.png
Edit/Copy
Edit/Paste as New Layer
Place at the bottom of
Layer
Layers/New Raster Layer
Add
your Watermark
Layers/Merge
All Flatten
Image/Resize/850
pixels wide - height will adjust itself
File/Export/JPEG
Optimiser/Compression Value 20
I hope you have enjoyed
this tutorial
A
big thank you to the ladies who test my Tutorials
TESTERS'
RESULTS
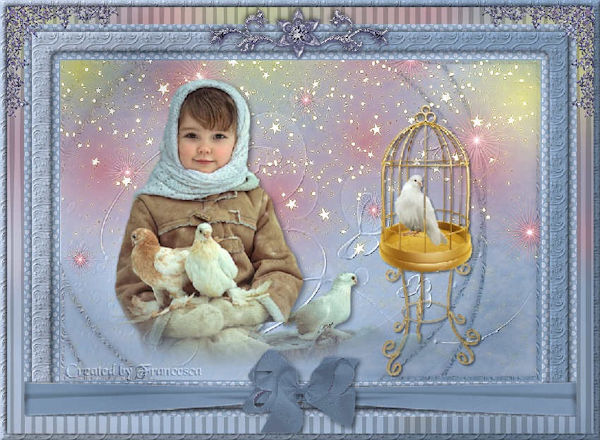
FRAN
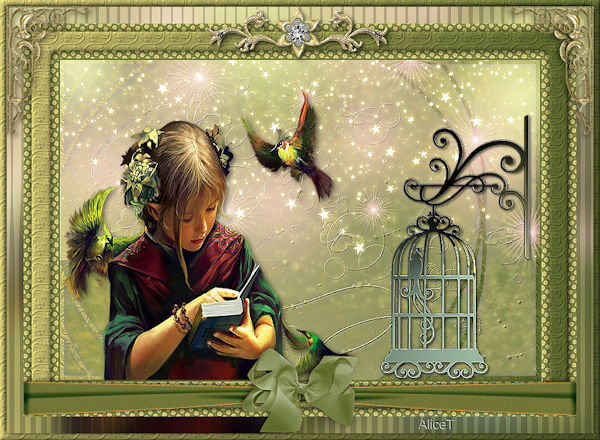
ALICE T.
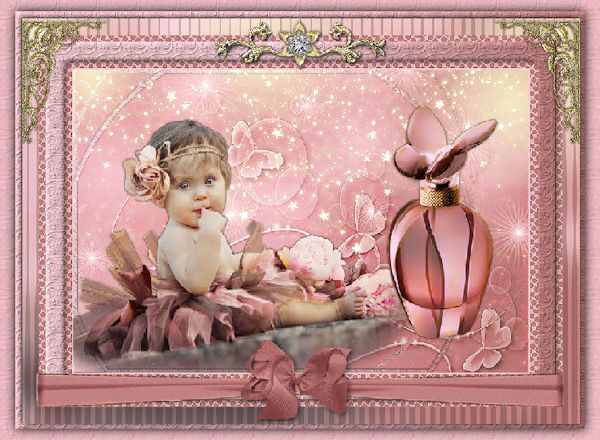
BETTY
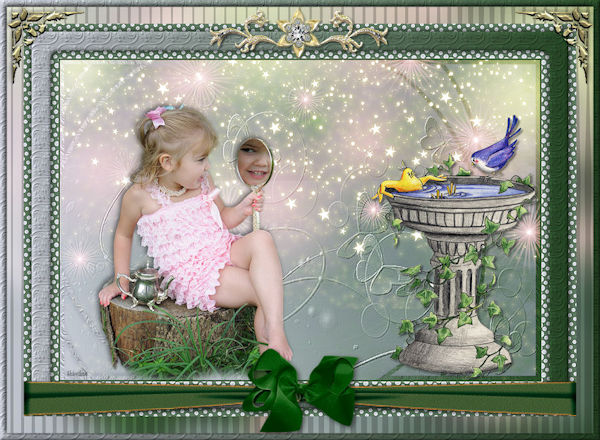
SHIRLEY NZ
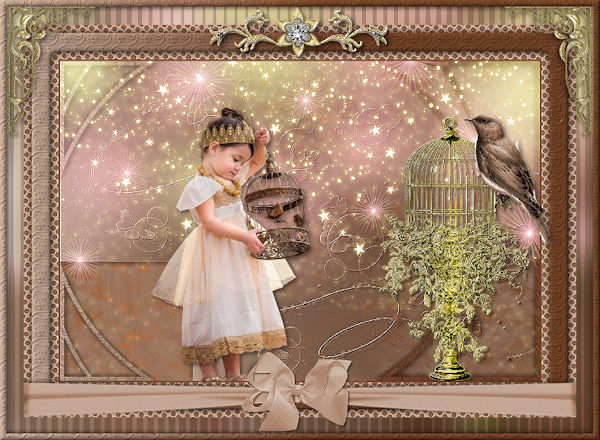
ELIZABETH
| | | |