Tutorial 2017
This Tutorial was written by
Denise D on 2nd December 2014
from my own ideas.
Any resemblance to any other tutorial is purely co-incidental
and unintentional.
You may share my Tutorial with others.
All I ask that permission is asked and credit given to the links
below.
http://escapingtopsp2.altervista.org/Home/homeb.html
and
https://groups.google.com/forum/#!forum/escaping-to-psp2
Please do not upload any of my
completed Tutorial images onto sites
such as Fotki, Pinterest,
Photobucket or similar
SHADES OF TEAL

![]() To follow Tutorial, hold down pencil - left click to move it
To follow Tutorial, hold down pencil - left click to move it


To print click on Printer

Double Click on the Box to download
Supplies
Images:
sitting-by-the-window_lizztish
You
can join this group at:
https://groups.google.com/forum/?fromgroups#!forum/emotivemists
maryanne_bb3_misted_nov06
vine_maryfran
Falling
Leaves
039.png
Obtained
through group shares.
If
this image belongs to you, please contract me
so
that appropriate credit can be given.
Selection:
D.D.ShadesOfTeal
D.D.ShadesOfTeal2
Texture:
JC_049
Mask:
sg_valentine-bouquet
Narah_mask_Abstract134
Pattern:
sg_real-silver
Plugins:
Toadies
Simple
Eye Candy 3.0
AAA Frames
Found here:
http://www.chezviolette17.com/02filtres/Filtres.htm
Notes:
This Tutorial was created in PSP
X5..... other versions may need adjustment
Some of the graphics may be from Free
to Use sites or Share
Groups.
If you are the creator of one of these
please let me know
so that appropriate credit can be given.
No infringement of
copyright is intended or intentional.
Before opening PSP, download plugins
and install
Place Pattern in PSP Pattern Folder
Place Texture in PSP Texture Folder
Place Selection in PSP Selection Folder
Instal Presets
Open graphics in PSP, duplicate (Shift
D) and close the original.
The
settings remain the same throughout this Tutorial unless otherwise
stated.
Set your Foreground colour to #cdf7f7
Set your Background colour to #87c9c8
Step One:
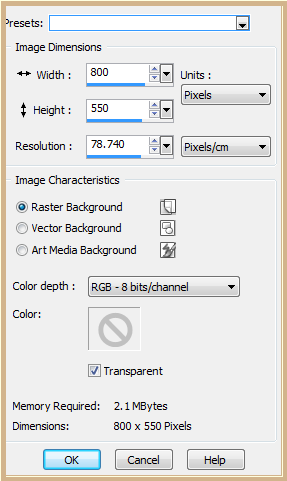
File/New/New Image 800
pixels x 550 pixels as follows:
Change Foreground Colour to Foreground/Background/Sunburst Gradient as
follows:
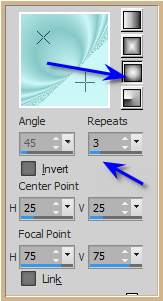 Flood Fill with Gradient
Step
Two:
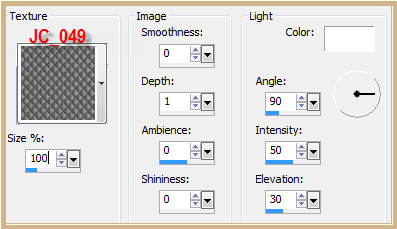
Effects/Texture Effects/Texture
JC_049 as follows:
 Effects/Plugins/Simple/Diamonds
Effects/Plugins/Toadies/Weaver as
follows:
 Step
Three:
Layers/New Raster Layer
Change Background Colour to White
Flood Fill with White
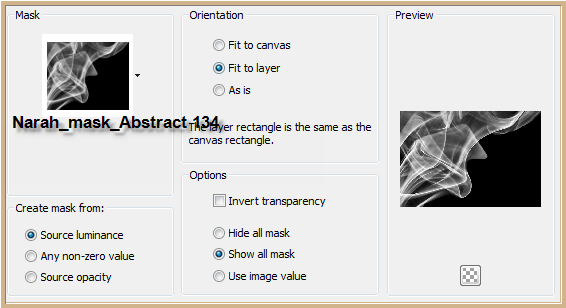
Layers/Load/Save Mask/Load Mask
Narah_mask_Abstract134 from Disk as follows:
 Effects/Edge Effects/Enhance
Layers/Merge/Merge Group
Effects/Plugins/Eye Candy 3.0/Drop
Shadow as follows:
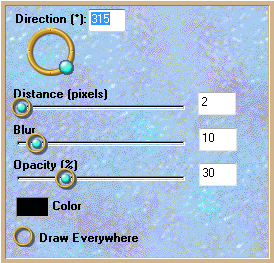 Step
Four:
Layers/New Raster
Layer
Selections/Load/Save
Selection/Load Selection D.D.ShadesOfTeal2 from Disk as follows:
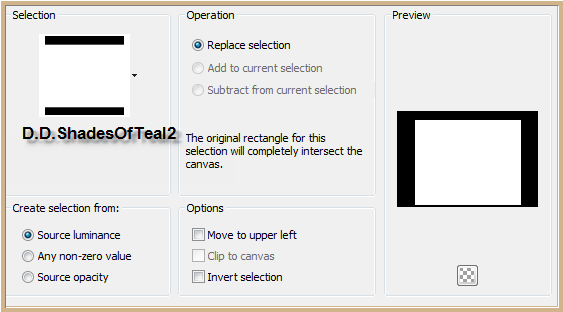 Change Background
Colour Back to #87c9c8
Flood
Fill with Gradient
Layers/Load/Save
Mask/Load Mask sg_valentine-bouquet from Disk as follows:
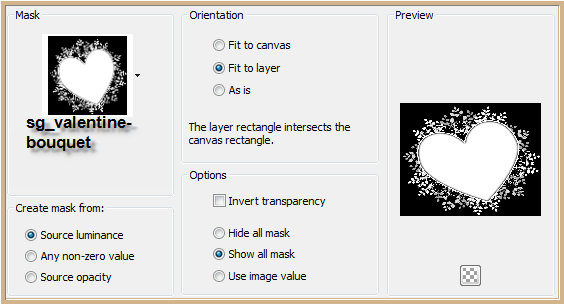 Effects/Edge
Effects/Enhance
Layers/Merge/Merge
Group
Selections/Select
None
Effects/Plugins/MuRa's
Seamless/Emboss at Alpha/Default Settings
Effects/Plugins/Eye
Candy 3.0/Drop Shadow
Step
Five:
Maximise
maryanne_bb3_misted_nov06
Edit/Copy
Edit/Paste as a New Layer
Effects/Image/Effects/Offset
as follows:
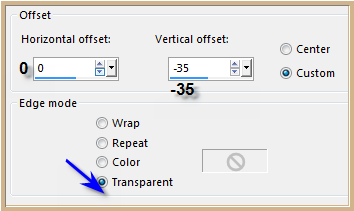 Eraser
Tool with the following settings:
 Carefully
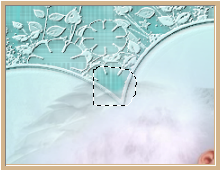
erase mist in the area shown below:
 Step Six:
Layers/New Raster Layer
Selections/Load/Save Selection/Load
Selection from Disk D.D.ShadesOfTeal
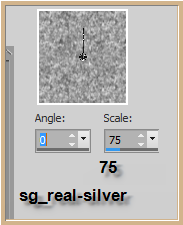
Change Background to Pattern
sg_real-silver as follows:
 Flood Fill with Background Pattern
Effects/Edge Effects/Enhance
Selections/Modify/Contract 2 pixels
Edit/Clear
Flood Fill with Gradient
Layers/New Raster Layer
Maximise vine_maryfran
Edit/Copy
Edit/Paste into Selection
Adjust/Sharpness/Sharpen More
Selections/Select None
Step Seven:
Layers/Merge/Merge Down
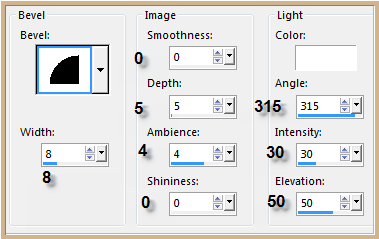
Effects/3D Effects/Inner Bevel as
follows:
 Layers/Duplicate
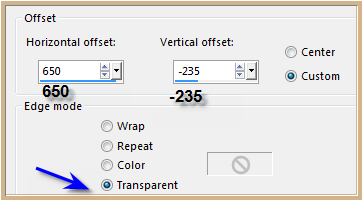
Effects/Image Effects/Offset as
follows:
 Layers/Merge/Merge Down
Effects/Plugins/Eye Candy 3.0/Drop
Shadow
Step
Eight:
Maximise image falling leaves
Edit/Copy
Edit/Paste as New Layer
Adjust/Hue
and Saturation/Colorize as follows:
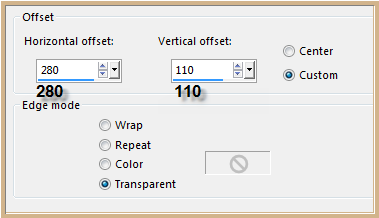
 Effects/Image
Effects/Offset as follows:
 Layers/Duplicate
Image/Mirror
Image/Flip
Layers/Merge/Merge Down
Effects/Plugins/Eye Candy 3.0/Drop
Shadow
Step Nine:
Maximise
text
Edit/Copy
Edit/Paste as New Layer
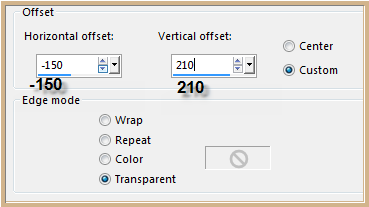
Effects/Image
Effects/Offset as follows:
 Image/Add
Borders/3 pixels/White
Magic
Wand with the following settings:
 Select
Border with Magic Wand
Flood
Fill with Pattern
Effects/Edge
Effects/Enhance
Selections/Select
None
Image/Add
Borders/10 pixels/Background Colour
Select
with Magic Wand
Effects/Texture
Effects/Blinds as follows:
Select
Border with Magic Wand
Flood
Fill with Pattern
Effects/Edge
Effects/Enhance
Selections/Select
None
Image/Add
Borders/10 pixels/Background Colour
Select
with Magic Wand
Effects/Texture
Effects/Blinds as follows:
 Effects/Edge
Effects/Enhance
Selections/Select
None
Step Ten:
Image/Add
Borders/1 pixels/Background Colour
Image/Add
Borders/3 pixels/White
Select
with Magic Wand
Flood
Fill with Pattern
Effects/Edge
Effects/Enhance
Selections/Select
None
Image/Add
Borders/30 pixels/White
Select
with Magic Wand
Flood
Fill with Gradient BUT change Repeats to 10
Effects/Plugins/Toadies/Weaver
Effects/Edge
Effects/Enhance
Selections/Select
None
Image/Add
Borders/1 pixel/Background Colour
Image/Add
Borders/3 pixels/White
Select
with Magic Wand
Flood
Fill with Pattern
Effects/Edge
Effects/Enhance
Selections/Select
None
Step Eleven:
Maximise sitting-by-the-window_lizztish
Edit/Copy
Edit/Paste as New Layer
Effects/Image
Effects/Offset as follows:
Effects/Edge
Effects/Enhance
Selections/Select
None
Step Ten:
Image/Add
Borders/1 pixels/Background Colour
Image/Add
Borders/3 pixels/White
Select
with Magic Wand
Flood
Fill with Pattern
Effects/Edge
Effects/Enhance
Selections/Select
None
Image/Add
Borders/30 pixels/White
Select
with Magic Wand
Flood
Fill with Gradient BUT change Repeats to 10
Effects/Plugins/Toadies/Weaver
Effects/Edge
Effects/Enhance
Selections/Select
None
Image/Add
Borders/1 pixel/Background Colour
Image/Add
Borders/3 pixels/White
Select
with Magic Wand
Flood
Fill with Pattern
Effects/Edge
Effects/Enhance
Selections/Select
None
Step Eleven:
Maximise sitting-by-the-window_lizztish
Edit/Copy
Edit/Paste as New Layer
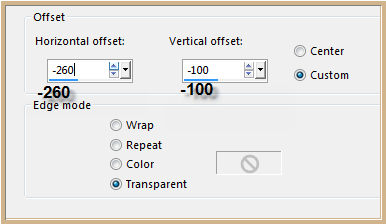
Effects/Image
Effects/Offset as follows:
 Maximise 039.png
Edit/Copy
Edit/Paste as New Layer
Image/Resize/50%
Adjust/Sharpness/Sharpen
Adjust/Hue
and Saturation/Colorize/CHANGE
SATURATION TO 130
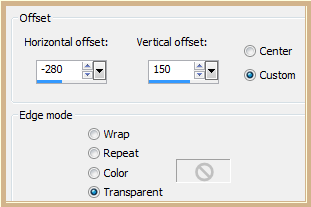
Effects/Image
Effects/Offset as follows:
 Effects/3D
Effects/Drop Shadow
Layers/Duplicate
Image/Mirror
Step Twelve:
Layers/New
Raster Layer
Add
your Watermark
Layers/Merge
All Flatten
Image/Resize/800
pixels wide - height will adjust itself
Adjust/Sharpness/Sharpen
File/Export/JPEG
Optimiser/Compression Value 20
I hope you have
enjoyed this tutorial
A big thank you to
Lillian, Shirley, Betty, Alice, Sjoertdje and Gisela. the ladies who
test my Tutorials
TESTERS' RESULTS
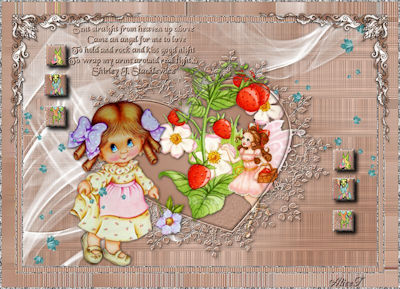
ALICE T.
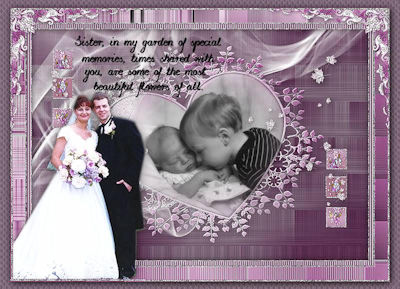
BETTY

LILLIAN

SHIRLEY

FRANIE MARGOT
FOR
OTHER VERSIONS OF THE TUTORIAL
PLEASE
GO TO:
https://goo.gl/photos/RV46i9cSJ8mv1ua68

| | | | | |