Tutorial 2017
This
tutorial is written by
Denise D. on 14th June, 2018
from
my own ideas.
Any
resemblance to other tutorials is
co-incidental and unintentional.
You
may share my tutorials with other
groups.
All I ask is that you advise me
and
credit for the tutorial is given to me and linked to
http://escapingtopsp2.altervista.org/Home/homeb.html
Please
do not upload any of my completed Tutorial images onto sites
such as Fotki, Pinterest, Photobucket or similar
WIND
IN MY HAIR
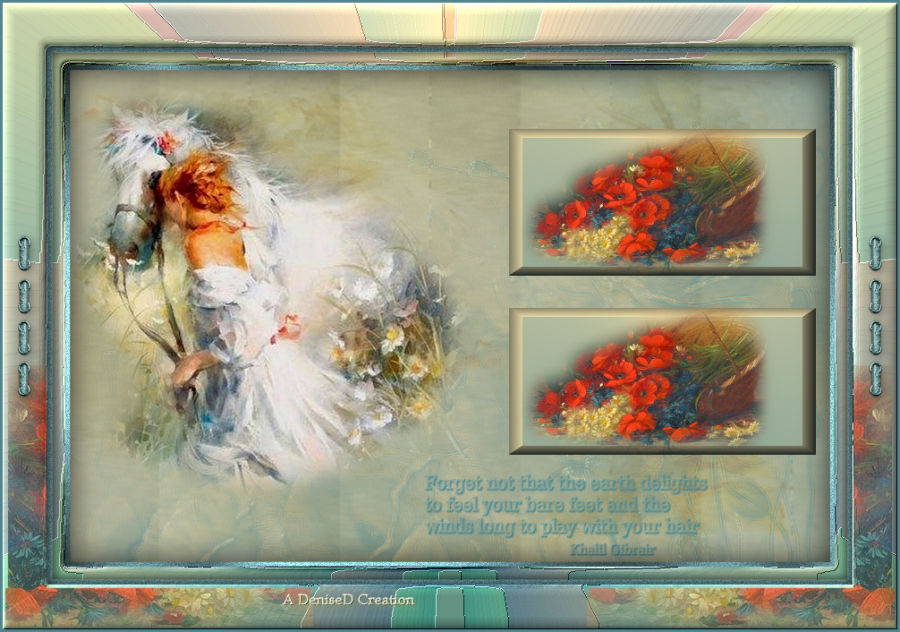
http://escapingtopsp2.altervista.org/WindInMyHair/WindInMyHair.html

Thank you Inge-Lore for this German Translation
Use this pencil to follow the steps
hold down left click to grab and move it

Click on the Box to download Supplies

To print click on Printer

Supplies
Images:
lizztish_flowers-n-horses.2.pspimage
(image by Willem Haenraets)
lizztish_basket-of-poppies.2.pspimage
lizztish_basket-of-poppies.3.pspimage
You can join this Group at:
https://groups.google.com/forum/?fromgroups#!forum/emotivemists
Stitching.pspimage
DeniseD Signature.png
This image was obtained from the Internet
If you are the owner of this
image, please contact me
so that credit can be given to
you
Brush:
D.D.WindInHair
Brush Tip D.D.WindInHair
Copy of
Brush image
Mask:
lizztish_lost_in_time_mask.jpg
You can join this Group
at:
https://groups.google.com/forum/?fromgroups#!forum/emotivemists
Selections:
D.D.WindInMyHair
D.D.WindInMyHair2
Texture:
dream texture_gh
Plugins:
Alien Skin Eye Candy 3.0
OR
Alien Skin Eye Candy 4000
DSB Flux
Graphics Plus
Found here:
http://www.saturnelladesign.fr/pages/filtres.htm
http://www.maidiregrafica.eu/paginafiltri/filtri.html
Notes:
This Tutorial was created in PSP
X9.... other
versions may need adjustment
Some of the graphics may be from Free
to Use sites or Share
Groups.
If you are the creator of one of these
please let me know
so that appropriate credit can be given.
No infringement of
copyright is intended or intentional.
Some
helpful information:
You can change the blend mode, opacity and drop shadow, as
well as colourise
the materials,
according to the tubes/colours you are using.
When applying the Resize with the All Layers option checked, this will
be
informed in the tutorial,
otherwise, apply the resize with this option unchecked.
Remember always to save your work.
Whenever you reduce an image, apply Adjust/Sharpness/Sharpen, to
maintain the
sharpness of the image.

Before opening PSP, download plugins
and install
Please
Note: Offset
settings provided in this tutorial may vary according to size of your
image.
Please
adjust to suit.
The
settings remain the same throughout this Tutorial unless otherwise
stated.
Set your Foreground colour to #f6e1a8
Set your Background colour to #52858e
Step One:
Place Gradient in PSP
Gradient Folder
Place Texture in PSP Texture
Folder
Place Mask in PSP Mask
Folder
Place Selection in PSP
Selection Folder
File/Import Brush into
PSP Brush Folder
Open graphics in PSP, duplicate (Shift
D) and close the original.
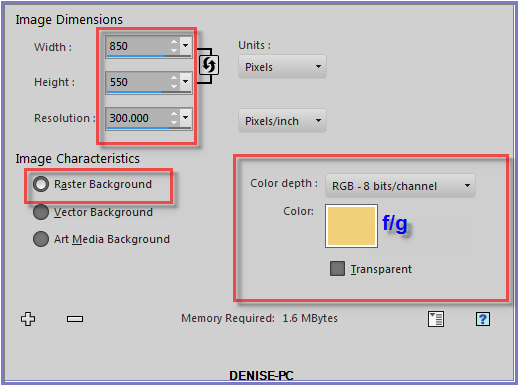
File/New/New Image 850 pixels x 550
pixels as follows:
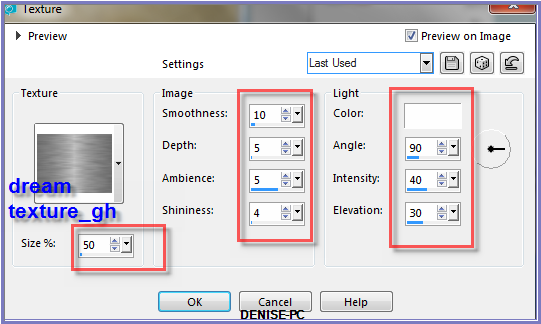
Effects/Texture
Effects/Texture/dream texture_gh as follows:
Step Two:
Layers/New Raster Layer
Selections/Select All
Maximise lizztish_flowers-n-horses.2.pspimage
Edit/Copy Edit/Paste into Selection
Selections/Select None
Layers/Merge/Merge Down
Effects/Image Effects/Seamless Tiling at Default
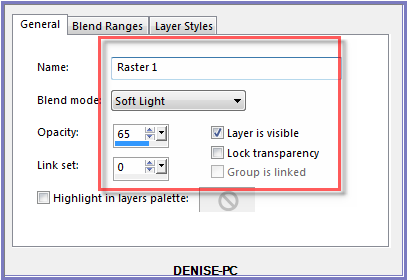
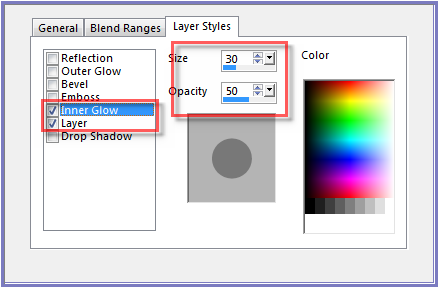
Right Click on Raster 1 and choose Properties with the following
settings:
Step Three:
Layers/Merge/Merge Down
Layers/New Raster Layer
Flood Fill Tool with the following settings:

Flood Fill with Background Colour
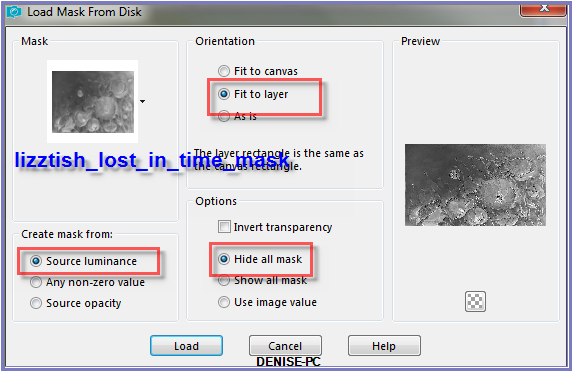
Layers/Load/Save Mask/Load Mask lizztish_lost_in_time_mask from Disk as
follows;
Adjust/Sharpness/Sharpen More
Layers/Merge/Merge Group
Change Flood Fill Tool back to the following
settings:

Step Four:
Maximise
lizztish_flowers-n-horses.2.pspimage
Edit/Copy Edit/Paste as New Layer
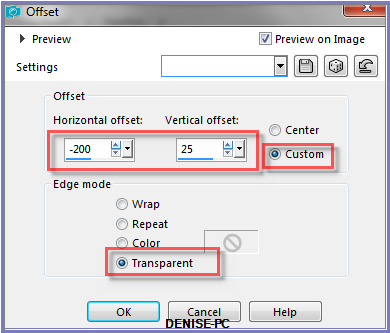
Effects/Image Effects/Offset as follows:
Step Five:
Layers/New Raster Layer
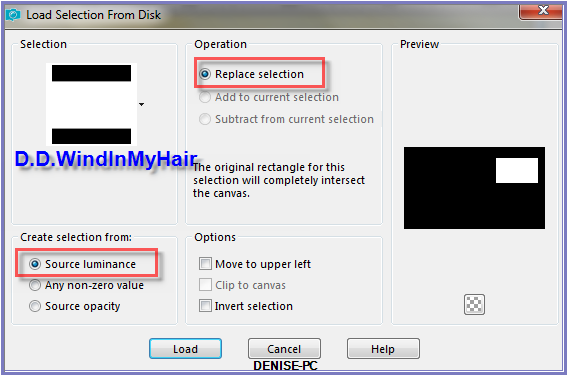
Selections/Load/Save Selection/Load Selection D.D.WindInMyHair from
Disk as follows:
Promote Selection to Layer
Change Foreground Colour to Foreground/Background
Radial Gradient with the following settings:
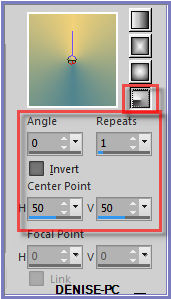 Flood
fill with Gradient
Effects/3D
Effects/Buttonize as follows:
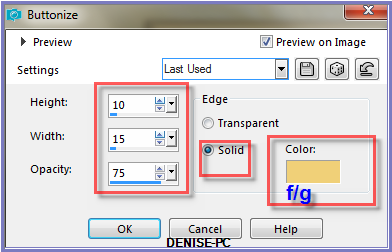
Selections/Select None
Step Six:
Maximise
lizztish_basket-of-poppies.2.pspimage
Edit/Paste as New Layer
Image/Resize/50% as follows:
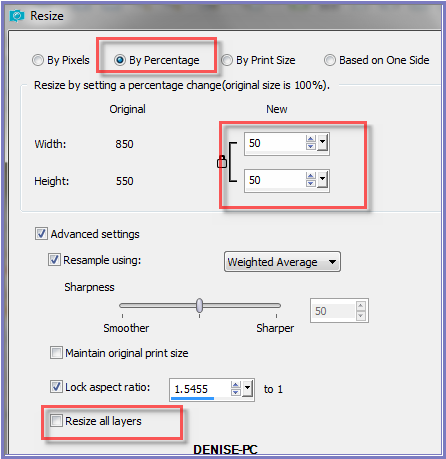
Effects/Image
Effects/Offset as follows:
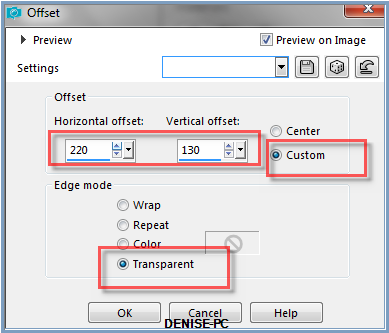
Layers/Merge/Merge Down
Layers/Duplicate
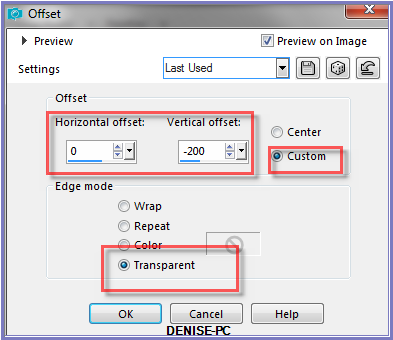
Effects/Image Effects/Offset as follows:
Step Seven:
Layers/New Raster Layer
Brush Tool/D.D.WindInHair with the following settings:


(If you couldn't import the Brush, a copy of the image is attached.
The beauty of the Brush is that you can change size and effect easily)
Using the Background Colour click twice on the Layer
See my image for Placement
Deselect the Brush Tool
Step Eight:
Image/Add Borders/5 pixels/Background Colour
Magic Wand with the following settings:

Select Border with Magic Wand
Effects/Plugins/DSB Flux/Bright Noise as follows:
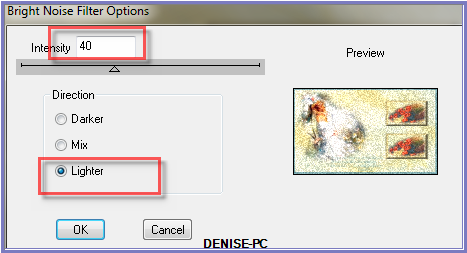
Effects/Plugins/Graphics Plus/Cross Shadow as follows:
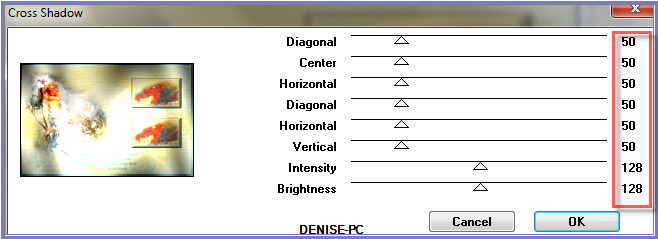
Selections/Select None
Step Nine:
Image/Add Borders/15 pixels/White
Select with Magic Wand
Flood Fill with Gradient
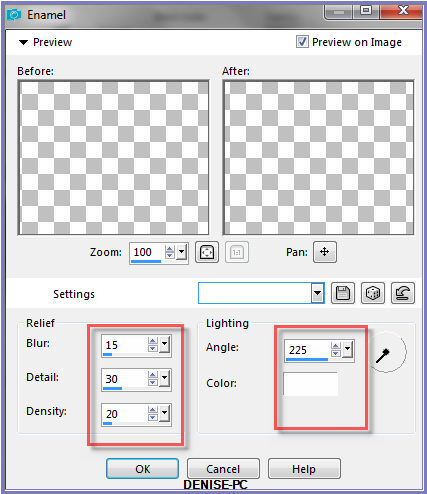
Effects/Artistic Effects/Enamel as follows;
Selections/Select All
Selections/Modify/Contract 20 pixels
Effects/3D Effects/Cutout as follows:
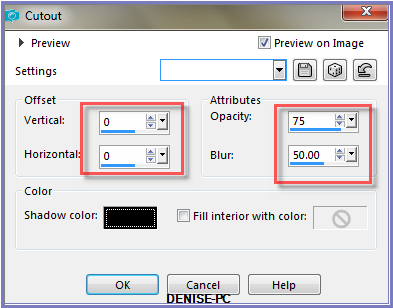
Selections/Select None
Step Ten:
Image/Add Borders/5 pixels/Background Colour
Select with Magic Wand
Effects/Plugins/DSB Flux/Bright Noise
Effects/Plugins/Eye Candy 3.0/Drop Shadow as follows:
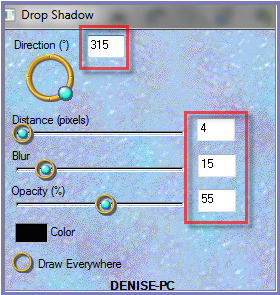
OR
Effects/Plugins/Eye Candy 4000/Shadowlab as follows:
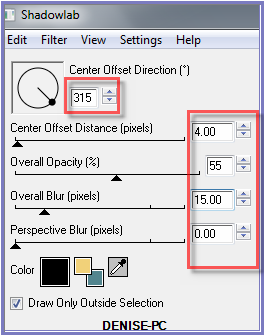
Repeat Drop Shadow/Shadowlab/Direction 135
Selections/Select None
Step
Eleven:
Image/Add
Borders/50 pixels/White
Select with Magic Wand
Flood Fill with Gradient
Effects/Artistic Effects/Enamel
Effects/3D Effects/Inner Bevel as follows:
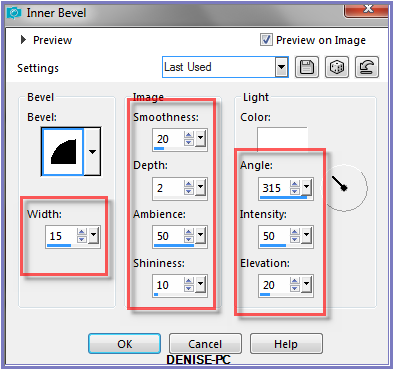
Effects/Plugins/Eye Candy 3.0/Drop Shadow
OR
Effects/Plugins/Eye Candy 4000/Shadowlab
Repeat Drop Shadow/Shadowlab/Direction 315
Selections/Select None
Image/Add Borders/3 pixels/Background Colour
Step Twelve:
Selections/Load/Save Selection/Load Selection D.D.WindInMyHair2 from
Disk
Maximise lizztish_basket-of-poppies.3.pspimage
Edit/Copy Edit/Paste as New Layer
Move the image over to the bottom right hand corner so that
it covers the selection
Selections/Invert
Edit/Clear
Selections/Select None
Change Opacity
to 75%
Layers/Duplicate
Image/Mirror/Horizontal OR Image/Mirror
Step
Thirteen:
Maximise Stitching.pspimage
Edit/Copy Edit/Paste as New Layer
Adjust/Hue and Saturation/Colorize as follows:
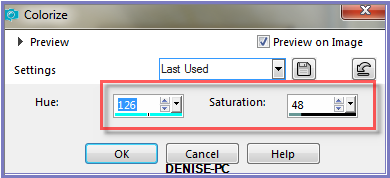
Effects/Image Effects/Offset as follows:
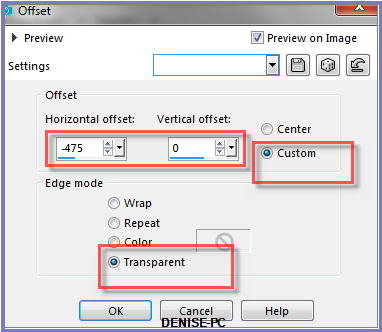
Layers/Duplicate
Image/Mirror Horizontal OR Image/Mirror
Layers/Merge/Merge Down
Effects/Plugins/Eye Candy 3.0/Drop Shadow BUT change Opacity to 40
OR
Effects/Plugins/Eye Candy 4000/Shadowlab BUT change
Opacity to 40
Step Fourteen:
Maximise DeniseD Signature.png
Edit/Copy Edit/Paste as New Layer
Place at bottom of Layer
Layers/New Raster Layer
Add
your Watermark
Layers/Merge
All Flatten
Image/Resize/900
pixels wide - height will adjust itself
File/Export/JPEG
Optimiser/Compression Value 20
I
hope you have enjoyed
this tutorial
A
big thank you to the ladies who test my Tutorials
TESTERS'
RESULTS
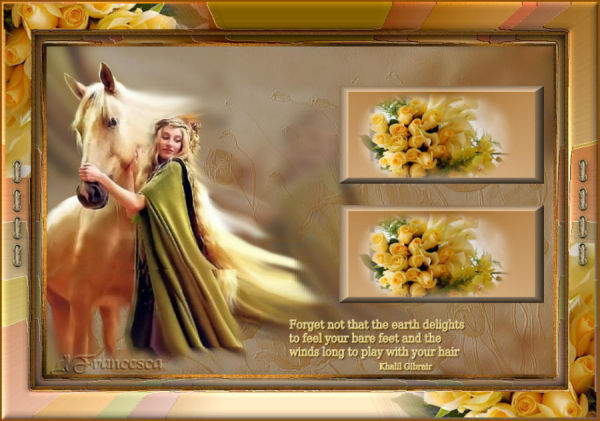
FRAN
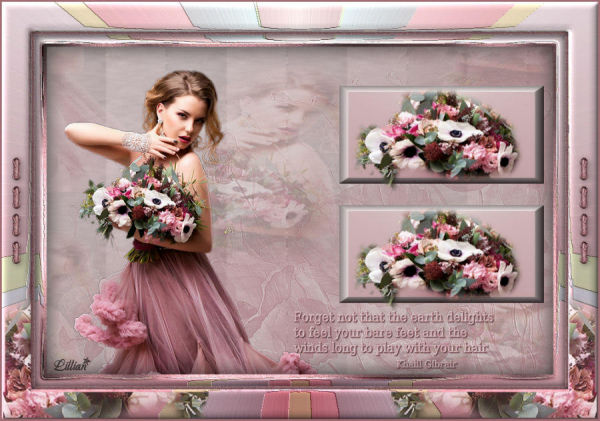
LILLIAN
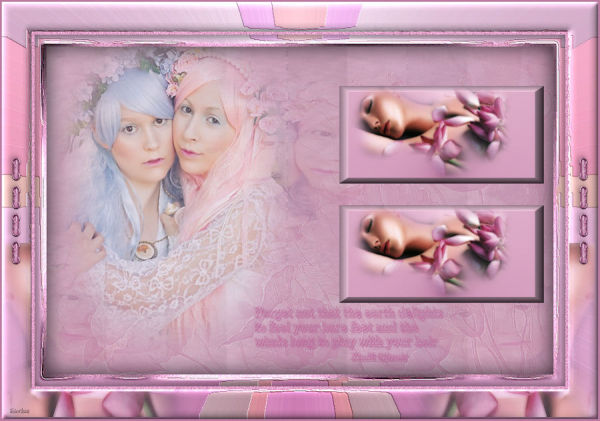
SHIRLEY NZ
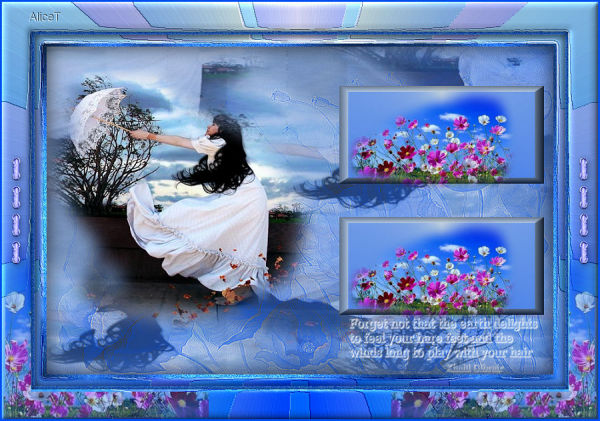
ALICE T.
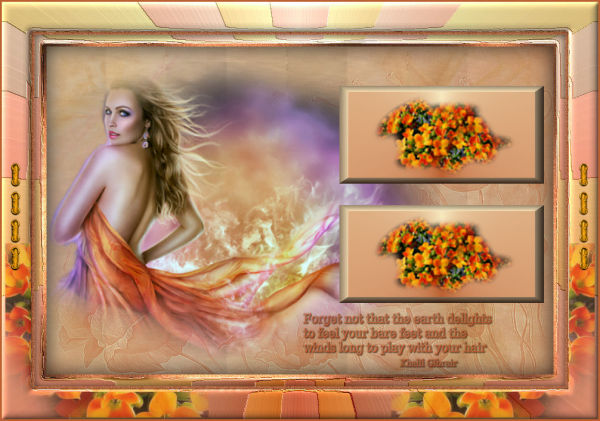
JOYCE
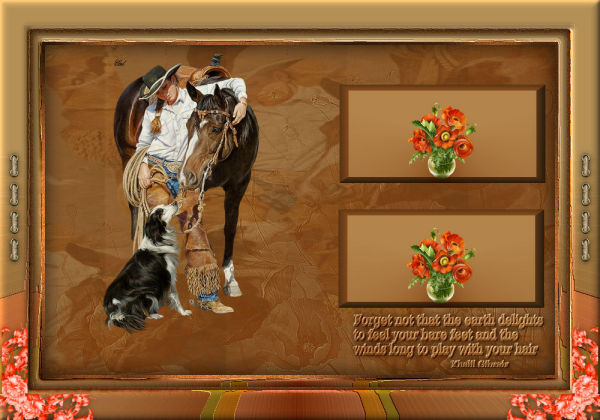
ELIZABETH
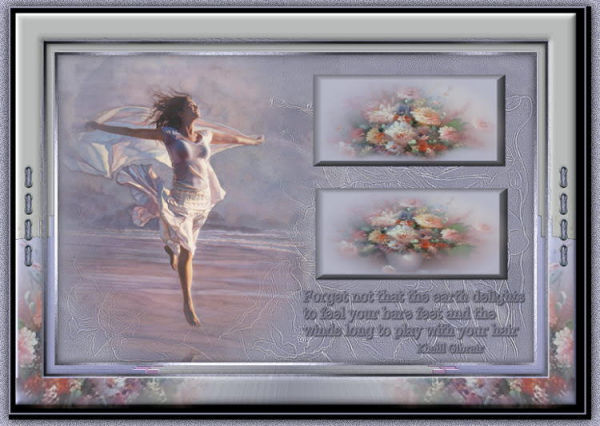
BETTY
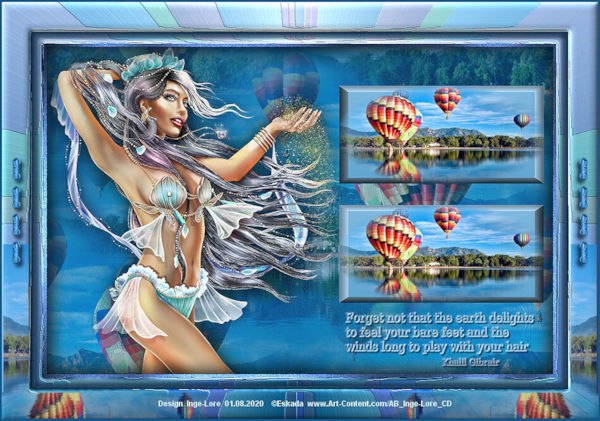
INGE-LORE
| | | |