TEMPLATE 2015
This tutorial is written by
Denise D. on 17th October, 2015
from my own ideas.
Any
resemblance to other tutorials is co-incidental and unintentional.
You
may share my tutorials with other groups. All I ask is that
you advise me
and
credit for the tutorial is given to me and linked to
http://escapingtopsp2.altervista.org/Home/homeb.html
If you wish to join my
mailing list, please go to:
https://groups.google.com/g/escaping-to-psp3
Please do not upload any of
my completed Tutorial images onto sites such as
Fotki, Pinterest, Photobucket
or similar
WEDDING
BELLS
 Click
on Box to download supplies
Supplies
Images:
CJ_CMC~DRL~The_Bridal_Path~May_2003+Mist
SpringRingFrm_cc_05
A2Gcornersset9
Obtained through Internet
If these images was created by you,
please let me know
so that appropriate credit can be
given.
DeniseDSignature.png
lizztish_floral-presentation4
You can join this group at:
https://groups.google.com/forum/?fromgroups#!forum/emotivemists
Mask:
Narah_mask_0670
You can join this Group at:
https://ar.groups.yahoo.com/neo/groups/TUBESpack/info
125018164_nikita_masques
You can join this Group at:
http://www.reveries.fr/accueil.php
Plugins:
Eye Candy 3.0
Filter Factory Gallery G
Simple
Found here:
http://violettegraphic.com/
http://janaly.com/Filtres/Filtre.html
Notes:
This Tutorial was created in PSP
X7.... other
versions may need adjustment
Some of the graphics may be from Free
to Use sites or Share
Groups.
If you are the creator of one of these
please let me know
so that appropriate credit can be given.
No infringement of
copyright is intended or intentional.
Some
helpful information:
You can change the blend mode, opacity and drop shadow, as
well as colourise
the materials,
according to the tubes/colours you are using.
When applying the Resize with the All Layers option checked, this will
be
informed in the tutorial,
otherwise, apply the resize with this option unchecked.
Remember always to save your work.
Whenever you reduce an image, apply Adjust/Sharpness/Sharpen, to
maintain the
sharpness of the image.
Some tools or features have other names in earlier versions of the PSP.

Before opening PSP, download plugins
and install
Place Masks in PSP Mask Folder
Open graphics in PSP, duplicate (Shift
D) and close the original.
The
settings remain the same throughout this Tutorial unless otherwise
stated.
Set your Foreground colour to #dad9d8
Set your Background colour to #a7a9b3
Step One:
File/New/New Image 700 pixels x 700
pixels as follows:
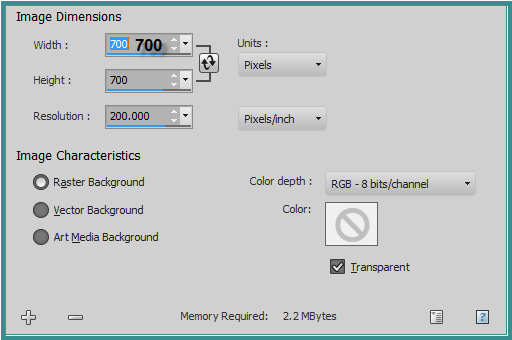 Change Foreground Colour to
Foreground/Background/Linear Gradient as follows:
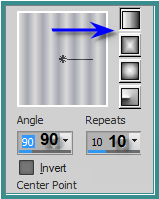 Flood Fill with Gradient
Step Two:
Effects/Distortion Effects/Pixilate as
follows:
 Effects/Distortion Effects/Lens
Distortion/as follows:
 Image/Resize/90% as follows:
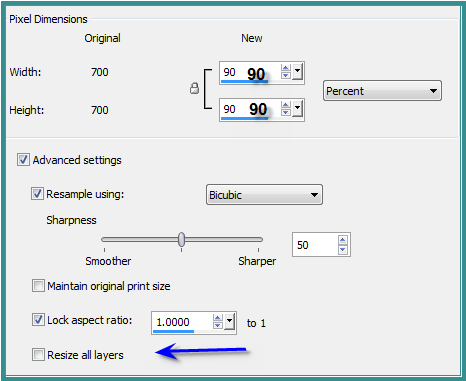 Layers/Duplicate
Step
Three:
Select Raster 1
Close off Copy of Raster 1
Magic Wand with the following settings:
 Select the area shown below:
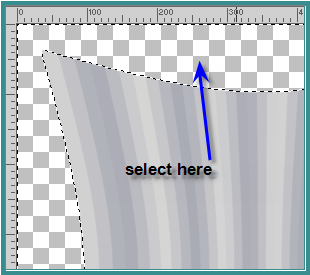 Selections/Invert
Selections/Modify/Select Selection
Borders as follows:
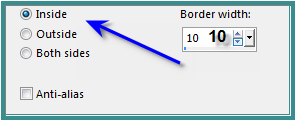 Layers/New Raster Layer
Flood Fill with Background Colour
Effects/3D Effects/Inner Bevel as
follows:
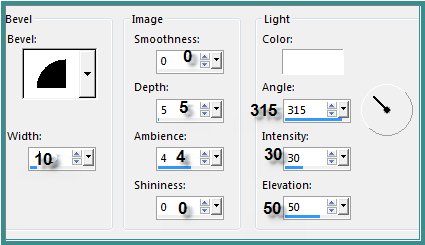 Selections/Select None
Step
Four:
Select and open Copy of Raster 1
Image/Resize/78% as follows:
Adjust/Sharpness/Sharpen
Image/Free Rotate/45 degrees/Right as
follows:
 Effects/Plugins/Filter Factory Gallery
G/Xaggerate as follows:
 Layers/Duplicate
Image/Resize 90%
Image/Mirror
Adjust/Sharpness/Sharpen
Layers/Merge/Merge Down
Effects/3D Effects/Inner Bevel
Effects/Plugins/Eye Candy 3.0/Drop
Shadow as follows:
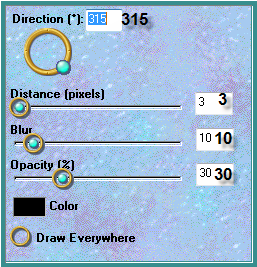 Repeat Drop Shadow Direction 135
Step
Five:
Layers/New Raster Layer
Layers/Arrange/Send to Bottom
Flood Fill with Gradient
Effects/Plugins/Filter Factory Gallery
G/Blast 'm as follows:
 Layers/Merge/Merge All Flatten
Image/Add Borders/1 pixel/Background
Colour
Image/Add Borders/30 pixels/White
Select Border with Magic Wand
Change Gradient Settings to Angle 45
degrees
Flood Fill with Gradient
Effects/Plugins/Filter Factory Gallery
G/Xaggerate
Effects/Edge Effects/Enhance
Effects/Plugins/Eye Candy 3.0/Drop
Shadow
Repeat Drop Shadow Direction 315
Selections/Select None
Step Six:
Maximise SpringRingFrm_cc_05
Edit/Copy
Edit/Paste as New Layer
Image/Resize/90%
Adjust/Sharpness/Sharpen More
Change Blend Mode to Luminance
Effects/3D Effects/Inner Bevel
Effects/Plugins/Eye Candy 3.0/Drop
Shadow
Maximise
CJ_CMC~DRL~The_Bridal_Path~May_2003+Mist
Edit/Copy
Edit/Paste as New Layer
Image/Resize/65%
Adjust/Sharpness/Sharpen
Layers/Arrange/Move Down
Step Seven:
Image/Add Borders/50 pixels/White
Select with Magic Wand
Flood Fill with Gradient
Promote Selection to Layer
Layers/New Raster Layer
Flood Fill with Background Colour
Effects/Plugins/Filter Factory Gallery
G/Blast'm
Layers/Load/Save Mask/Load Mask
125018164_nikita_masques from Disk as follows:
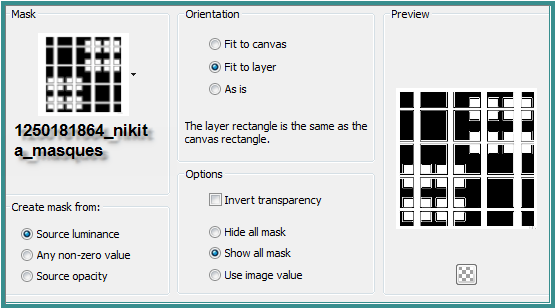 Effects/Edge Effects/Enhance
Layers/Merge/Merge Group
Effects/Plugins/MuRa's Seamless/Emboss
at Alpha/Default Settings
Effects/Plugins/Eye Candy 3.0/Drop
Shadow
Repeat Drop Shadow Direction 135
Selections/Select None
Step Eight:
Maximise A2Gcornersset9
I chose Layer 10
Edit/Copy
Edit/Paste as New Layer
Image/Resize 125%
Effects/Edge Effects/Enhance
Effects/Image Effects/Offset as
follows:
Effects/Edge Effects/Enhance
Layers/Merge/Merge Group
Effects/Plugins/MuRa's Seamless/Emboss
at Alpha/Default Settings
Effects/Plugins/Eye Candy 3.0/Drop
Shadow
Repeat Drop Shadow Direction 135
Selections/Select None
Step Eight:
Maximise A2Gcornersset9
I chose Layer 10
Edit/Copy
Edit/Paste as New Layer
Image/Resize 125%
Effects/Edge Effects/Enhance
Effects/Image Effects/Offset as
follows:
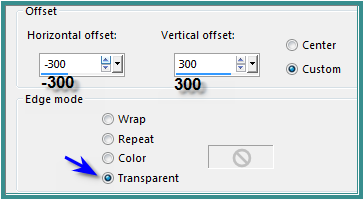 Effects/3D Effects/Drop Shadow as
follows:
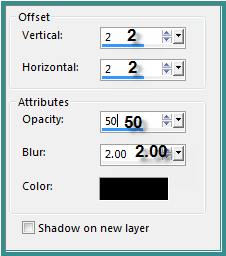 Effects/Plugins/Simple/Top Left Mirror
Layers/Duplicate
Image/Resize/112%
Adjust/Sharpness/Sharpen
Step Nine:
Maximise lizztish_floral-presentation4
Edit/Copy
Edit/Paste as New Layer
Image/Resize/70%
Adjust/Sharpness/Sharpen
Effects/Image/Effects/Offset as
follows:
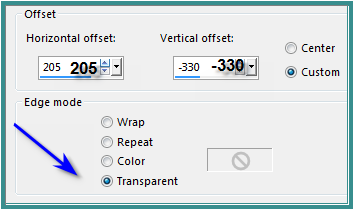 Layers/New Raster Layer
Flood Fill with Foreground Colour
Layers/Load/Save/Mask/Load Mask
Narah_mask_0670 from Disk as follows:
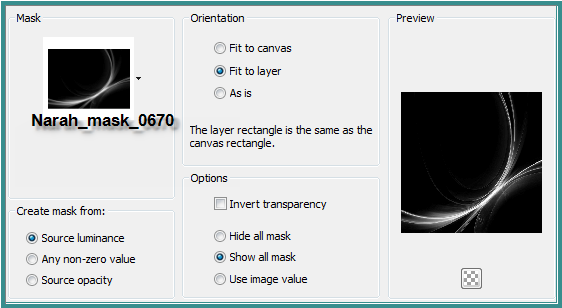
Effects/Edge Effects/Enhance
Layers/Merge/Merge Group
Effects/Plugins/Eye Candy 3.0/Drop
Shadow
Step Ten:
Image/Add Borders/10 pixels/Background
Colour
Select with Magic Wand
Effects/3D Effects/Inner Bevel
Effects/Plugins/Eye Candy 3.0/Drop
Shadow
Repeat Drop Shadow/Direction 315
Selections/Select None
Step
Eleven:
Maximise
Denise D Signature.png
Edit/Copy
Edit/Paste as New Layer
Place at bottom of Layer
Layers/New
Raster Layer
Add
your Watermark
Layers/Merge
All Flatten
Image/Resize/750
pixels wide - height will adjust itself
File/Export/JPEG
Optimiser/Compression Value 20
| | | |