This Tutorial was written by Denise D on 24th November 2014
from my own ideas.
Any resemblance to any other tutorial is purely co-incidental and unintentional.
You may share my Tutorial with others.
All I ask that permission is asked and credit given to the links below.
http://escapingtopsp2.altervista.org/Home/homeb.html
and
https://groups.google.com/forum/#!forum/escaping-to-psp2

Please do not upload any of my completed Tutorial images onto sites
such as Fotki, Pinterest, Photobucket or similar

TIS THE SEASON

TIS THE SEASON


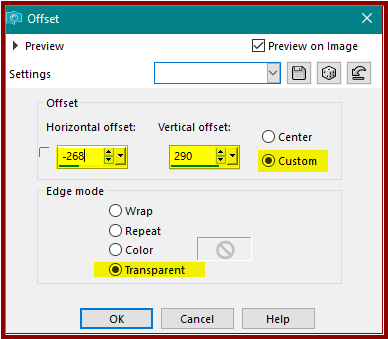
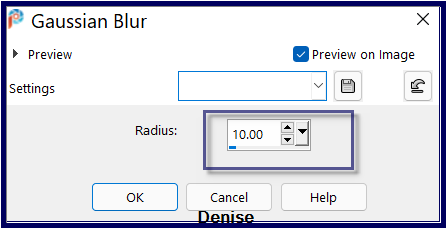
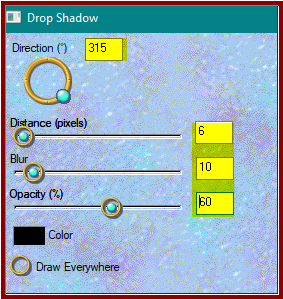
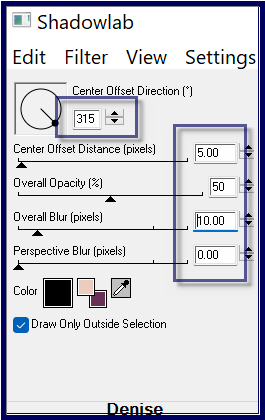
To follow Tutorial, hold down pencil - left click to move it


To print click on Printer

box
Double Click on the Box to download Supplies


FRENCH TRANSLATION HTML TEXT
FRENCH FLAG
Thank you Franie Margot for your French Translation
Please go to:

http://franie-margot.eklablog.com/tis-the-season-p1312414


Supplies

  Images:
denise's wreath
StarSwirlsbyCait can be found at:


staitlee


calguissapin 27112011
calguiscutsanta 39112011
calguischeminee 26112011(1)

All three images can be found at:

https://groups.google.com/group/flowerpowerpartagetubes

GG Santa_095.psp
Tubed by Gran Gran obtained through Group Shares
1PatriesStrik1-2 used with permission.  These images can be found at:
http://www.sitevanpatries.nl/dieren%204.htm


This image was obtained from the Internet
If you are the owner of this image, please contact me
so that credit can be given to you   

Gradient:
fairygold

  Patterns:
Christmas_Text_ Free.2_003 by Mystic Nights.

 Mask:
Corel 07_007

Font:
       
Blairesque Curley


Plugins:

Eye Candy 3 OR Eye Candy 4000
Simple
FM Tile Tools
Texture
MuRa's Seamless

Found here:
http://www.saturnelladesign.fr/pages/filtres.htm
http://janaly.com/Filtres/Filtre.html
http://www.maidiregrafica.eu/paginafiltri/filtri.html
Notes:
This Tutorial was created in PSP X9.... other versions may need adjustment
Some of the graphics may be from Free to Use sites or Share Groups. 
If you are the creator of one of these please let me know so that appropriate credit can be given. 
No infringement of copyright is intended or intentional.
Before opening PSP, download plugins and install
Place Pattern in PSP Pattern Folder
Place Gradient in PSP Gradient Folder
Place Mask in PSP Mask Folder
Open graphics in PSP, duplicate (Shift D) and close the original.
Please Note:   Offset settings provided in this tutorial may vary according to size of your image.
Please adjust to suit.

The settings remain the same throughout this Tutorial unless otherwise stated.
Set your Foreground colour to #dfcaac

Set your Background colour to #b4bdda

Step One:
Set your Foreground to Pattern Christmas_Text_ Free.2_003 with the following settings:


pattern

Set your Background to  Gradient fairygold with the following settings:


gradient

Step Two:
File/New/ Transparent 700 pixels x 700 pixels as follows:

nl

Flood Fill with Pattern

Step Three:
Maximise denises wreath
Adjust/Hue and Saturation/Colorize with the following settings:


coloize

Edit/Copy        Edit/Paste as New Layer
Image/Resize/175% as follows:

175

Adjust/Sharpness/Sharpen More
Adjust Brightness and Contrast/Fill Light/Clarity as follows:

clarity

Step Four:
Effects/3D Effects/Drop Shadow as follows:

dsstar

Magic Wand with the following settings:

mw

Select inside the wreath
Selections/Modify/Expand 15 pixels
Activate Raster 1
Edit/Clear
Selections/Select None
Maximise
StarSwirlsbyCait

Edit/Paste as New Layer
Layers/Arrange/Bring to Top
Image/Resize/30%
Adjust/Sharpness/Sharpen
Effects/Image Effects/Offset as follows:

offset star

Effects/3D Effects/Drop Shadow
Layers/Duplicate
Image/Mirror/Horizontal OR  Image/Mirror
Minimise for now


Step Five:
We are now going to make the image for the centre of the wreath.
Layers/New Raster Layer 700 pixels x 700 pixels
Flood fill with Gradient
Adjust/Blur/Gaussian Blur as follows:

blur

Maximise
calguischeminee 26112011(1)
Edit/Copy        Edit/Paste as New Layer
Image/Resize/80%
Adjust/Sharpness/Sharpen
Move to the bottom of the layer
See my image for placement

image

Effects/Plugins/Eye Candy 3.0/Drop Shadow as follows:

ds
OR
Effects/Plugins/Eye Candy 4000/Shadowlab as follows:

shadowlab

Step Six:
Maximise calguissapin 27112011
Edit/Copy        Edit/Paste as New Layer
Image/Resize/80%
Adjust/Sharpness/Sharpen
Effects/Plugins/Eye Candy 3.0/Drop Shadow
OR
Effects/Plugins/Eye Candy 4000/Shadowlab
See my image for placement
 
Maximise calguiscutsanta 39112011
Edit/Copy        Edit/Paste as New Layer
Image/Resize/80%
Adjust/Sharpness/Sharpen
Effects/Plugins/Eye Candy 3.0/Drop Shadow
OR
Effects/Plugins/Eye Candy 4000/Shadowlab
Effects/Image Effects/Offset as follows:

offset santa

Layers/Merge/Merge All Flatten

Step Seven:
Layers/New Mask Layer/Corel_07_007From Image as follows:

mask

Layers/Merge/Merge Group
Layers/New Raster Layer
Layers/Arrange/Send to Bottom
Flood fill with Foreground Colour
#dfcaac

Effects/Plugins/Texture/Texturizer/Canvas as follows:

canvas
Layers/Merge/Merge All Flatten
Edit/Copy
(For safety sake save this image)

Step Eight:
Back to the original frame image
Activate Raster 2 (weath)
Select inside the wreath with Magic Wand
Selections/Modify/Expand 15 pixels
Layers/New Raster Layer
Layers/Arrange/Send to Bottom
Edit/Paste into Selection
Selections/Select None

Step Nine:
Image/Add Borders/5 pixels/Foreground Colour
Image/Add Borders/10 pixels/White
Select with Magic Wand
Flood Fill with Background Gradient
Selections/Select None
Image/Add Borders/5 pixels/Foreground Colour
Selections/Select All
Selections/ModifyContract by 20 pixels
Selections/Invert
Effects/3D Effects/Inner Bevel as follows:

bevel

Effects/3D Effects/Drop Shadow
Repeat Drop Shadow/Directions -2 H and V

Step Ten:
Image/Add Borders/25 pixels/White
Select with Magic Wand
Change Foreground back to Foreground Pattern BUT change scale to 50
Flood Fill with Pattern
Effects/FM Tile Tools/Collage-Circular with the following settings:


collage

Selections/Select None

Step Eleven:

Image/Add Borders/5 pixels/Foreground Colour
Image/Add Borders/10 pixels/White
Select with Magic Wand
Flood Fill with Background Gradient
Selections/Select None
Image/Add Borders/5 pixels/Foreground Colour

Selections/Select All
Selections/ModifyContract by 20 pixels
Selections/Invert
Effects/3D Effects/Inner Bevel

Effects/3D Effects/Drop Shadow
Repeat Drop Shadow/Directions +2 H and V


Step Twelve:
Maximise GG Santa_095.psp
Edit/Copy        Edit/Paste as New Layer
Image/Resize/125%
Adjust/Sharpness/Sharpen
Effects/Plugins/Eye Candy 3.0/Drop Shadow
OR
Effects/Plugins/Eye Candy 4000/Shadowlab
Effects/Image Effects/Offset as follows:

santa 2

Text Tool with the following settings:

text

text 2

Settings may vary according to your version of PSP
Change Materials Box as follows:

materials

Write

Seasons Greetings

Convert to Raster Layer
Effects/Plugins/MuRa's Seamless/Emboss at Alpha/Default Settings
Effects/3D Effects/Drop Shadow
Objects/Align/Horizontal Centre
Place at the top of the image (see my image for placement)
Change Size of Text Tool to 20
Again, with the Text Tool write:

From My House
to Yours...

Convert to Raster Layer
See my image for placement at bottom of image.
Effects/Plugins/MuRa's Seamless/Emboss at Alpha/Default Settings
Effects/3D Effects/Drop Shadow
Layers/New Raster Layer
Add your Watermark
Layers/Merge All Flatten
Image/Resize/800 pixels wide - height will adjust itself
File/Export/JPEG Optimiser/Compression Value 20

I hope you have enjoyed this tutorial
A big thank you to the ladies who test my Tutorials


tuttag


footer
DeniseD 2017
All Rights Reserved
Designed and Maintained by ESCAPING TO PSP GROUP