Tutorial 2017
This
tutorial is written by
Denise D. on 10th March, 2019
from
my own ideas.
Any
resemblance to other tutorials is
co-incidental and unintentional.
You
may share my tutorials with other
groups.
All I ask is that you advise me
and
credit for the tutorial is given to me and linked to
http://escapingtopsp2.altervista.org/Home/homeb.html
Please
do not upload any of my completed Tutorial images onto sites
such as Fotki, Pinterest, Photobucket or similar
STAINED
GLASS
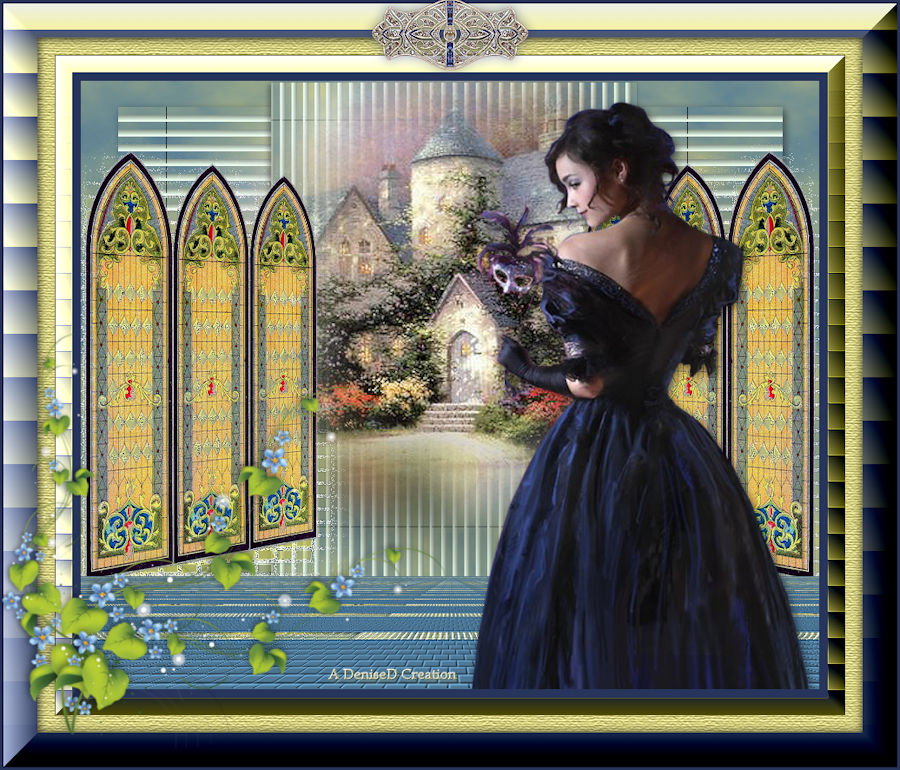
http://escapingtopsp2.altervista.org/StainedGlass/StainedGlass.html
Thank you Franie Margot for the French Translation of this Tutorial

Click on the Box to download Supplies

.gif) Click on Arrow to follow Tutorial
Click on Arrow to follow Tutorial
Supplies
Images:
Sorensen_Designs
Tube Sept 114-11.pspimage
You can join this Group at:
https://groups.yahoo.com/neo/groups/SorensenDesignsMistsandTubes/info
lizztish_country-estate3.pspimage
You can join this Group at:
https://groups.google.com/forum/?fromgroups#!forum/emotivemists
Vintage-Stained-Glass-Church-Window-GraphicsFairy-308x1024.png
border_trim2.png
Brooch439_dédé.png
Signature.png
This image was obtained from the Internet
If you are the owner of this
image, please contact me
so that credit can be given to
you
Texture:
large bricks.jpg
Plugins:
MuRa's
Meister
Alien
Skin Eye Candy 3.0
OR
Alien Skin Eye Candy 4000
&<Sandflower
Specials"v"> (Import into
Filters Unlimited
2.0)
Texture
Xero
Found here:
 AND AND

Notes:
This
Tutorial was created in Corel Paint Shop Pro 2019.... other
versions may need adjustment
Some of
the graphics may be from Free
to Use sites or Share
Groups.
If you are
the creator of one of these
please let me know
so that appropriate credit can be given.
No
infringement of
copyright is intended or intentional.
Before
opening PSP, download plugins
and install
Some
helpful information:
You can change the blend mode, opacity and drop shadow, as
well as colourise
the materials,
according to the tubes/colours you are using.
When applying the Resize with the All Layers option checked, this will
be
informed in the tutorial,
otherwise, apply the resize with this option unchecked.
Remember always to save your work.
Whenever you reduce an image, apply Adjust/Sharpness/Sharpen, to
maintain the
sharpness of the image.
Some tools or features have other names in earlier versions of the PSP.

Please
Note: Offset
settings provided in this tutorial may vary according to size of your
image.
Please
adjust to suit.
The
settings remain the same throughout this Tutorial unless otherwise
stated.
Set your
Foreground colour to #d4cf80
Set your
Background colour to #4d7795
Step One:
Open
graphics in PSP, duplicate (Shift
D) and close the original.
Place Texture in PSP
Texture Folder
File/New/New
Image 850 pixels x 600
pixels as follows:
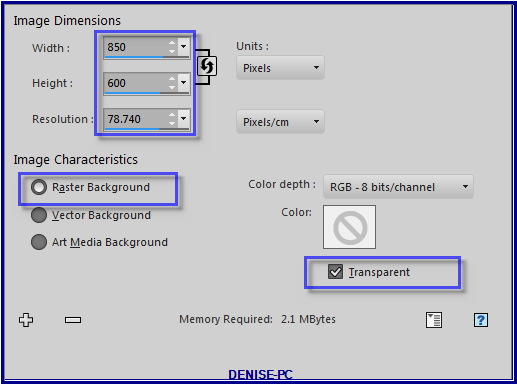
Change
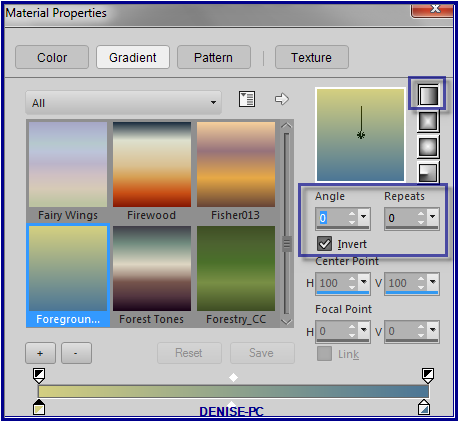
Foreground Colour to
Foreground/Background/Linear Gradient as follows:
Step Two:
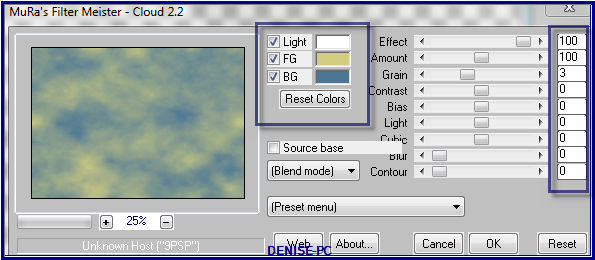
Effects/Plugins/MuRa's Meister/Cloud as follows:
Layers/Duplicate
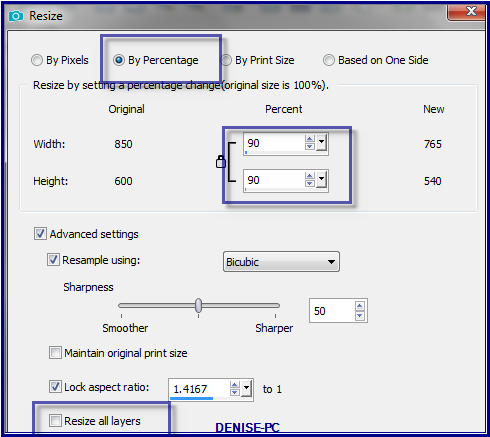
Image/Resize/90% as follows:
Step Three:
Selections/Select All
Selections/Float
Selections/Defloat
Effects/Filters
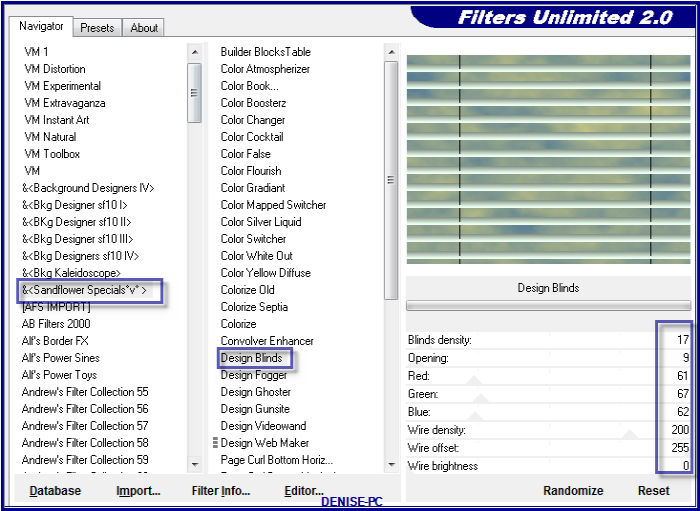
Unlimited 2.0/&<Sandflower Specials"v">/Design
Blinds as
follows:
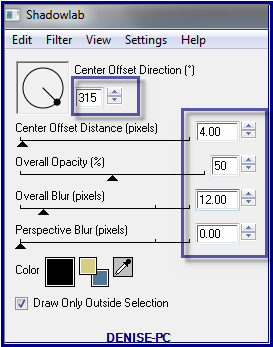
Effects/Plugins/Eye Candy 4000/Shadowlab as follows:
Step Four:
Layers/New Raster Layer
Maximise
lizztish_country-estate3.pspimage
Edit/Copy Edit/Paste into Selection
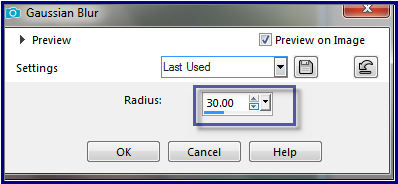
Adjust/Blur/Gaussian Blur as follows:
Selections/Select None
Layers/Merge/Merge Down
Layers/Duplicate
Image/Resize/78%
Adjust/Sharpness/Sharpen
Image/Free Rotate/90 Degrees/Right
Step Five
Maximise
Vintage-Stained-Glass-Church-Window-GraphicsFairy-308x1024.png
Edit/Copy Edit/Paste as New Layer
Image/ Resize/50%
Adjust/Sharpness/Sharpen
Effects/Image Effects/Offset as follows:
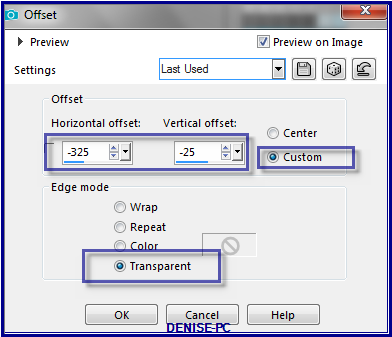
Layers/Duplicate
Effects/Image Effects/Offset as follows:
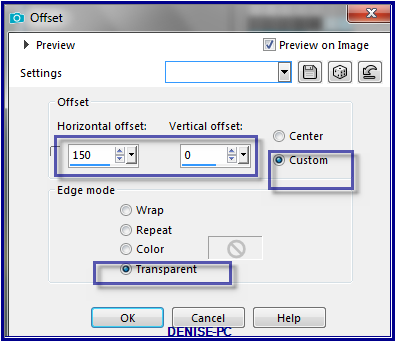
Layers/Duplicate
Effects/Image Effects/Offset (same as before)
Layers/Merge/Merge Down
Repeat Layers/Merge Down once
Effects/Geometric Effects/Perspective - Horizontal as follows:
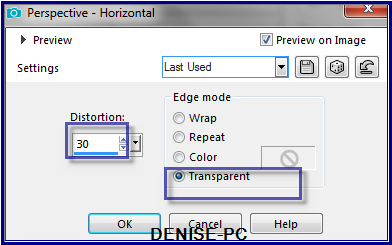
Step Six:
Pick Tool/Deform Tool with the following settings:

Using the right hand middle Node, move the right side of the image in
to 300 pixels as shown below:
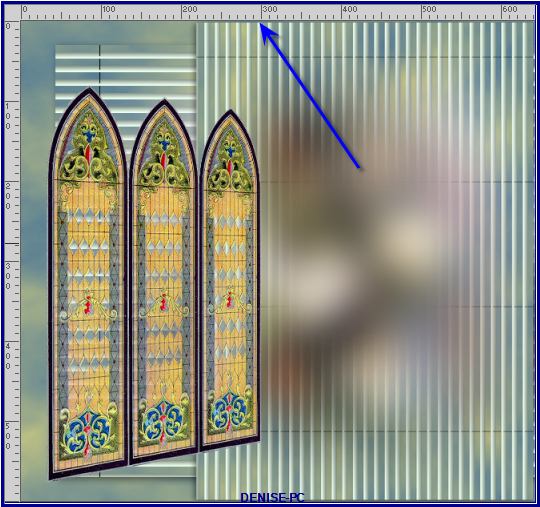
RESULT
Deselect
Pick/Deform Tool
Using the Move Tool, move the image slightly out to the left hand side
(see my image for placement)
Layers/Duplicate
Image/Mirror/Horizontal OR Image/Mirror
Layers/Merge/Merge Down
Step Seven:
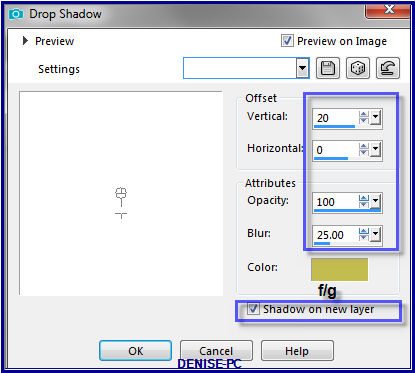
Effects/3D Effects/Drop Shadow as follows:
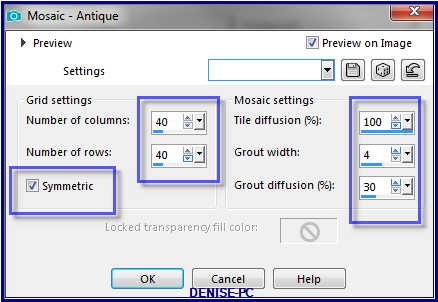
Effects/Texture Effects/Mosaic Antique as follows:
Effects/Edge Effects/Enhance More
Step Eight:
Maximise
lizztish_country-estate3.pspimage
Edit/Copy
Edit/Paste as New Layer
Image/Resize 140%
Adjust/Sharpness/Sharpen
Effects/Image Effects/Offset as follows:
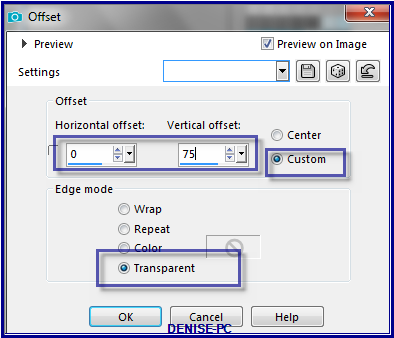
Step Nine:
Image/Add
Borders as follows:

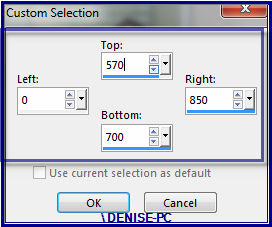
Selection Tool/Custom Selection Tool with the following settings:
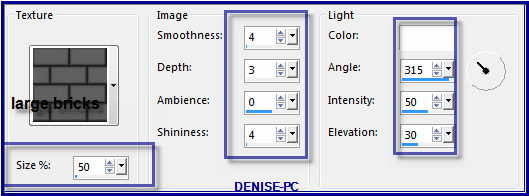
Effects/Texture Effects/Texture/large bricks.jpg as follows:
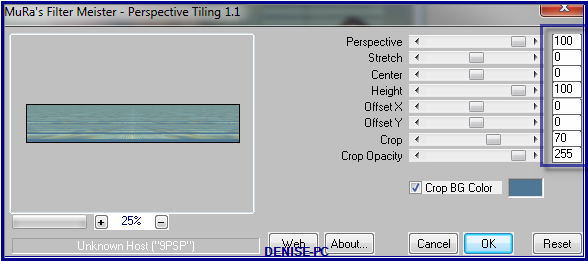
Effects/Plugins/MuRa's Meister/Perspective Tiling with the following
settings:
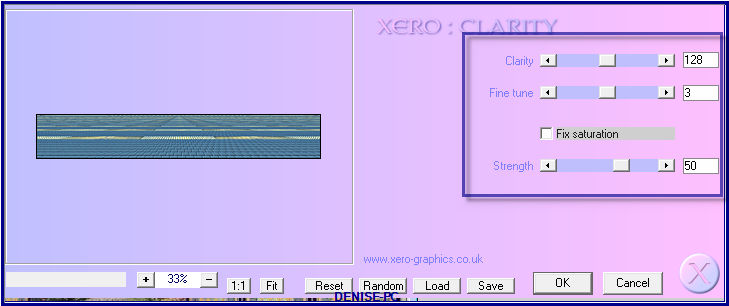
Effects/Plugins/Xero/Clarity as follows:
Selections/Select None
Step Ten:
Maximise Sorensen_Designs Tube Sept 114-11.pspimage
Edit/Copy Edit/Paste as New Layer
Image/Resize 90%
Adjust/Sharpness/Sharpen
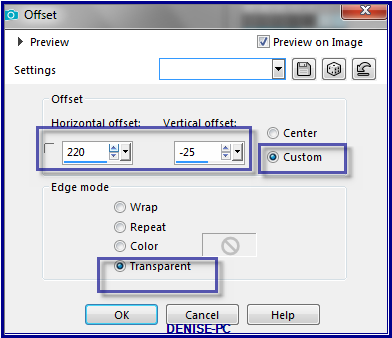
Effects/Image Effects/Offset as follows:
Effects/Plugins/Eye Candy 4000/Shadowlab/Direction 315
Step Eleven:
Change Background Colour to #27345b
Image/Add Borders/10 pixels/Background Colour (symmetric box ticked)
Image/Add Borders/20 pixels/White
Magic Wand with the following settings:

Select with Magic Wand
Flood Fill with Gradient
Effects/Texture Effects/Blinds as follows:
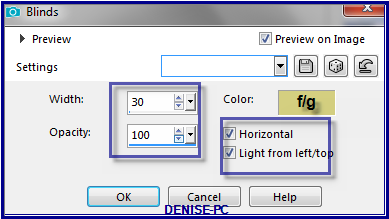
Effects/Edge Effects/Enhance
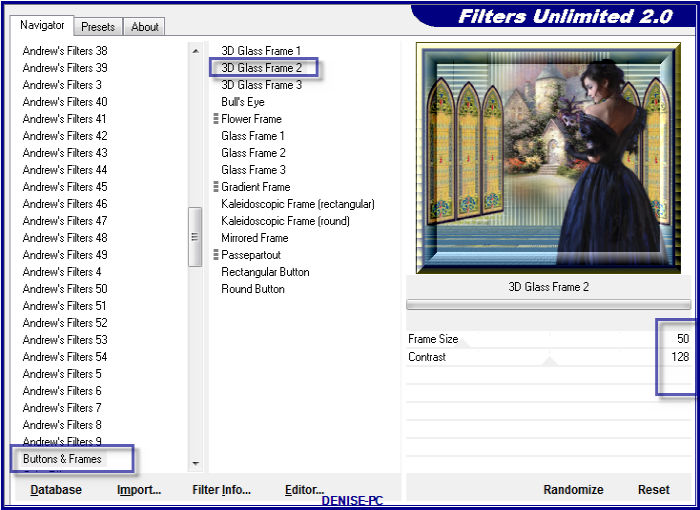
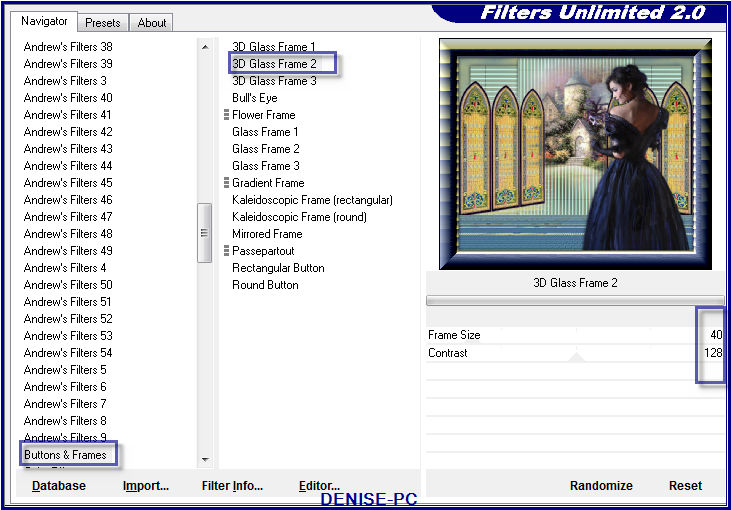
Effects/Plugins/Filters Unlimited 2.0/Buttons & Frames/3D Glass
Frame 2 as follows:
Selections/Select None
Step Twelve:
Image/Add Borders/20 pixels/ForegroundColour
Select
with Magic Wand
Effects/Plugins/Texture/Texturizer/Canvas as follows:
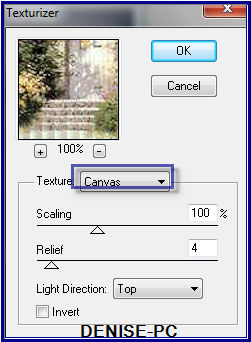 Selections/Select
None
Image/Add Borders/40 pixels/White
Select with Magic Wand
Flood fill with Foreground Gradient
Effects/Texture Effects/Blinds as follows:
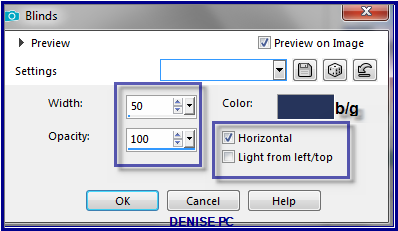
Effects/Plugins/Filters Unlimited 2.0/Buttons and Frames/3D Glass Frame
2 as follows:
Effects/Plugins/Eye
Candy 3.0/Drop Shadow
OR
Effects/Plugins/Eye Candy 4000/Shadowlab
Repeat Drop Shadow/Shadowlab Direction 135
Selections/Select None
Image/Add Borders/3
pixels/Background Colour
Step
Thirteen:
Maximise
border_trim2.pspimage
Edit/Copy
Edit/Paste as New Layer
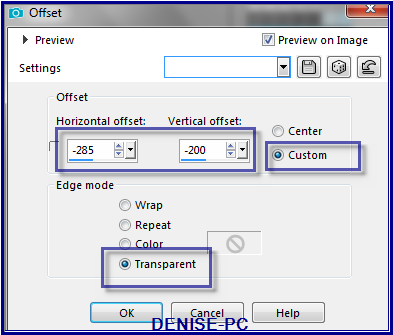
Effects/Image
Effects/Offset as follows:
Effects/Plugins/Eye
Candy 3.0/Drop Shadow
OR
Effects/Plugins/Eye Candy 4000/Shadowlab
Layers/Duplicate
Image/Resize/90%
Adjust/Sharpness/Sharpen
Image/Free Rotate/Right
25 degrees
Move down towards the
bottom of the Layer
See my image for
placement
Layers/Duplicate
Image/Resize/75%
Image/Free Rotate 65
Degrees/Left
Move to the left side of
the Layer
see my image for
placement
Layers/Merge/Merge Down
Repeat once
Step Fourteen:
Maximise Brooch439_dédé.png
Edit/Copy Edit/Paste as New Layer
Image/Resize/40%
Adjust/Sharpness/Sharpen
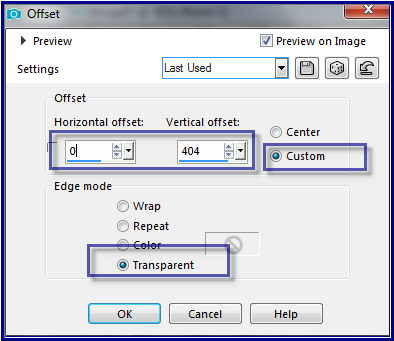
Effects/Image Effects/Offset as follows:
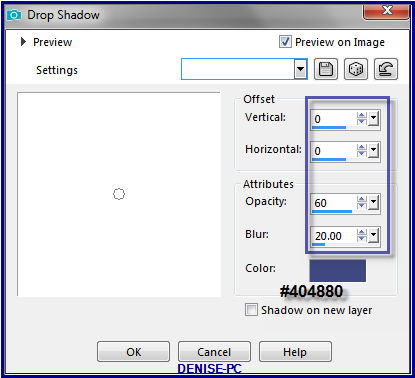
Effects/3D Effects/Drop Shadow as follows:
Maximise Signature.png
Edit/Copy Edit/Paste as New Layer
Place at bottom of Layer
Layers/New Raster Layer
Add
your Watermark
Layers/Merge
All Flatten
Image/Resize/900
pixels wide - height will adjust itself
File/Export/JPEG
Optimiser/Compression Value 20
I
hope you have enjoyed
this tutorial
A
big thank you to the ladies who test my Tutorials
TESTERS'
RESULTS
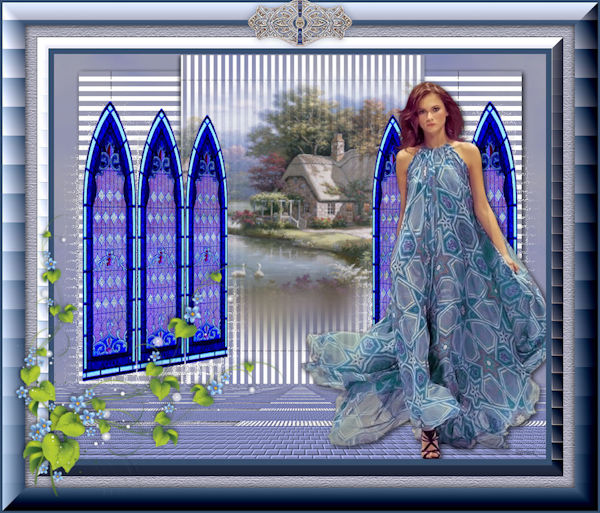
SHIRLEY NZ
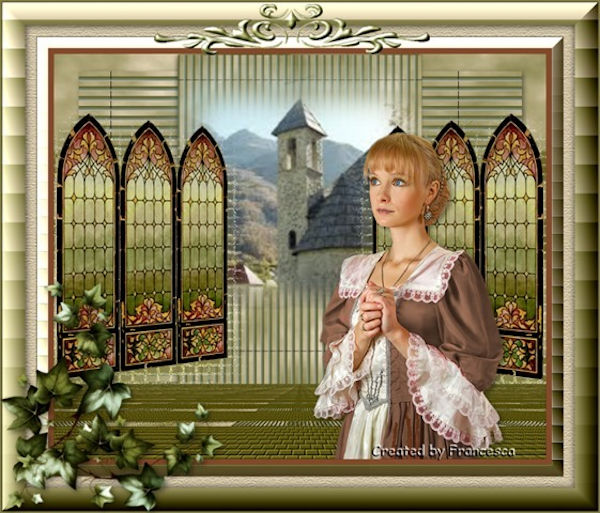
FRAN
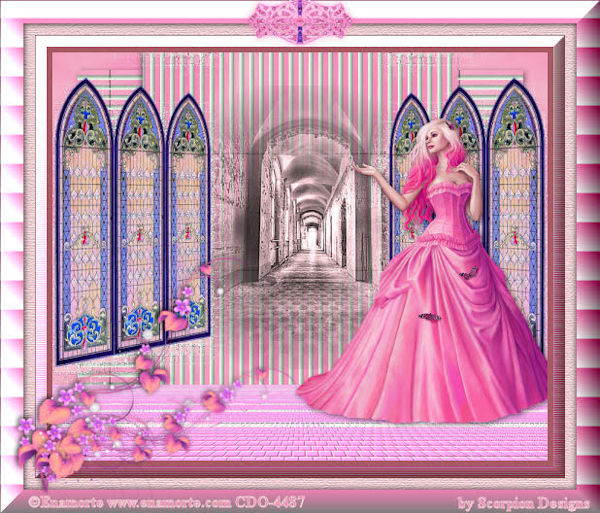
ANNIE
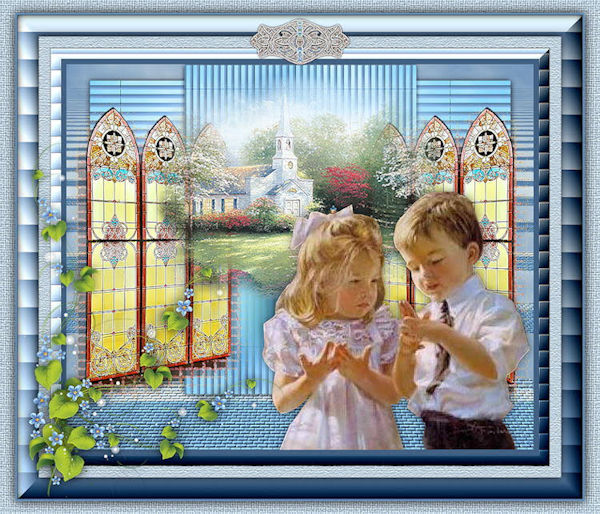
BETTY
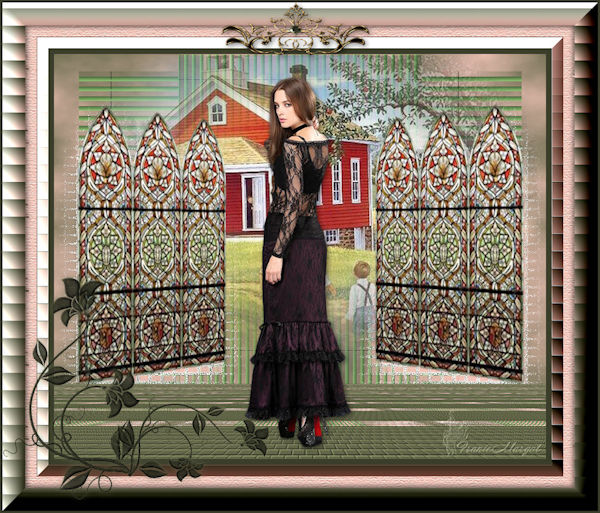
FRANIE MARGOT
FOR
OTHER VERSIONS OF THE TUTORIAL
PLEASE
GO TO:
HERE

| | | |