This
tutorial is written by
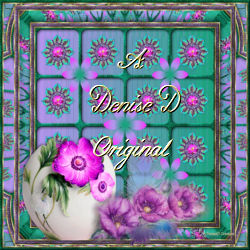
Denise D. on 9th March, 2018
from
my own ideas.
Any
resemblance to other tutorials is
co-incidental and unintentional.
You
may share my tutorials with other
groups.
All I ask is that you advise me
and
credit for the tutorial is given to me and linked to
http://escapingtopsp2.altervista.org/Home/homeb.html
Please
do not upload any of my completed Tutorial images onto sites
such as Fotki, Pinterest, Photobucket or similar
all
in a row
http://escapingtopsp2.altervista.org/AllInARow/AllInARow.html
Use this pencil to follow the steps
hold down left click to grab and move it


Click on the Box to download Supplies
To print click on Printer

Supplies
Images:
Still_Life_0078.pspimage
You can join this Group at:
https://groups.yahoo.com/neo/groups/Creative_for_fun/info
Element 20.png
You can join this Group at:
http://janaly.com/
DeniseD Signature.png
Mask:
Mask_4_Sao
20-20
Selections:
D.D.AllInARow
Plugins:
Alien Skin Eye Candy 3.0
OR
Alien Skin Eye Candy 4000
Texture
VM Toolbox
(Import into
Filters Unlimited 2.0)
DSB Flux
Found here:
http://www.saturnelladesign.fr/pages/filtres.htm
http://www.maidiregrafica.eu/paginafiltri/filtri.html
Notes:
This Tutorial was created in PSP
X9.... other
versions may need adjustment
Some of the graphics may be from Free
to Use sites or Share
Groups.
If you are the creator of one of these
please let me know
so that appropriate credit can be given.
No infringement of
copyright is intended or intentional.
Some
helpful information:
You can change the blend mode, opacity and drop shadow, as
well as colourise
the materials,
according to the tubes/colours you are using.
When applying the Resize with the All Layers option checked, this will
be
informed in the tutorial,
otherwise, apply the resize with this option unchecked.
Remember always to save your work.
Whenever you reduce an image, apply Adjust/Sharpness/Sharpen, to
maintain the
sharpness of the image.

Before opening PSP, download plugins
and install
Please
Note: Offset
settings provided in this tutorial may vary according to size of your
image.
Please
adjust to suit.
The
settings remain the same throughout this Tutorial unless otherwise
stated.
Set your Foreground colour to #17a37c
Set your Background colour to #b595ed
Step One:
Place Pattern in PSP Pattern Folder
Place Selection in PSP
Selection Folder
Install Preset
Install Plugins
Open graphics in PSP, duplicate (Shift
D) and close the original.
File/New/New Image 850 pixels x 850
pixels as follows:
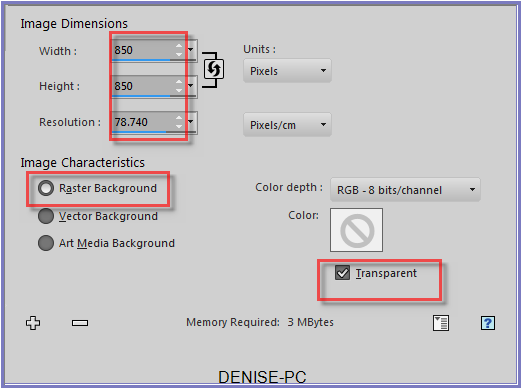
Change Foreground to Foreground/Background/Linear Gradient as follows:
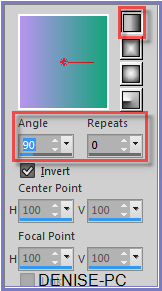
Flood fill with Gradient
Step Two:
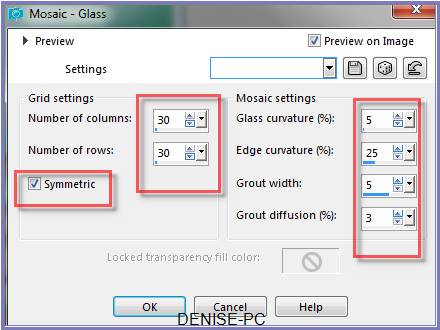
Effects/Texture Effects/Mosaic Glass as follows:
Selections/Select All
Selections/Modify/Contract 40 pixels
Effects/Edge Effects/Enhance
Effects/Artistic Effects/Enamel/Custom 6 OR as follows:
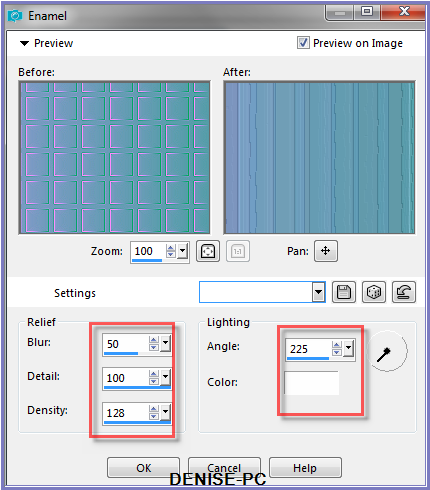
You could save this as a Preset if you don't already have it.
Adjust/Sharpness/Sharpen More
Selections/Select None
Step Three:
Maximise
3436-luzcristina.pspimage
Edit/Copy Edit/Paste as New Layer
Image/Resize/125% as follows:
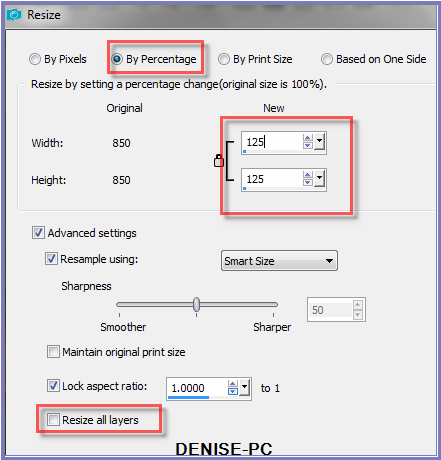
Adjust/Sharpness/Sharpen
Effects/Plugins/Eye Candy 3.0/Drop Shadow as follows:
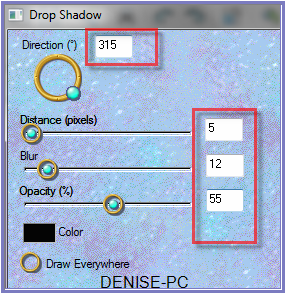
OR
Effects/Plugins/Eye Candy 4000/Shadowlab as follows:
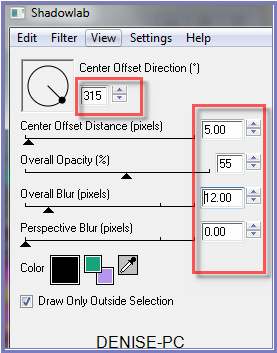
Step Four:
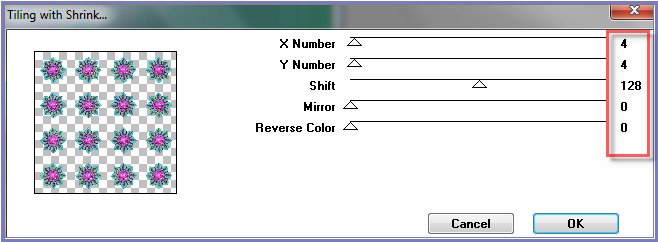
Effects/Plugins/MuRa's Seamless/Tiling with Shrink as follows:
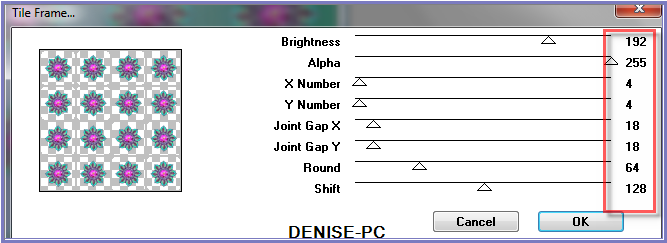
Effects/Plugins/MuRa's Seamless/Tile Frame as follows:
Step Five:
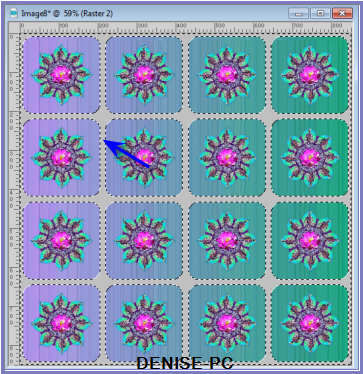
Magic Wand with the following settings:

Select frame as shown below:
Layers/New Raster Layer
Flood Fill with Gradient BUT change settings to Angle 45 Repeats 5
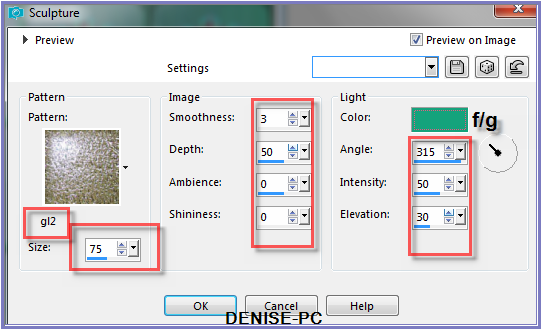
Effects/Texture Effects/Sculpture gl2 as follows:
Effects/3D Effects/Inner Bevel as follows:
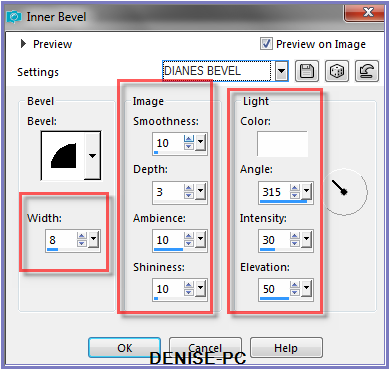
Effects/Plugins/Eye Candy 3.0/Drop Shadow
OR
Effects/Plugins/Eye Candy 4000/Shadowlab
Selections/Select None
Step Six:
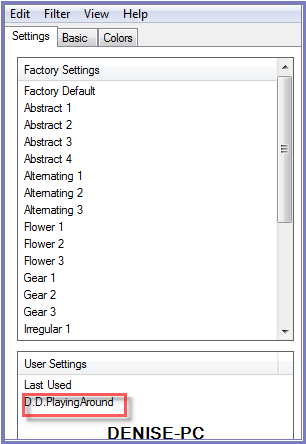
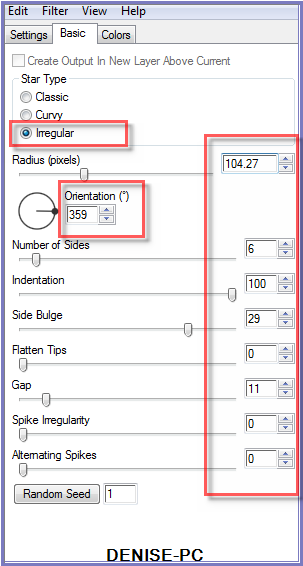
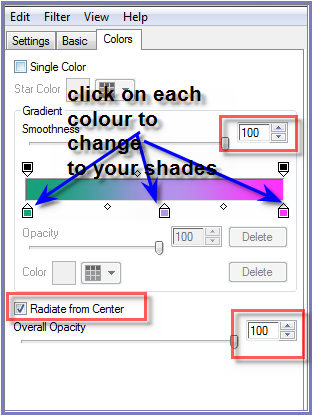
Effects/Plugins/Alien Skin Eye Candy 5/Impact/Super Star Preset
OR as follows:
Step Seven:
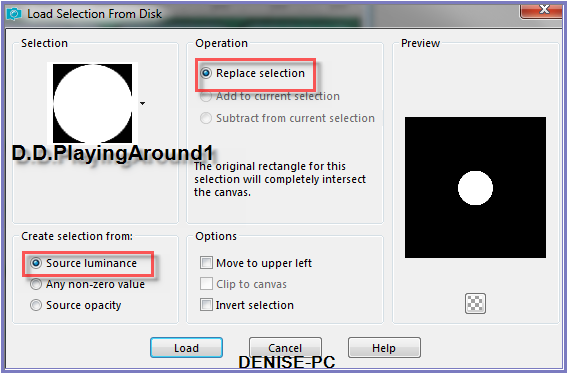
Selections/Load/Save Selection/Load Selection D.D.PlayingAround1 from
Disk as follows:
Edit/Copy
Selections/Select None
Edit/Paste as New Layer
Image/Resize/85%
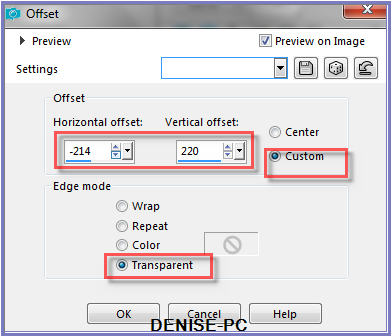
Effects/Image Effects/Offset as follows:
Effects/Plugins/Simple/Top Left Mirror
Layers/Merge/Merge Down
Step Eight:
Image/Add Borders/5 pixels White
Select with Magic Wand
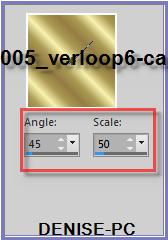
Change Background Colour to Pattern 005_verloop6-ca as follows:
Flood Fill with Pattern
Selections/Select None
Step Nine:
Image/Add
Borders/15 pixels/White
Select with Magic Wand
Flood Fill with Gradient
Effects/Texture Effects/Sculpture BUT change colour to Background Colour
Effects/3D Effects/Inner Bevel
Selections/Invert
Effects/Plugins/Eye Candy 3.0/Drop Shadow
OR
Effects/Plugins/Eye Candy 4000/Shadowlab
Repeat Drop Shadow/Shadowlab/Direction 135
Selections/Select None
Image/Add Borders/5 Pixels/White
Select with Magic Wand
Flood fill with Background Pattern
Selections/Select None
Step Ten:
Image/Add Borders/50 pixels/White
Select with Magic Wand
Flood Fill with Gradient
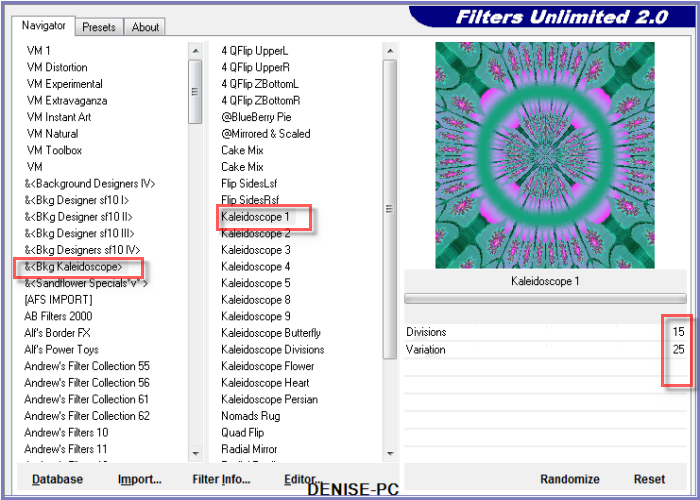
Effects/Plugins/Filters Unlimited 2.0./&<Bkg
Kaleidoscope>/Kaleidoscope1 as follows:
Adjust/Sharpness/Sharpen
Effects/3D Effects/Inner Bevel as follows:
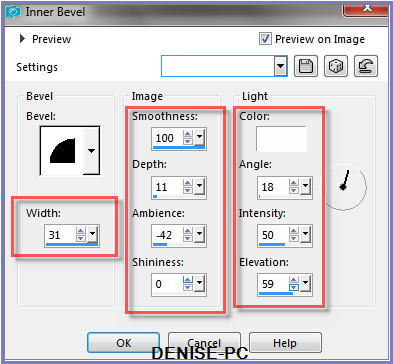
Selections/Invert
Effects/Plugins/Eye
Candy 3.0/Drop Shadow
OR
Effects/Plugins/Eye Candy 4000/Shadowlab
Repeat Drop Shadow/Shardowlab/Direction 315
Selections/Select None
Step Eleven:
Image/Add Borders/5 pixels/White
Select with Magic Wand
Flood Fill with Background Pattern
Selections/Select None
Image/Add
Borders/15 pixels/White
Select with Magic Wand
Flood Fill with Gradient
Effects/Texture Effects/Sculpture
Effects/3D Effects/Inner Bevel as follows:

Selections/Invert
Effects/Plugins/Eye
Candy 3.0/Drop Shadow
OR
Effects/Plugins/Eye Candy 4000/Shadowlab
Repeat Drop Shadow/Shardowlab/Direction 135
Selections/Select None
Step Twelve:
Image/Add Borders/5 Pixels/White
Select with Magic Wand
Flood Fill with Background Pattern
Selections/Select None
Maximise Mina@.4709 vaso.05.17.pspimage
Edit/Copy Edit/Paste as New Layer
Selections/Load/Save Selection/Load Selection D.D.PlayingAround from
Disk
Manual Color Correction Tool with the following settings:
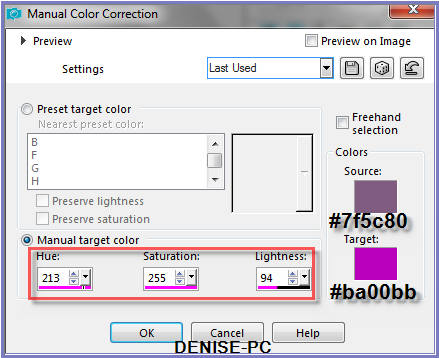
Selections/Select
None
Image/Resize/85%
Adjust/Sharpness/Sharpen
Effects/Image
Effects/Offset as follows
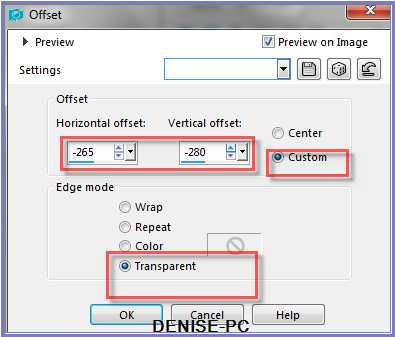
Effects/Plugins/Eye
Candy 3.0/Drop Shadow
OR
Effects/Plugins/Eye Candy 4000/Shadowlab
Step Thirteen:
Maximise lizztish_promise-of-christmas4.pspimage
Edit/Copy Edit/Paste as New Layer
Image/Free Rotate/25 degrees/Right
Effects/Image Effects/Offset as follows;
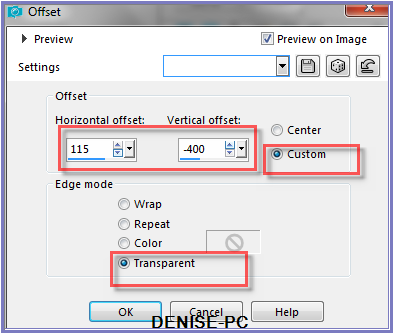
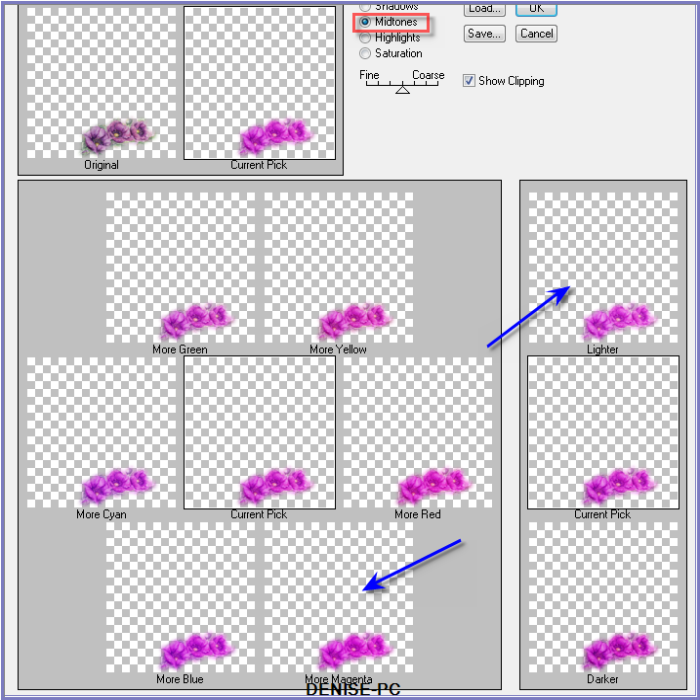
Effects/Plugins/Adjust/More Magenta/Lighter as follows;
Step Fourteen:
Maximise Zona-Feather21-11-17.pspimage
Edit/Copy Edit/Paste as New Layer
Image/Free
Rotate/25 degrees/Right
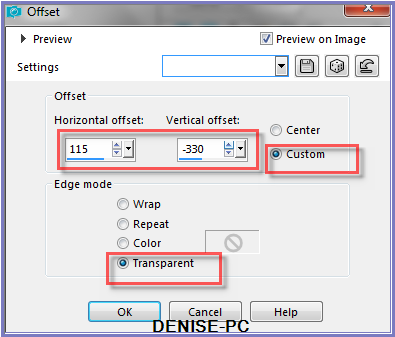
Effects/Image Effects/Offset as follows
Layers/Arrange/Move Down
Effects/Plugins/Adjust/More Magenta/Darker
Select Top Layer
Layers/Merge/Merge Down
Effects/Plugins/Eye
Candy 3.0/Drop Shadow
OR
Effects/Plugins/Eye Candy 4000/Shadowlab
Step
Fifteen:
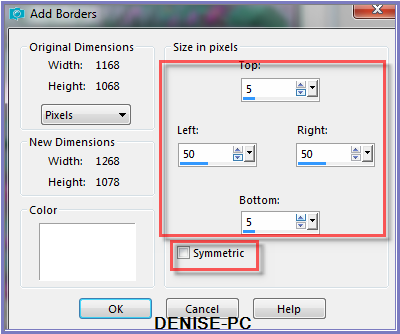
Image/Add Borders as follows:
Select with Magic Wand
Flood Fill with Gradient
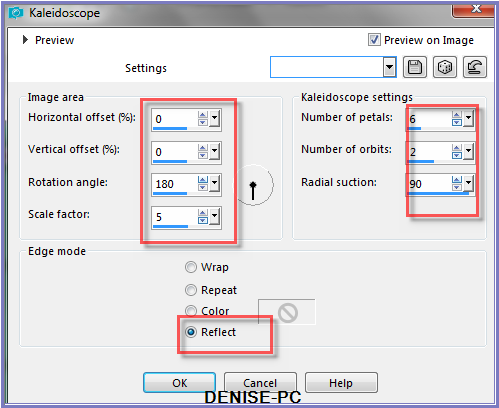
Effects/Reflection Effects/Kaleidoscope as follows:
Effects/Edge Effects/Enhance
Selections/Select None
Image/Add Borders/5 pixels/White (Symmetric Box Ticked)
Select with Magic Wand
Flood Fill with Background Pattern
Image/Add Borders/10 Foreground Colour
Select with Magic Wand
Effects/Texture Effects/Sculpture BUT change colour to Foreground Colour
Effects/3D Effects/Inner Bevel
Effects/Plugins/Eye
Candy 3.0/Drop Shadow
OR
Effects/Plugins/Eye Candy 4000/Shadowlab
Repeat Drop Shadow/Shadowlab/Direction 315
Selections/Select
None
Maximise DeniseD Signature.png
Edit/Copy Edit/Paste as New Layer
Place at bottom of Layer
Layers/New Raster Layer
Add
your Watermark
Layers/Merge
All Flatten
Image/Resize/900
pixels wide - height will adjust itself
File/Export/JPEG
Optimiser/Compression Value 20
I hope you have enjoyed
this tutorial
A
big thank you to the ladies who test my Tutorials
TESTERS'
RESULTS
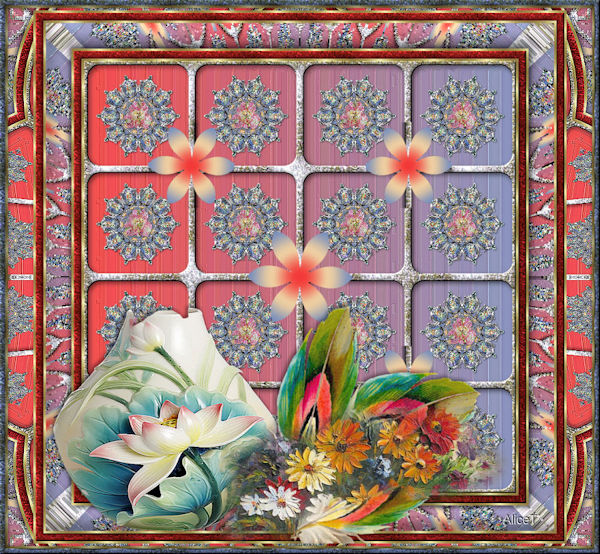
ALICE T.
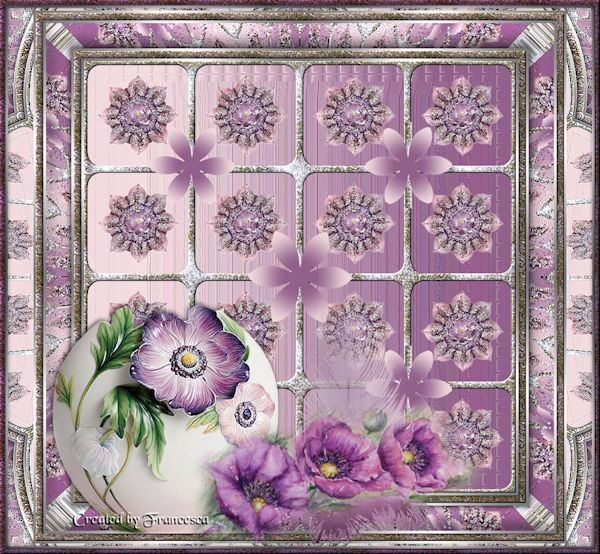
FRAN
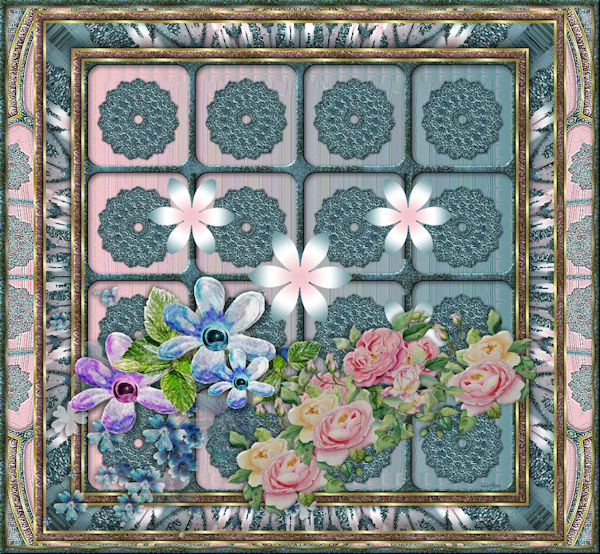
SHIRLEY NZ
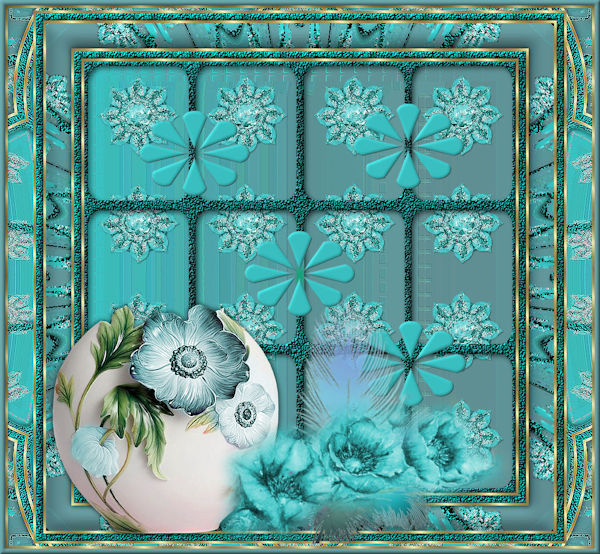
ELIZABETH
|