TEMPLATE 2015
This tutorial is written by
Denise D. on 15th February 2016
from my own ideas.
Any
resemblance to other tutorials is co-incidental and unintentional.
You
may share my tutorials with other groups. All I ask is that
you advise me
and
credit for the tutorial is given to me and linked to
http://escapingtopsp2.altervista.org/Home/homeb.html
Please do not upload any of
my completed Tutorial images onto sites such as
Fotki, Pinterest, Photobucket
or similar
mother's
day 2016

Click on Box to download
Supplies
Supplies
Images:
bouquet anniversaire-milas
marquis.pspimage
You can join this group at:
http://www.monpetitjardin-moi.fr.nf/
JHanna_803 background.jpg
You can join this group at:
http://groups.yahoo.com/group/JHanna_Tubes
Mira_MLC_NLambert_les_triples_et_leur_maman_cherie_01.pspimage
Mira_fetedesmeres2007_01.pspimage
You can join this group at:
https://fr.groups.yahoo.com/neo/groups/Leelooandco/info
DENISE
D Signature.png
Pattern:
ABgold2.jpg
Plugins:
MuRa's Meister
Splat (download from https://app.box.com/s/q3cvh7m3ih54392qk61l0nzkk8ql0pnq)
This
Plugin is sometimes called Alien Skin 5.0/Splat and might appear in the
menu under this name
Simple
Alien Skin Eye Candy 5/Textures
Eye Candy 3.0
MuRa's Seamless
Found here:
http://www.violettegraphic.com/02filtres/Filtres.htm
http://janaly.com/Filtres/Filtre.html
http://www.saturnelladesign.fr/pages/filtres.htm
Notes:
This Tutorial was created in PSP
X7.... other
versions may need adjustment
Some of the graphics may be from Free
to Use sites or Share
Groups.
If you are the creator of one of these
please let me know
so that appropriate credit can be given.
No infringement of
copyright is intended or intentional.
Some
helpful information:
You can change the blend mode, opacity and drop shadow, as
well as colourise
the materials,
according to the tubes/colours you are using.
When applying the Resize with the All Layers option checked, this will
be
informed in the tutorial,
otherwise, apply the resize with this option unchecked.
Remember always to save your work.
Whenever you reduce an image, apply Adjust/Sharpness/Sharpen, to
maintain the
sharpness of the image.
Some tools or features have other names in earlier versions of the PSP.

Before opening PSP, download plugins
and install
Place Pattern in PSP Pattern Folder
Open graphics in PSP, duplicate (Shift
D) and close the original.
Please
Note: Offset
settings provided in this tutorial may vary according to size of your
image.
Please
adjust to suit.
The
settings remain the same throughout this Tutorial unless otherwise
stated.
Set your Foreground colour to #f8f8ea
Set your Background colour to #9c90d0
Step One:
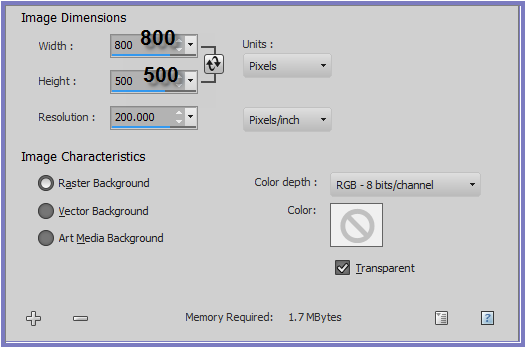
File/New/New Image 800 pixels x 500
pixels as follows:
 Step Two:
Maximise bouquet anniversaire-milas
marquis
Edit/Copy
Edit/Paste as New Layer
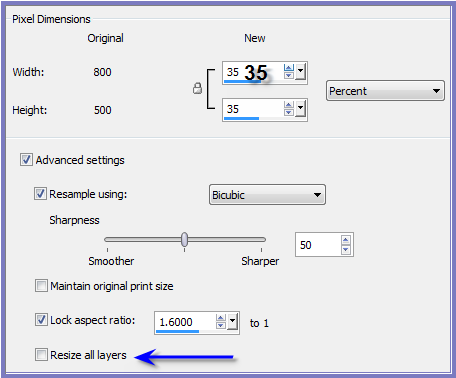
Image/Resize/35% as follows;
 Adjust/Sharpness/Sharpen
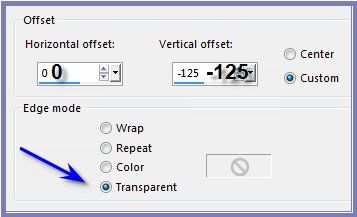
Effects/Image Effects/Offset as
follows:
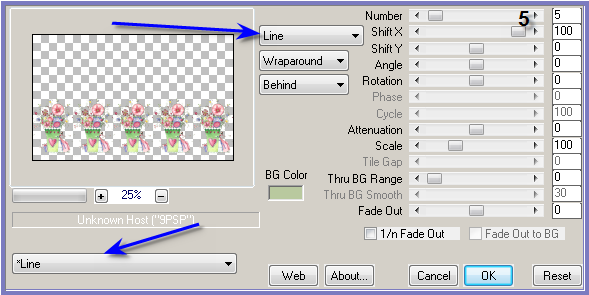
 Effects/Plugins/MuRa's Meister/Copies
as follows:
 Effects/Plugins/Eye Candy 3.0/Drop
Shadow as follows:
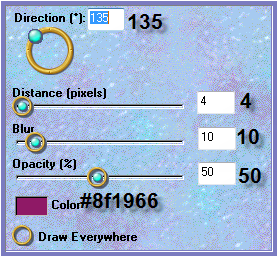 Step Three:
Select Raster 1
Selections/Select All
Maximise JHanna_803 background
Edit/Copy
Edit/Paste into Selection
Selection/Select None
Effects/Plugins/Simple/Centre Tile
Effects/Edge Effects/Enhance More
Effects/Plugins/Splat/Edges as follows:
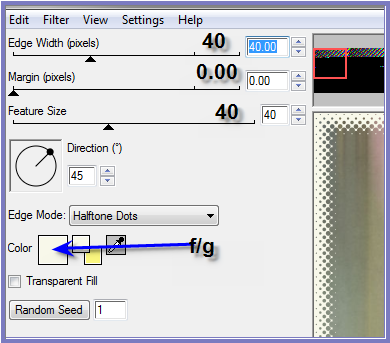 Step Four:
Selection Tool/Custom Selection with
the following settings:

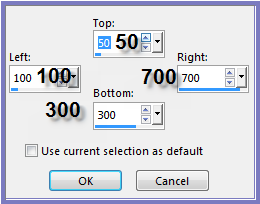 Effects/Plugins/Simple/Zoom Out and
Flip
Adjust/Sharpness/Sharpen
Effects/Plugins/Splat/Edges
Selections/Select None
Step Five:
Maximise
Mira_MLC_NLambert_les_triples_et_leur_maman_cherie_01
Edit/Copy
Edit/Paste as New Layer
Image/Resize/30%
Adjust/Sharpness/Sharpen
Effects/Image Effects/Offset as
follows:
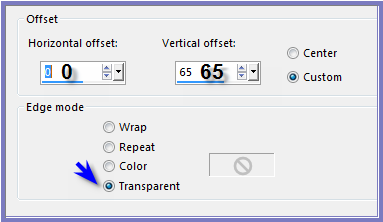 Effects/Plugins/Eye Candy 3.0/Drop
Shadow BUT change colour to Black
Step Six:
Image/Add Borders/3 pixels/Background
Colour
Image/Add Borders/3 pixels/White
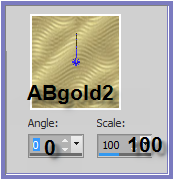
Change Foreground Colour to Pattern
ABgold2 as follows:
 Select Border with Magic Wand with the
following settings:
 Flood Fill with Pattern
Effects/Edge Effects/Enhance
Selections/Select None
Image/Add Borders/3 pixels/Background
Colour
Selections/Select All
Selections/Modify/Contract 9 pixels
Selections/Invert
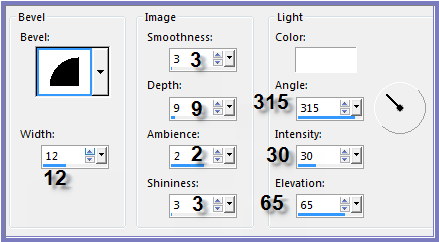
Effects/3D Effects/Inner Bevel as
follows:
 Selections/Select None
Step
Seven:
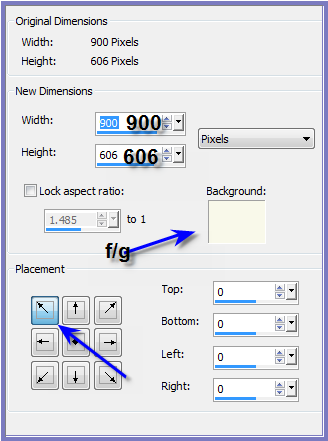
Image/Canvas Size as follows:
 Select border with Magic Wand
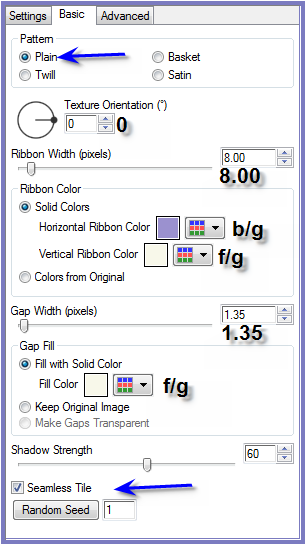
Effects/Plugins/Alien Skin Eye Candy
5.0/Textures/Weave as follows:
 Effects/Edge Effects/Enhance
Effects/3D Effects/Inner Bevel
Selections/Select None
Step Seven:
Custom Selection Tool with the
following settings:
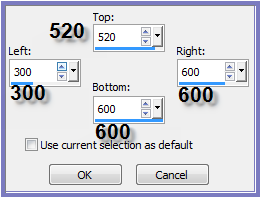 Layers/New Raster Layer
Flood Fill with Background Colour
Effects/Plugins/Splat!/Edges
Layers/New Raster Layer
Maximise Mira_fetedesmeres2007_01
Edit/Copy
Edit/Paste into Selection
Effects/Plugins/MuRa's Seamless/Emboss
at Alpha/Default Settings
Selections/Select None
Layers/Merge/Merge Down
Step Eight:
Maximise bouquet anniversaire-milas
marquis
Edit/Copy
Edit/Paste as New Layer
Image/Resize/15%
Adjust/Sharpness/Sharpen
Effects/Image Effects/Offset as
follows:
Layers/New Raster Layer
Flood Fill with Background Colour
Effects/Plugins/Splat!/Edges
Layers/New Raster Layer
Maximise Mira_fetedesmeres2007_01
Edit/Copy
Edit/Paste into Selection
Effects/Plugins/MuRa's Seamless/Emboss
at Alpha/Default Settings
Selections/Select None
Layers/Merge/Merge Down
Step Eight:
Maximise bouquet anniversaire-milas
marquis
Edit/Copy
Edit/Paste as New Layer
Image/Resize/15%
Adjust/Sharpness/Sharpen
Effects/Image Effects/Offset as
follows:
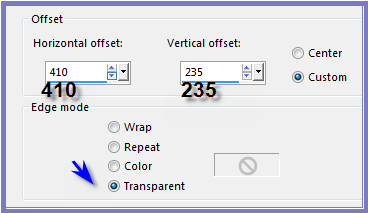 Effects/Plugins/MuRa's Seamless/Emboss
at Alpha/Default Settings
Effects/Plugins/Eye Candy 3.0/Glow
with the following settings:
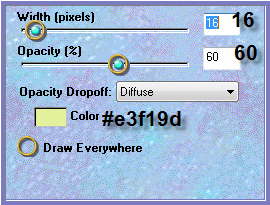 Layers/Duplicate
Effects/Image Effects/Offset as
follows:
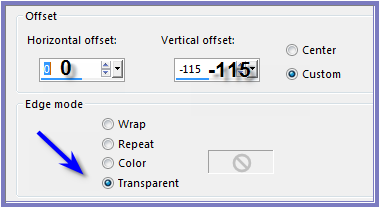 Repeat Layers/Duplicate -
Effects/Image Effects/Offset three more times so that you
have 5 images.
Close Off Background and Raster 1
Layers/Merge/Merge Visible
Open Background and Raster 1
Step Nine:
Image/Add Borders/1 pixels/Background
Colour
Image/Add Borders/3 pixels/White
Select with Magic Wand (it is easier
to pick it from the top right hand corner)
Flood Fill with Pattern
Effects/Edge Effects/Enhance
Selections/Select None
Image/Add Borders/25 pixels/Background
Colour
Select with Magic Wand
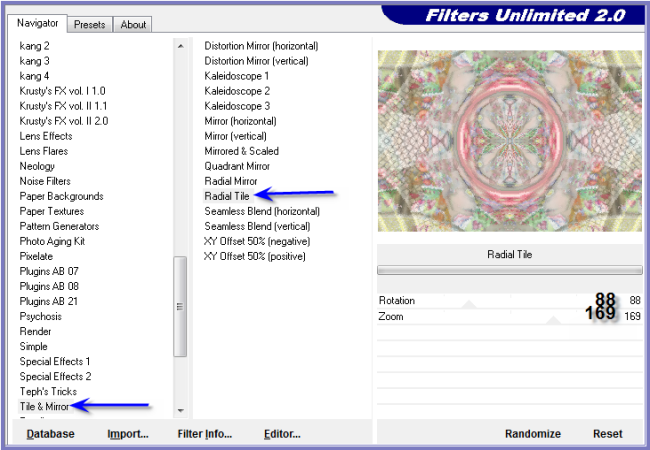
Effects/Plugins/Filters Unlimited
2.0/Tile and Mirror/Radial Tile as follows:
 Adjust/Sharpness/Sharpen
Effects/3D Effects/Inner Bevel
Effects/Plugins/Eye Candy 3.0/Drop
Shadow
Repeat Drop Shadow/Direction 315
Selections/Select None
Image/Add Borders/5 pixels/White
Select with Magic Wand
Flood Fill with Pattern
Effects/Edge Effects/Enhance
Selections/Select None
Step Ten:
Image/Add Borders/30 pixels/Foreground
Colour
Select with Magic Wand
Effects/Plugins/Filters Unlimited
2.0/Tile and Mirror/Radial Tile
Effects/Plugins/Eye Candy 3.0/Drop
Shadow
Repeat Drop Shadow/Direction 135
Selections/Select None
Image/Add Borders/5 pixels/Background
Colour
Select with Magic Wand
Effects/3D Effects/Inner Bevel
Effects/Plugins/Eye Candy 3.0/Drop
Shadow
Repeat Drop Shadow/Direction 135
Selections/Select None
Step
Eleven:
Maximise
DENISE D Signature.png
Edit/Copy
Edit/Paste as New Layer
Place at bottom of Layer
Layers/New
Raster Layer
Add
your Watermark
Layers/Merge
All Flatten
Image/Resize/850
pixels wide - height will adjust itself
File/Export/JPEG
Optimiser/Compression Value 20
| | | |