Tutorial 2017
This
tutorial is written by
Denise D. on 26th January, 2019
from
my own ideas.
Any
resemblance to other tutorials is
co-incidental and unintentional.
You
may share my tutorials with other
groups.
All I ask is that you advise me
and
credit for the tutorial is given to me and linked to
http://escapingtopsp2.altervista.org/Home/homeb.html
Please
do not upload any of my completed Tutorial images onto sites
such as Fotki, Pinterest, Photobucket or similar
memories
of CHILDHOOD 2
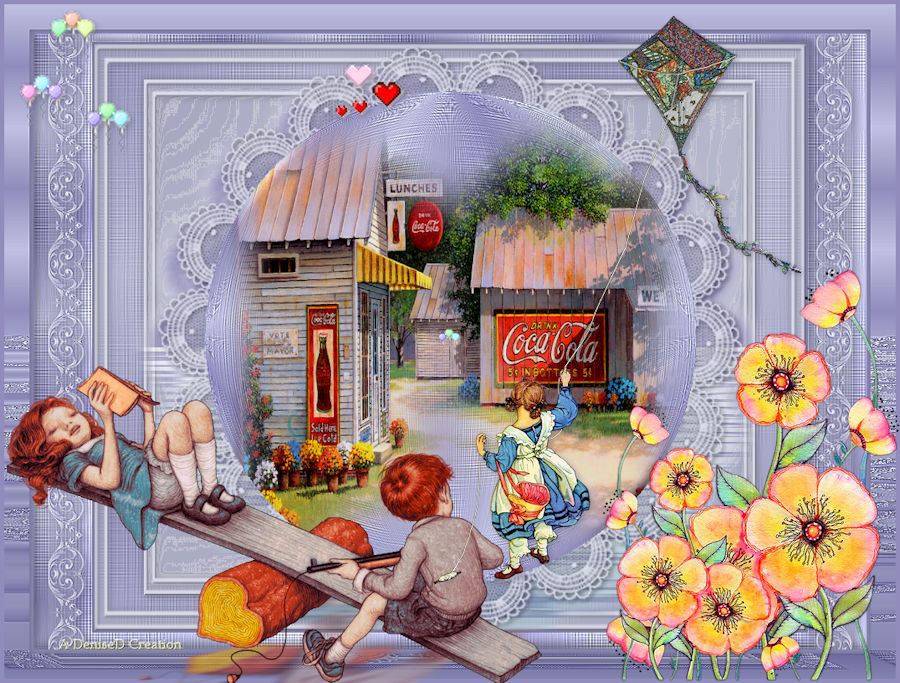
http://escapingtopsp2.altervista.org/MemoriesOfChildhood2/MemoriesOfChildhood.html
Thank you Franie Margot for the French Translation:

Click on the Box to download Supplies

Supplies
Images:
Fantasy Flowers_LR-5-26-18.png
You can join this Group here:
psp-4-fun-resources-subscribe@yahoogroups.com
Vintage Little Girl Flying Kite C M Burd by Donna.psp
You can join this Group here:
https://groups.yahoo.com/neo/groups/TubesandMistsbyDonna/info
lizztish_hb-3rdOct.5.pspimage
You can join this Group here:
https://groups.google.com/forum/?fromgroups#!forum/emotivemists
adb@whjharrison_coke2002june.png
CAL-2844-071318-Exclusive.png
Antique
lace.png
Opaque Frame.png
lace_trim2.png
These image was obtained from the Internet
If you are the owner of this
image, please contact me
so that credit can be given to
you
Signature.png
Selections:
D.D.MemoriesOfChildhood
Presets:
Preset_Texture_Gravel
Preset_Rotating Mirror_D.D.Repeat
Preset_Page Curl_Big curl lower left
Preset_InnerBevel_BlockFrame.PspScript
Preset_Contours_Busy
white.PspScript
Preset_InnerBevel_preset
flowers inner bevel.PspScript
Plugins:
Alien Skin Eye Candy 3.0
OR
Alien Skin Eye Candy 4000
Alien Skin Eye Candy 5/Impact
Filters
Unlimited/2.0/VM Natural
Simple
Preset
D.D.MemoriesOfChildhoodPreset.fls
Double
Click on the  icon
in your supplies folder to install this Preset in your Plugin.
Found here:
 AND AND 
Notes:
This
Tutorial was created in PSP
X9.... other
versions may need adjustment
Some of
the graphics may be from Free
to Use sites or Share
Groups.
If you are
the creator of one of these
please let me know
so that appropriate credit can be given.
No
infringement of
copyright is intended or intentional.
Before
opening PSP, download plugins
and install
Some
helpful information:
You can change the blend mode, opacity and drop shadow, as
well as colourise
the materials,
according to the tubes/colours you are using.
When applying the Resize with the All Layers option checked, this will
be
informed in the tutorial,
otherwise, apply the resize with this option unchecked.
Remember always to save your work.
Whenever you reduce an image, apply Adjust/Sharpness/Sharpen, to
maintain the
sharpness of the image.
Some tools or features have other names in earlier versions of the PSP.

Please
Note: Offset
settings provided in this tutorial may vary according to size of your
image.
Please
adjust to suit.
The
settings remain the same throughout this Tutorial unless otherwise
stated.
Set your
Foreground colour to #918cbc
Set your
Background colour to #bec1e0
Step One:
Place
Selection in PSP Selection Folder
Place Presets contained in Presets Folder in your PSP Presets Folder
Install Preset D.D.MemoriesOfChildhoodPreset
Open graphics in PSP, duplicate (Shift
D) and close the original.
File/New/New
Image 850 pixels x 700
pixels as follows:
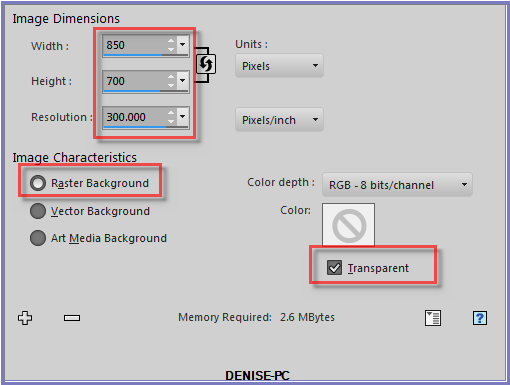
Change
Foreground Colour to
Foreground/Background/Radial Gradient as follows:
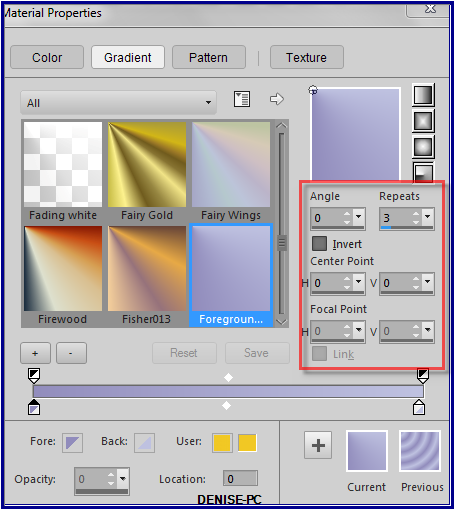
Flood Fill with Gradient
Step Two:
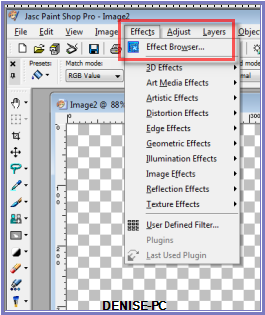
We are going to use the Effects/Browser in this tutorial.
It is a helpful tool to see what the presets in certain Tools will do
to the layer you are working on.
Some Presets may not be included in your version of PSP but I have
included them
in the Materials Folder for you to install into your Presets Folder if
you don't already have them.
Effects/Effects Browser as follows:
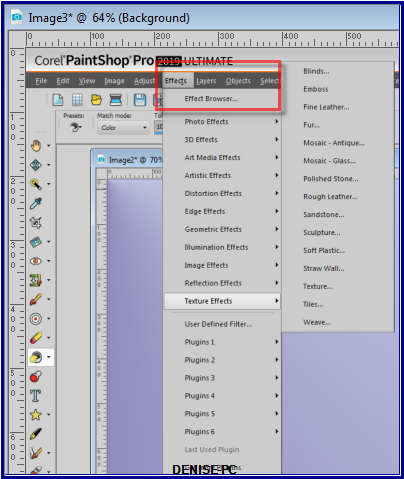 
PSP
X9
PSP 9
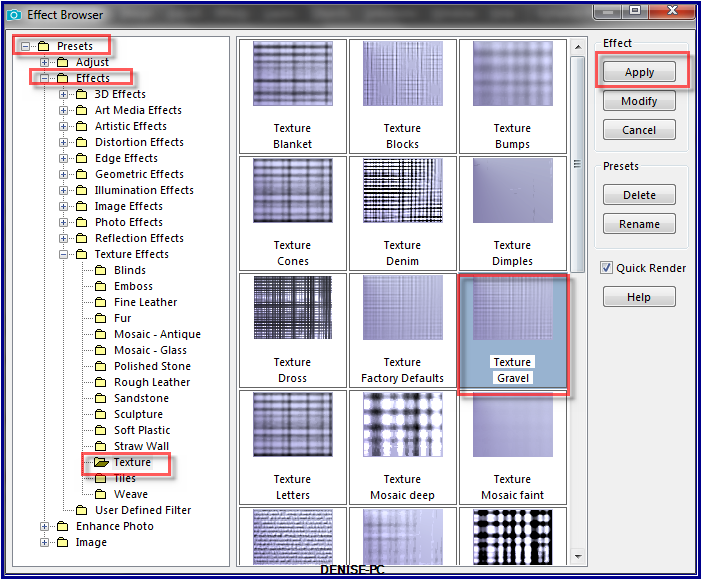
Select Effects/Effects Browser/Texture/Texture Gravel as follows:
Adjust/Sharpness/Sharpen More
Step Three:
Layers/Duplicate
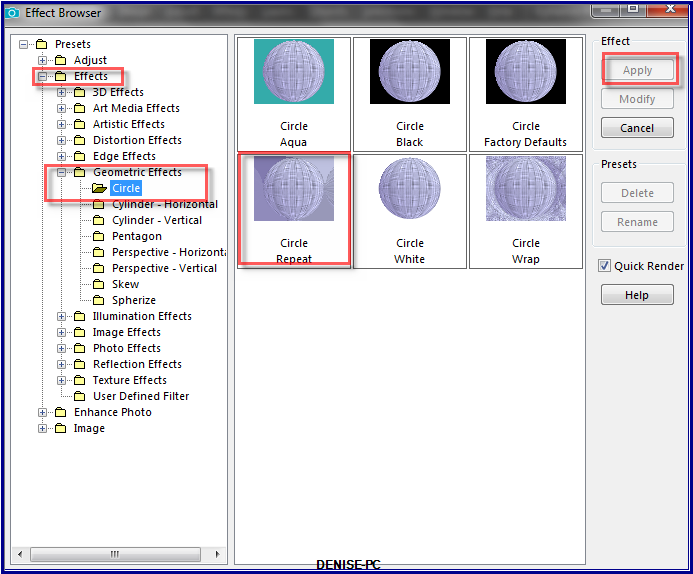
Effects/Effects Browser/Geometric Effects/Circle/Circle Repeat as
follows:
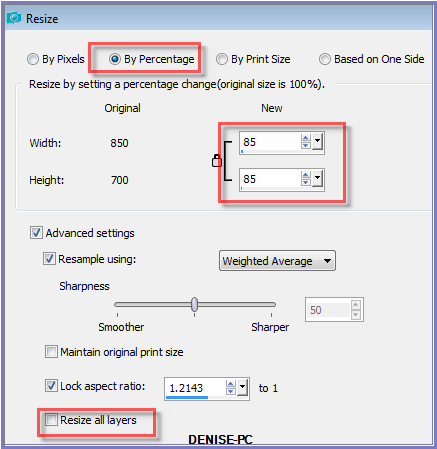
Image/Resize/85% as follows:
 Adjust/Sharpness/Sharpen
More
Step Four:
Selections/Load/Save Selection/Load Selection D.D.MemoriesOfChildhood
from Disk as follows:
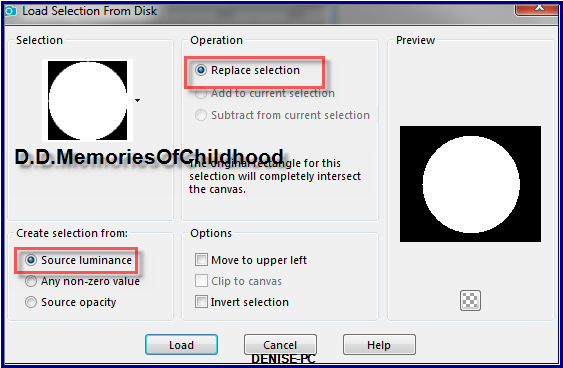
Promote Selection to Layer
Layers/New Raster Layer
Maximise adb@whjharrison_coke2002june.png
Edit/Copy Edit/Paste into Selection
Effects/Effects Browser/3D Effects/Inner Bevel/Inner Bevel Block Frame
as follows:
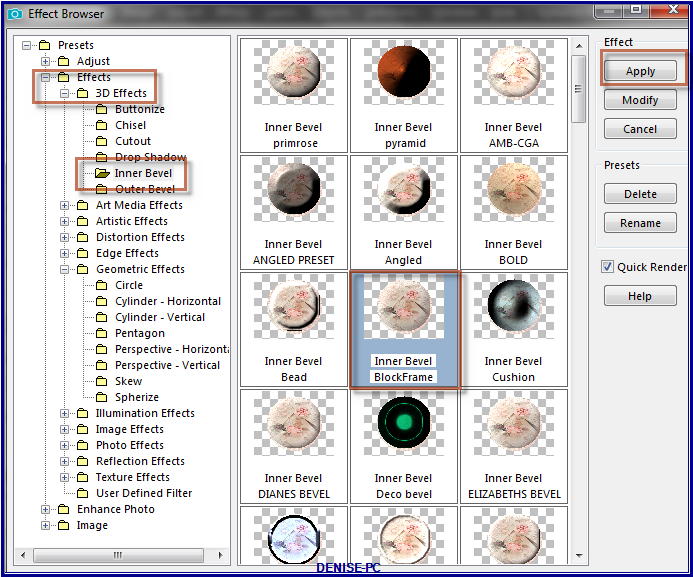
Repeat Inner Bevel Block Frame once
Step Five:
Selections/Invert
Select Copy of Raster 1 Layer
Edit/Clear
Selections/Invert
Effects/Plugins/Eye Candy 3.0/Drop Shadow as follows:
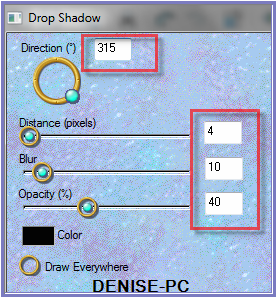
OR
Effects/Plugins/Eye Candy 4000/Shadowlab as follows:
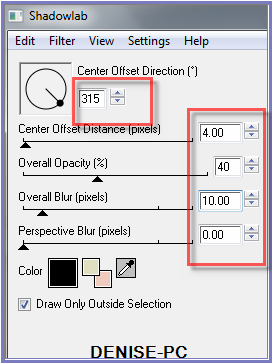
Repeat Drop Shadow/Shadowlab/Direction 135
Selections/Select None
Step Six:
Maximise
Antique Lace.png
Edit/Copy Edit/Paste as New Layer
Image/Resize 175%
Adjust/Sharpness/Sharpen
Manual Color CorrectionTool with the following settings:
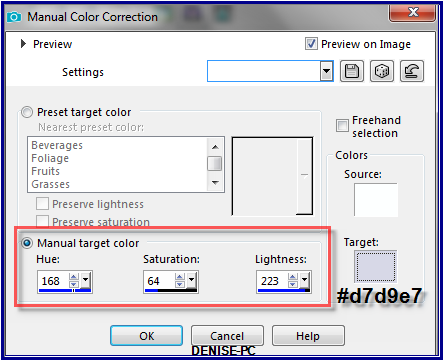
Instructions on how to install this Tool are available at:
https://app.box.com/s/a6jfqy0ycvuka532zvnjyoomz573uqd6
Effects/3D Effects/Drop Shadow as follows:
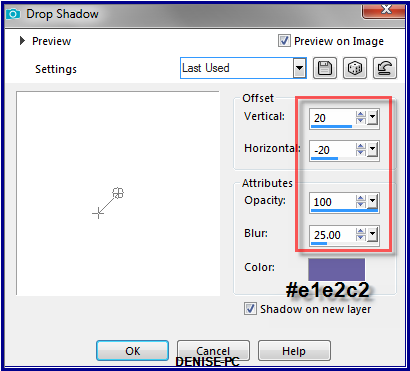
Still on the Raster 2 Shadow 1 Layer
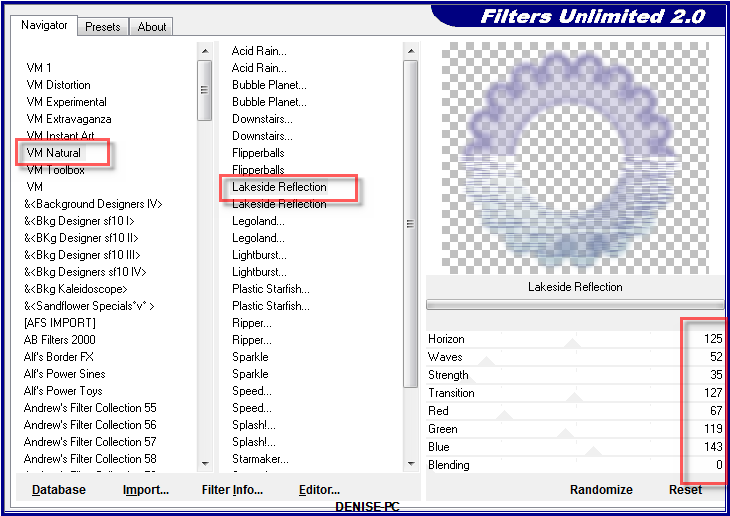
Effects/Plugins/Filters Unlimited 2.0/VM Natural/Lakeside Reflection as
follows:
Layers/Duplicate
Image/Mirror Horizontal OR Image/Mirror
Layers/Merge/Merge Down
Step Seven:
Select Raster 1
Layers/Duplicate
Image/Resize/85% as follows:

Effects/Effects/Effects
Browser/3D
Effects/Inner Bevel/Preset_InnerBevel_preset flowers inner bevel as
follows:
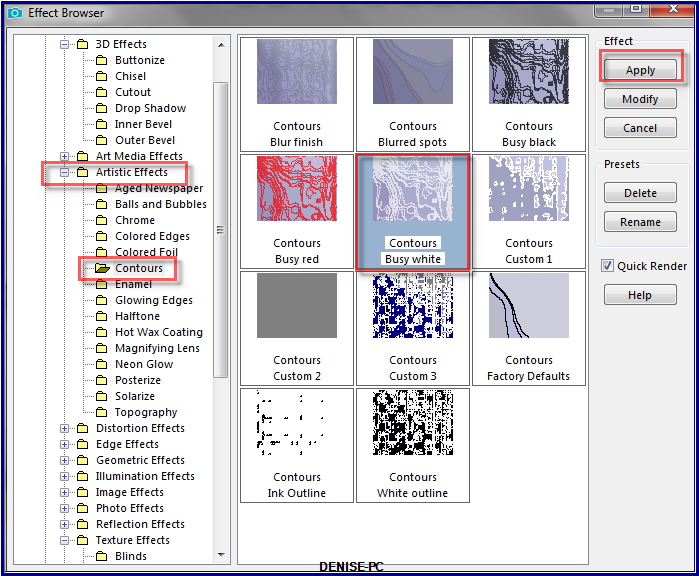
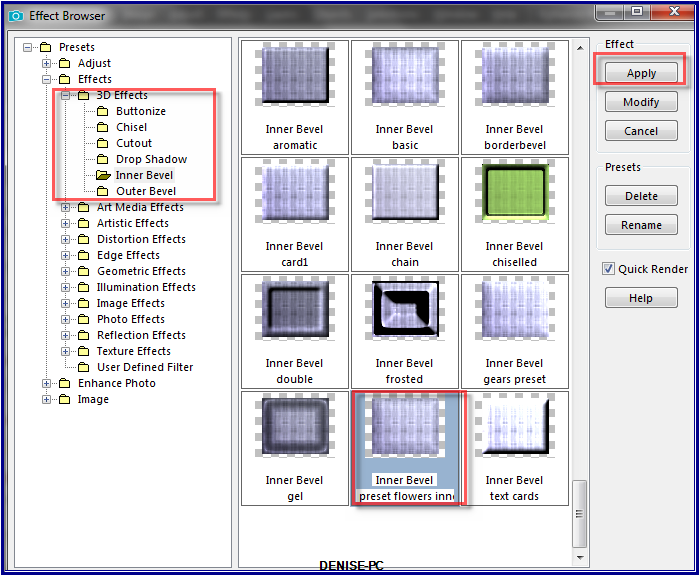 Select
Raster 1
Effects/Effects/Effects Browser/3D Effects/Artistic
Effects/Contours/Contours Busy white as follows:
 Step Eight:
Selections/Select All
Layers/New Raster Layer
Maximise Opaque Frame.png
Edit/Copy
Edit/Paste into Selection
Selections/Select None
Manual Color Correction Tool with same settings
Effects/Plugins/Eye Candy 3.0/Drop Shadow
OR
Effects/Plugins/Eye Candy 4000/Shadowlab
Repeat Drop Shadow/Shadowlab/Direction 315
Select
Layer/ Copy 1 of Raster 1
Edit/Paste as New Layer
Manual Color Correction Tool with same settings
Effects/Plugins/Eye Candy 3.0/Drop Shadow
OR
Effects/Plugins/Eye Candy 4000/Shadowlab
Repeat Drop
Shadow/Shadowlab/Direction 135
Step Nine:
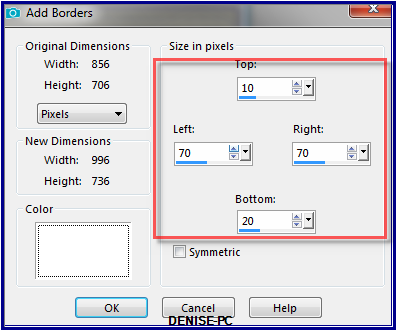
Image/Add Borders/3 pixels/Foreground Colour
Image/Add Borders as follows:
Magic Wand with the following settings:

Select this border with Magic Wand
Flood fill with Gradient BUT change settings to Repeats 10
Effects/Effects Browser/Texture Effects/Texture/Texture Gravel
Effects/Edge Effects/Enhance
Effects/Effects/Effects Browser/Preset_InnerBevel_preset
flowers inner bevel as follows::

Effects/Plugins/Eye
Candy 3.0/Drop Shadow
OR
Effects/Plugins/Eye Candy 4000/Shadowlab
Repeat Drop
Shadow/Shadowlab/Direction 315
Selections/Select
None
Step Ten:
Maximise lace_trim2.png
Edit/Copy Edit/Paste as New Layer
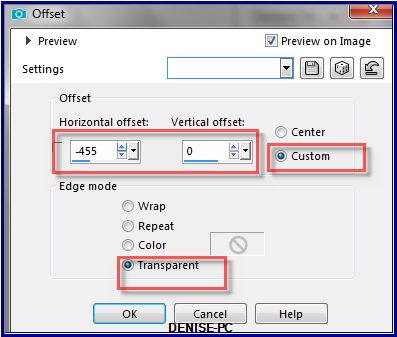
Effects/Image Effects/Offset as follows:
Using the Change to Target Tool, wipe over the element with Foreground
Gradient
Using the Pick/Deform Tool, drag the top and bottom of the image to the
top and bottom of the Layer
as shown below:

Deselect Drag/Deform Tool
Layers/Duplicate
Image/Mirror Horizontal OR Image/Mirror
Layers/Merge/Merge Down
Effects/Plugins/Eye
Candy 3.0/Drop Shadow
OR
Effects/Plugins/Eye Candy 4000/Shadowlab
Repeat Drop Shadow/Shadowlab/Direction 135
Step Eleven:
Image/Add Borders/5 pixels/Foreground Colour (symmetric box ticked)
Image/Add Borders/30 pixels/White
Select with Magic Wand
Flood Fill with Gradient BUT change Gradient to Linear (same settings)
Flood Fill with Gradient
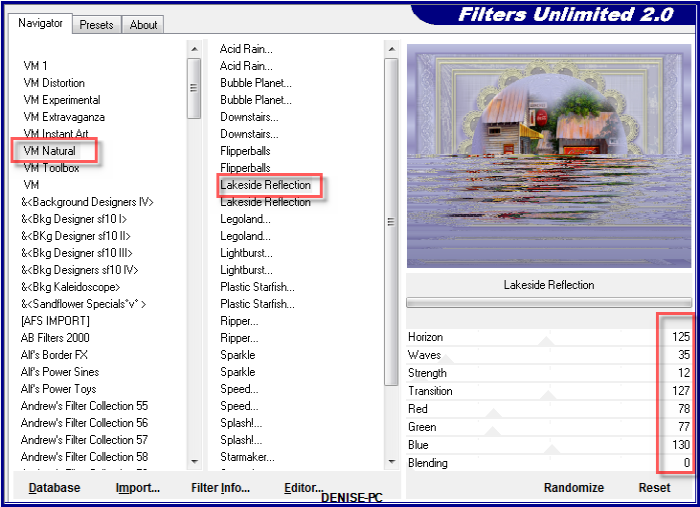
Effects/Plugins/VM Natural/Lakeside Reflection as follows:
Adjust/Sharpness/Sharpen
More
Effects/Plugins/Eye Candy 3.0/Drop Shadow
OR
Effects/Plugins/Eye Candy 4000/Shadowlab
Repeat Drop Shadow/Shadowlab/Direction 315
Selections/Select
None
Step Twelve:
Image/Add Borders/5 pixels/Foreground Colour
Maximise CAL-2844-071318-Exclusive.png
Edit/Copy Edit/Paste as New Layer
Carefully remove the tuber's watermark with Eraser Tool
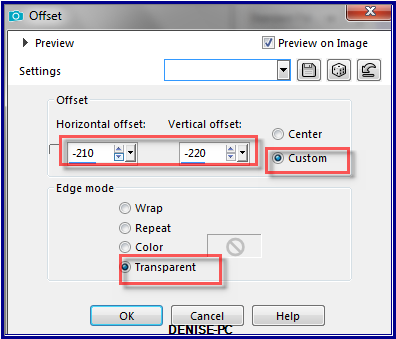
Effects/Image Effects/Offset as follows:
Effects/Plugins/Eye
Candy
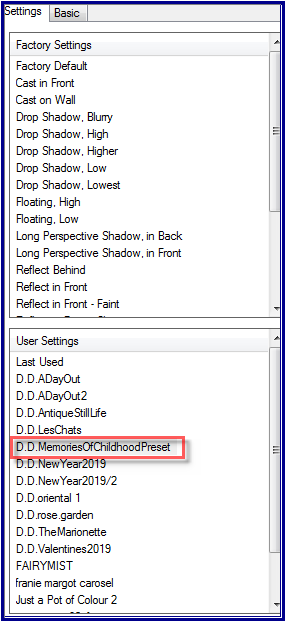
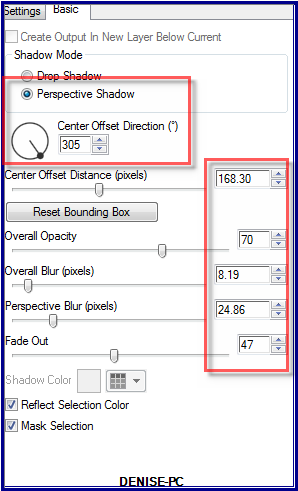
5/Impact/Perspective Shadow/D.D.MemoriesOfChildhoodPreset OR as follows:
Step Thirteen:
Maximise
Vintage Little Girl Flying Kite C M Burd by
Donna.psp
Edit/Copy Edit/Paste as New Layer
Image/Resize 35%
Adjust/Sharpness/Sharpen
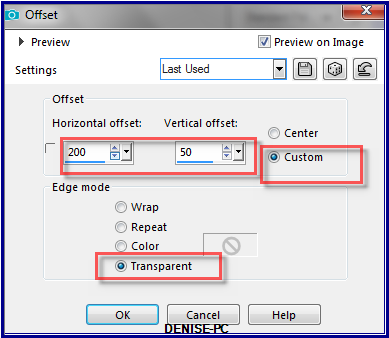
Effects/Image Effects/Offset as follows:
Effects/Plugins/Eye
Candy 3.0/Drop Shadow
OR
Effects/Plugins/Eye Candy 4000/Shadowlab
Step Fourteen:
Maximise
Fantasy Flowers_LR-5-26-18.png
Edit/Copy Edit/Paste as New Layer
Carefully remove the
tuber's watermark with Eraser Tool
Image/Resize/70%
Adjust/Sharpness/Sharpen
Image/Mirror
Effects/Image
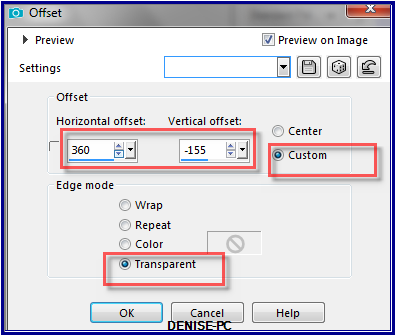
Effects/Offset as follows:
Effects/Plugins/Eye
Candy 3.0/Drop Shadow
OR
Effects/Plugins/Eye Candy 4000/Shadowlab
Maximise
lizztish_hb-3rdOct.5.pspimage
Layers/Merge/Merge Visible
Edit/Copy Merged Edit/Paste as New Layer
Unmerge the original image
Back to your work
Image/Resize/200%
Adjust/Sharpness/Sharpen
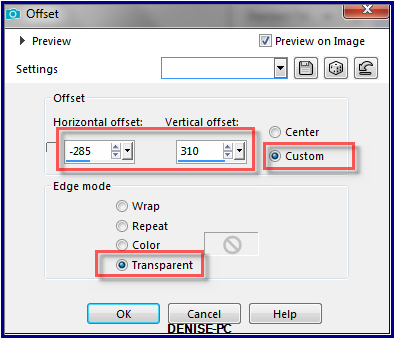
Effects/Image Effects/Offset as follows:
Maximise Signature.png
Edit/Copy Edit/Paste as New Layer
Place at bottom of Layer
Layers/New Raster Layer
Add
your Watermark
Layers/Merge
All Flatten
Image/Resize
900
pixels wide - height will adjust itself
File/Export/JPEG
Optimiser/Compression Value 20
I
hope you have enjoyed
this tutorial
A
big thank you to the ladies who test my Tutorials
TESTERS'
RESULTS
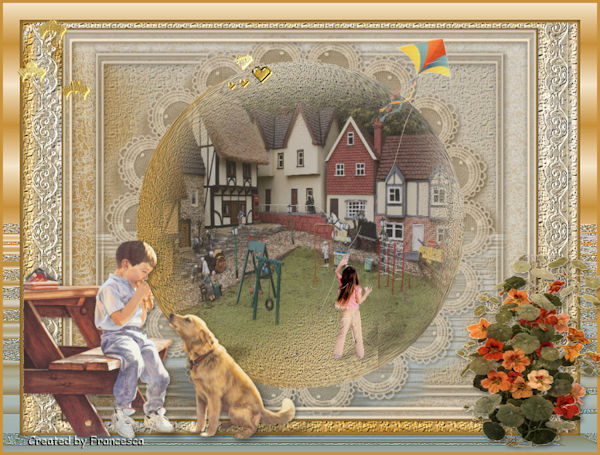
FRAN
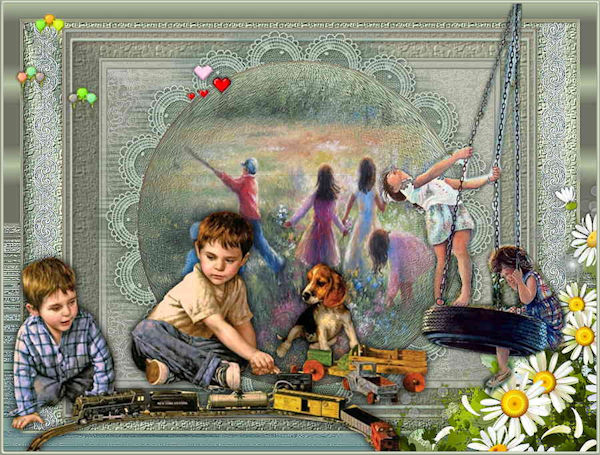
BETTY
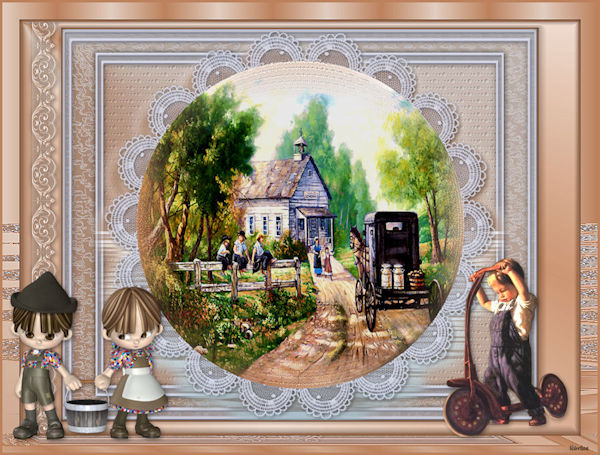
SHIRLEY NZ

FRANIE MARGOT
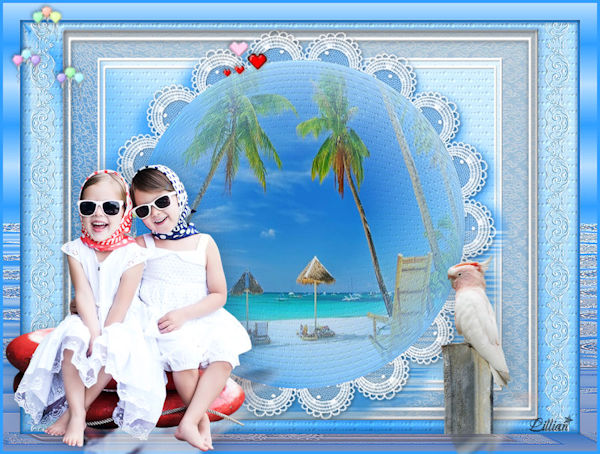
LILLIAN
FOR
OTHER VERSIONS OF THE TUTORIAL
PLEASE
GO TO:
HERE

| | | |