Supplies
Images:
Vintage
Paper Lace Card Back 6 by Donna.psp
You
can join this Group at:
TubesandMistsbyDonna-subscribe@yahoogroups.com
romancehsk 2011 125.pspimage
You
can join this group at:
http://www.heidisdesign.com/
BrideGroombyDavidBall.pspimage
You
can join this group at:
http://www.arasimages.com/tubes/tubes.html
ac_envoleeprintaniere_8.png
Obtained through Group Shares.
If this image was created by you,
please let me know
so that appropriate credit can be
given.
DENISED
Signature.png
Mask:
Narah_mask_0579
You can join this group at:
http://ar.groups.yahoo.com/group/TUBESpack
Brush:
PMSBrush.12.010
Copy of Brush image
Plugins:
Alien Skin Xenofex 2
MuRa's Meister
MuRa's Seamless
Alien Skin Eye Candy 3.0
Found here:
http://www.chezviolette17.com/02filtres/Filtres.htm
Notes:
This Tutorial was created in PSP
X5..... other versions may need adjustment
Some of the graphics may be from Free
to Use sites or Share
Groups.
If you are the creator of one of these
please let me know
so that appropriate credit can be given.
No infringement of
copyright is intended or intentional.
Some
helpful information:
You can change the blend mode, opacity and drop shadow, as
well as colourise
the materials,
according to the tubes/colours you are using.
When applying the Resize with the All Layers option checked, this will
be
informed in the tutorial,
otherwise, apply the resize with this option unchecked.
Remember always to save your work.
Whenever you reduce an image, apply Adjust/Sharpness/Sharpen, to
maintain the
sharpness of the image.
Some tools or features have other names in earlier versions of the PSP.

Before opening PSP, download plugins
and install
Save Mask to PSP Mask Folder
Import
Brush
Open graphics in PSP, duplicate (Shift
D) and close the original.
The
settings remain the same throughout this Tutorial unless otherwise
stated.
Set your Foreground colour to #e2dcda
Set your Background colour to #cec4c2
Step One:
File/New/New Image 700 pixels x 550
pixels as follows:
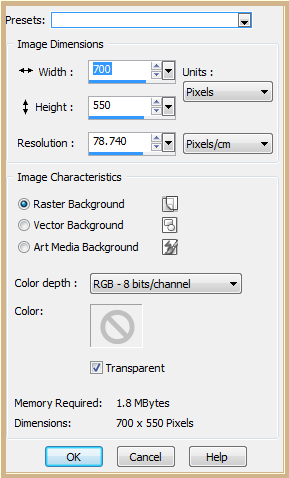 Change Foreground to
Foreground/Background Gradient as follows:
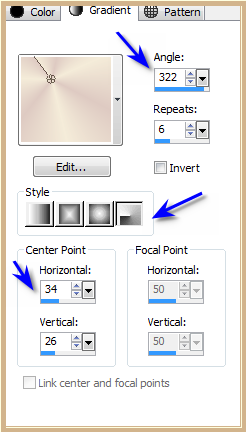 Flood Fill with Gradient
Step
Two:
Maximise ac_envoleeprintaniere_8.png
Edit/Copy
Edit/Paste as New Layer
Image/Resize/50% as follows:
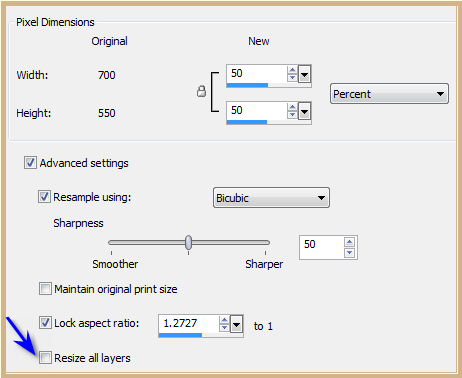 Adjust/Sharpness/Sharpen
Effects/Plugins/MuRa's Meister/Copies
as follows:
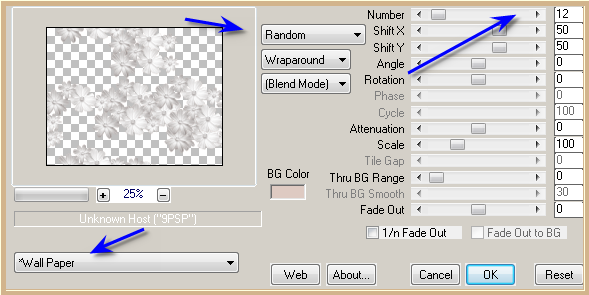 Layers/Merge/Merge Down
Step
Three:
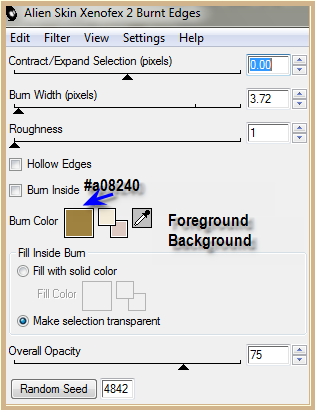
Effects/Plugins/Alien Skin Xenofex 2/Burnt Edges as follows:
 Layers/New
Raster Layer
Flood
Fill with Background Colour
Image/Resize
95%
Effects/Plugins/Alien
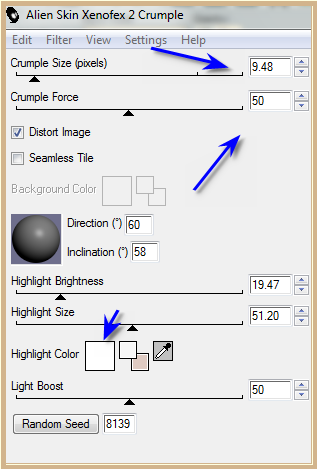
Skin Xenofex 2/Crumple as follows:
 Effects/Plugins/Eye
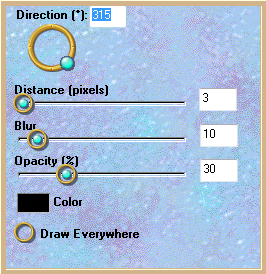
Candy 3.0/Drop Shadow as follows:
 Repeat
Drop Shadow Direction 135
Image/Free
Rotate/Left 5 degrees as follows:
 Step Four:
Maximise Vintage
Paper Lace Card Back 6 by Donna.psp
Edit/Copy
Edit/Paste as New Layer
Image/Resize/40%
Adjust/Sharpness/Sharpen
Image/Free
Rotate/5 degrees/Right
Effects/Plugins/Eye
Candy 3.0/Drop Shadow
Repeat Drop Shadow
Direction 315
Maximise
BrideGroombyDavidBall.pspimage
Edit/Copy
Edit/Paste as New Layer
Image/Resize
75%
Adjust/Sharpness/Sharpen
Effects/Image
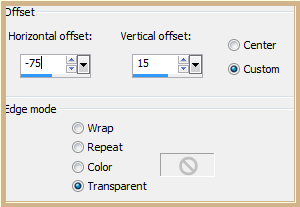
Effects/Offset as follows:
 Change
Opacity to 60%
Step Five:
Maximise
romancehsk 2011 125.pspimage
Edit/Copy
Edit/Paste as New Layer
Image/Resize/40%
Adjust/Hue and
Saturation/Colorise as follows:
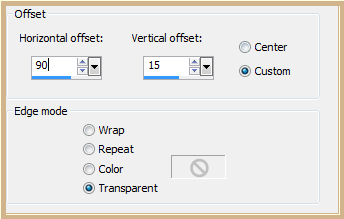
 Effects/Image
Effects/Offset as follows:
 Adjust/Sharpness/Sharpen
More
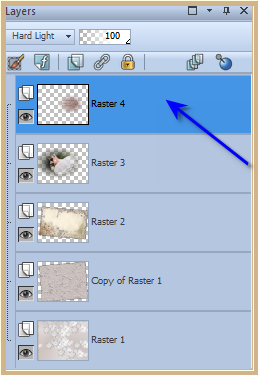
Double Click with
left side of Mouse on Raster 4 as follows:
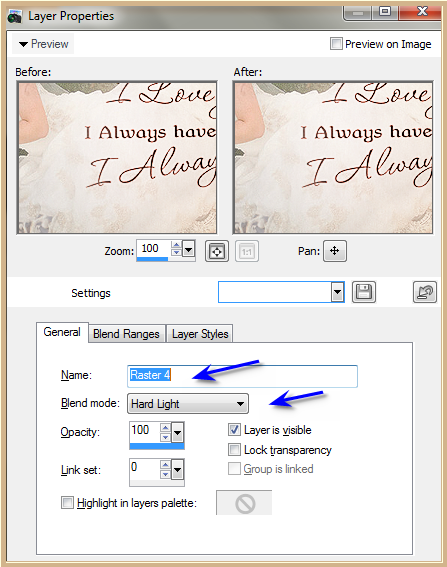
 The following box
will appear. Set the Blend Mode to Hard Light.
(you can also
change the Opacity in this box if needed but not in this case)
 Step Six:
Maximise ac_envoleeprintaniere_8.png
Edit/Copy
Edit/Paste as New Layer
Image/Resize/50%
Adjust/Hue
and Saturation/Colorize as follows:
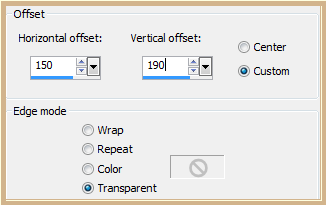
 Effects/Image
Effects/Offset as follows:
 Effects/Plugins/Eye
Candy 3.0/Drop Shadow
Effects/Plugins/MuRa's
Seamless/Emboss at Alpha/Default Settings
Step Seven:
Layers/Merge/Merge VISIBLE
Layers/New Raster Layer
Flood
Fill with Background Colour
Layers/Load/Save
Mask/Load Mask from Disk as follows:
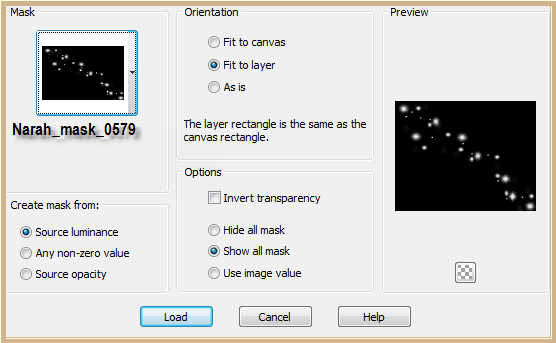 Layers/Merge/Merge
Group
Effects/Edge
Effects/Enhance More
Effects/3D
Effects/Drop Shadow as follows:
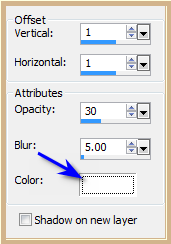 Step
Eight:
Layers/New Raster Layer
Change
Background Colour to #ecc3bb
Select
Brush Tool PMSBrush.12.010 as follows:
 Click
three times with the Background Colour in the bottom left hand corner
Deselect
Brush
Effects/Edge
Effects/Enhance More
Effects/Plugins/Eye
Candy 3.0/Drop Shadow
Effects/Plugins/MuRa's
Seamless/Emboss at Alpha/Default Settings
If
you can't install the brush use the image supplied
Edit/Copy
Edit/Paste as New Layer
Place at
the bottom left corner (see my image for placement)
Effects/Edge
Effects/Enhance More
Effects/Plugins/Eye
Candy 3.0/Drop Shadow
Effects/Plugins/MuRa's
Seamless/Emboss at Alpha/Default Settings
Step Nine:
Maximise
DENISE D Signature.png
Edit/Copy Edit/Paste as New Layer
Place at bottom of Layer
Layers/New Raster Layer
Add
your Watermark
Layers/Merge
VISIBLE
Adjust/Sharpness/Sharpen
File/Export/PNG
Optimiser
I hope you
have enjoyed this tutorial
A big thank you to the
ladies who test my Tutorials

SHIRLEY

SJOERTDJE
