LOVE ROSES2
This
tutorial is written by
Denise D. on 25th July, 2016
from
my own ideas.
Any
resemblance to other tutorials is
co-incidental and unintentional.
You
may share my tutorials with other
groups.
All I ask is that you advise me
and
credit for the tutorial is given to me and linked to
http://escapingtopsp2.altervista.org/Home/homeb.html
Please
do not upload any of my completed Tutorial images onto sites
such as Fotki, Pinterest, Photobucket or similar
LOVE
ROSES
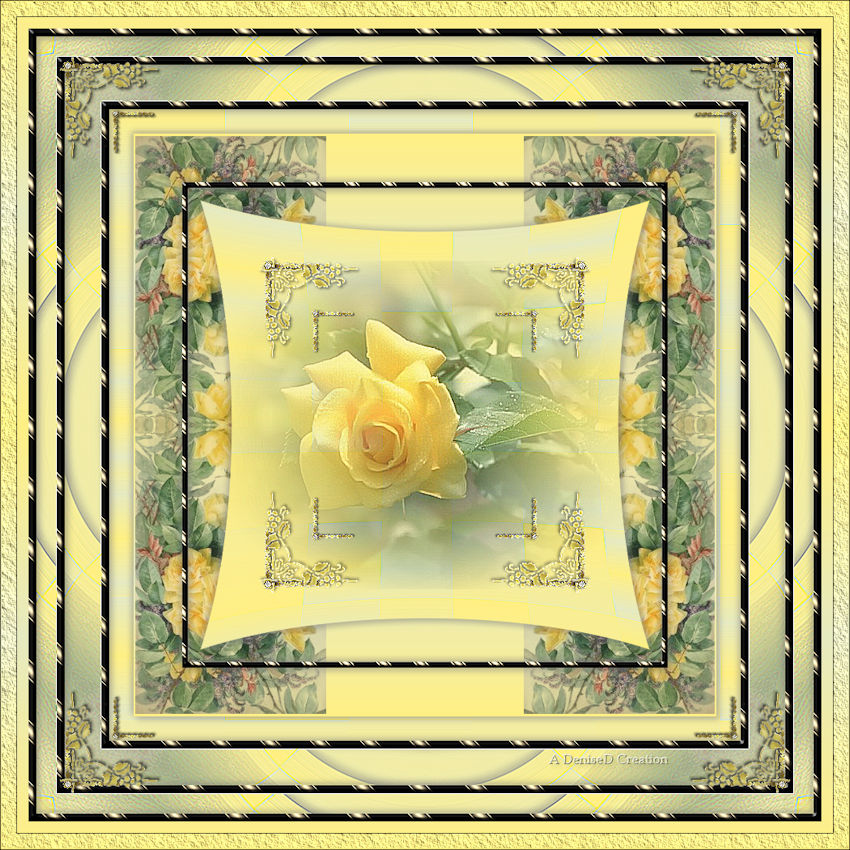
http://escapingtopsp2.altervista.org/LoveRoses/LoveRoses2.html

Thank
you Franie Margot for this French translation

Thank you Inge-Lore for this German translation

Click on Box to download supplies
Supplies
Images:
D.D.LoveRosesYellow
SS_63
You
can join her group at:
https://br.groups.yahoo.com/neo/groups/tda_tubes/info
corners3_ice
Obtained
through Internet
If
this image was created
by you, please let me know
so
that appropriate credit
can be given.
DENISE D Signature.png
Gradient:
mcq
Curl
Plugins:
Filters
Unlimited 2.0
Simple
Eye
Candy 3.0
VM
Distortion
(import into Filters
Unlimited 2.0)
AAA
Frames
Found
here:
http://www.saturnelladesign.fr/pages/filtres.htm
http://janaly.com/Filtres/Filtre.html
http://www.maidiregrafica.eu/paginafiltri/filtri.html
Notes:
This
Tutorial was created
in PSP X8.... other versions may need adjustment
Some
of the graphics may be
from Free to Use sites or Share Groups.
If
you are the creator of
one of these please let me know so that appropriate credit can be
given.
No
infringement of
copyright is intended or intentional.
Before
opening PSP,
download plugins and install
Some
helpful information:
You can change the blend mode, opacity and drop shadow, as
well as colourise
the materials,
according to the tubes/colours you are using.
When applying the Resize with the All Layers option checked, this will
be
informed in the tutorial,
otherwise, apply the resize with this option unchecked.
Remember always to save your work.
Whenever you reduce an image, apply Adjust/Sharpness/Sharpen, to
maintain the
sharpness of the image.
Some tools or features have other names in earlier versions of the PSP.

Place
Gradient in PSP
Gradient Folder
Open
graphics in PSP,
duplicate (Shift D) and close the original.
Please
Note:
Offset settings
provided in this tutorial may vary according to size of your image.
Please
adjust to suit.
The
settings remain the
same throughout this Tutorial unless otherwise stated.
Set
your Foreground colour
to #e6eac0
Set
your Background colour
to #ffef84
Step
One:
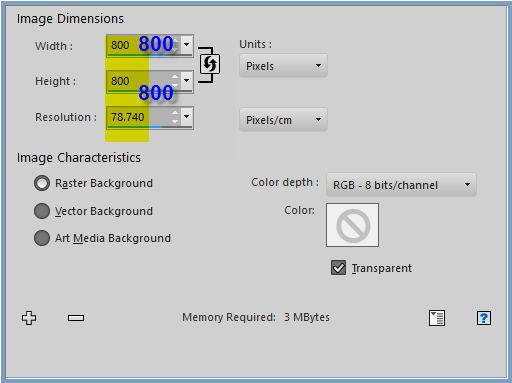
File/New/New
Image 800
pixels x 800 pixels as follows:
Change
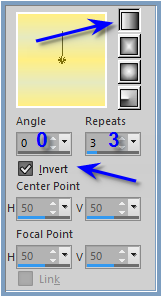
Foreground Colour to
Foreground/Background/Linear Gradient as follows:
Flood
Fill with Gradient
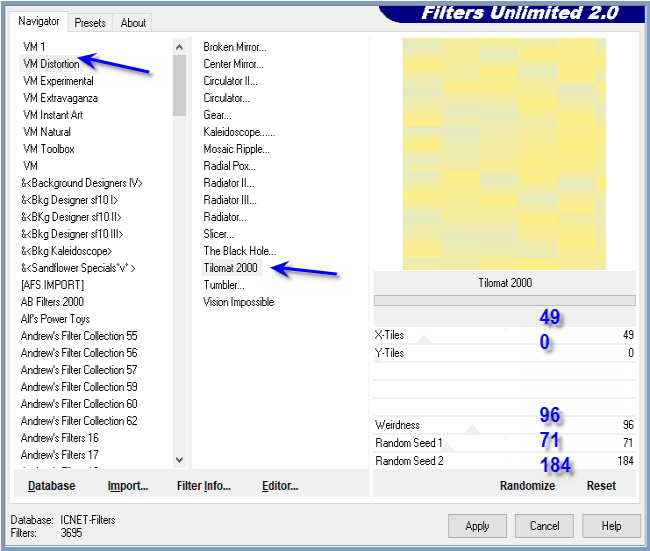
Effects/Plugins/Filters
Unlimited 2.0/VMDistortion/Tilomat 2000 as follows:
Effects/Edge
Effects/Enhance More
Step
Two:
Layers/New
Raster Layer
Flood
Fill with Gradient
Image/Resize/90%
as
follows:
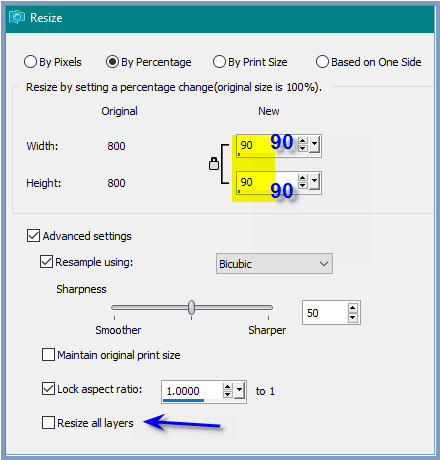
Maximise
D.D.LoveRosesYellow
Edit/Copy
Edit/Paste as New Layer
Effects/Image
Effects/Offset
as follows:
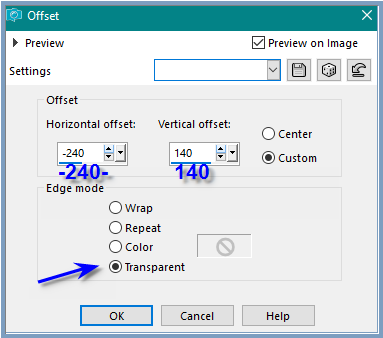
Effects/Plugins/Simple/Top
Left Mirror
Layers/Merge/Merge
Down
Step
Three:
Layers/New
Raster Layer
Flood
Fill with Gradient
Image/Resize/70%
Selections/Select
All
Selections/Float
Selections/Defloat
Effects/Plugins/Filters
Unlimited
2.0/VMDistortion/Tilomat 2000
Effects/Edge
Effects/Enhance More
Selections/Select
None
Effects/Geometric/Spherize
as follows:
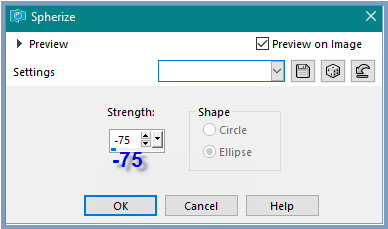
Step
Four:
Select
Raster 2
Effects/Plugins/Eye
Candy
3.0/Drop Shadow as follows:
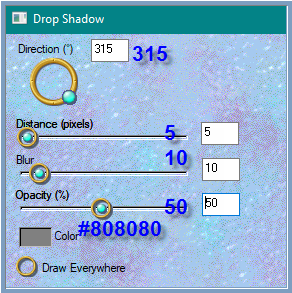
OR
Effects/Plugins/Eye Candy 4000/Shadowlab as follows:
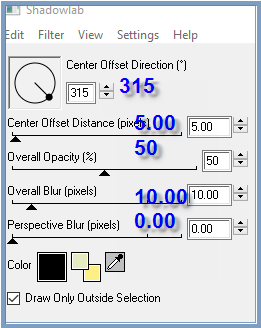
Repeat
Drop Shadow/Shadowlab Direction 135
Select
Raster 3
Repeat
Drop Shadow
Repeat
Drop Shadow
Direction 315
Maximise
SS_63
Edit/Copy
Edit/Paste as New Layer
Adjust/Sharpness/Sharpen
More
Step
Five:
Layers/New
Raster Layer
Change
Background Colour to
Gradient mcq Curl with the following settings:
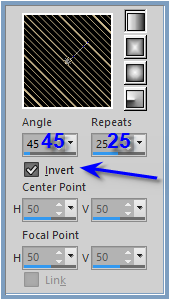 Flood
Fill with Gradient
Selections/Select
All
Selections/Modify/Contract
10 pixels
Edit/Clear
Selections/Invert
Effects/3D
Effects/Inner
Bevel as follows:
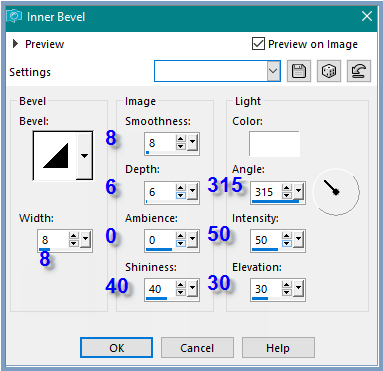
Effects/Plugins/Eye
Candy 3.0/Drop Shadow
Repeat
Drop
Shadow/Direction 135
Edit/Copy
Selections/Select
None
Step
Six:
Select
Raster 2
Edit/Paste
as New Layer
Image/Resize/75%
Adjust
Sharpness/Sharpen
More
Effects/Plugins/Eye
Candy
3.0/Drop Shadow
Repeat
Drop
Shadow/Direction 315
Image/Add
Borders/45
pixels/White
Magic
Wand with the
following settings:

Select
Border
Flood
Fill with Foreground
Gradient
Effects/Reflection
Effects/Kaleidoscope as follows:
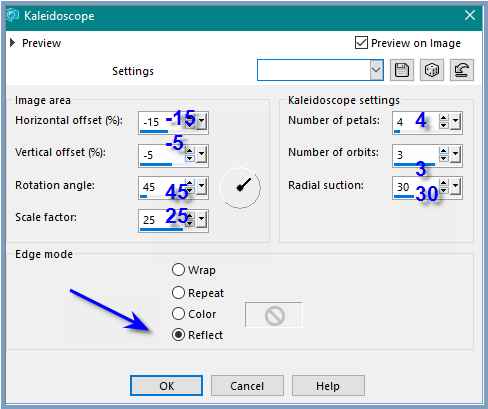 Effects/Edge
Effects/Enhance More
Selections/Select
None
Step
Seven:
Image/Add
Borders/10
pixels/White
Select
with Magic Wand
Flood
Fill with Background
Gradient
Effects/3D
Effects/Inner
Bevel
Effects/Plugins/Eye
Candy
3.0/Drop Shadow
Repeat
Drop Shadow
Direction 135
Selections/Select
None
Image/Add
Borders/25
pixels/White
Select
with Magic Wand
Flood
Fill with Foreground
Gradient
Effects/Reflection
Effects/Kaleidoscope
Effects/Edge
Effects/Enhance More
Selections/Select
None
Step
Eight:
Image/Add
Borders/10
pixels/White
Select
with Magic Wand
Flood
Fill with Background
Gradient
Effects/3D
Effects/Inner
Bevel
Effects/Plugins/Eye
Candy
3.0/Drop Shadow
Repeat
Drop Shadow
Direction 315
Selections/Select
None
Step
Nine:
Maximise
corners3_ice
Edit/Copy
Edit/Paste as New Layer
(leave
where it is)
Adjust/Sharpness/Sharpen
More
Maximise
corners3_ice again
Selection
Tool with the
following settings:

Edit/Copy
Edit/Paste as New Layer
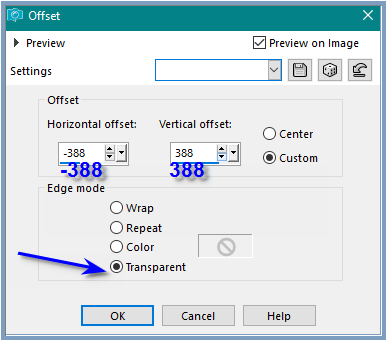
Effects/Image
Effects/Offset as follows:
 Adjust/Sharpness/Sharpen
More
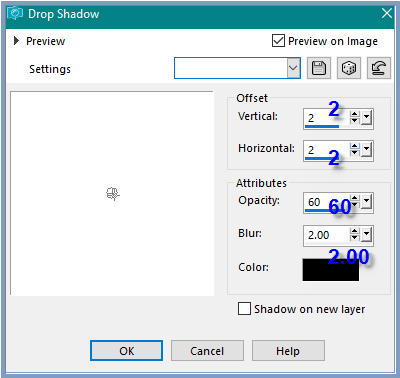
Effects/3D
Effects/Drop
Shadow as follows:
Effects/Plugins/Simple/Top
Left Mirror
Step
Ten:
Promote
Background Layer
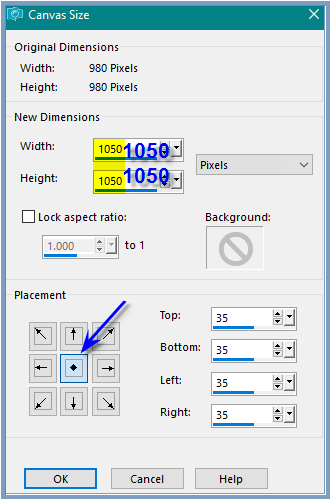
Image/Canvas
Size as follows:
Layers/New
Raster Layer
Flood
Fill with Foreground Gradient
Layers/Arrange/Send to Bottom
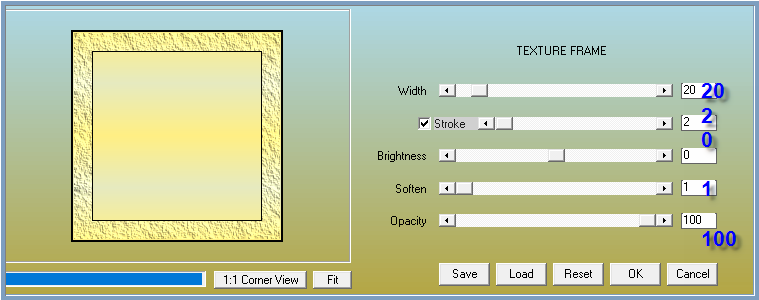
Effects/Plugins/AAA Frames/Texture Frames as follows:
Maximise
DENISE D Signature.png
Edit/Copy
Edit/Paste as New Layer
Place
at bottom of Layer
Add
your Watermark
Layers/Merge
All Flatten
Image/Resize/850
pixels wide - height will adjust itself
File/Export/JPEG
Optimiser/Compression Value 20
I
hope you have enjoyed this tutorial
A
big thank you to Annie, Alice T. Betty, Elizabeth, Gisela, Lillian
Sjoertdje and Shirley
the ladies who test my
Tutorials
TESTERS'
RESULTS
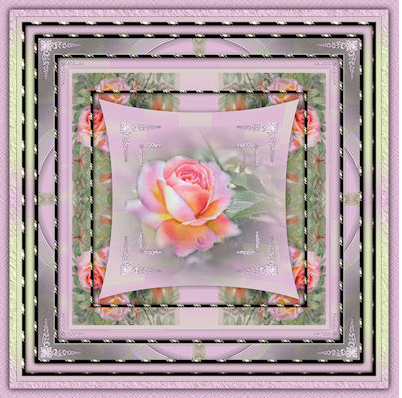
BETTY
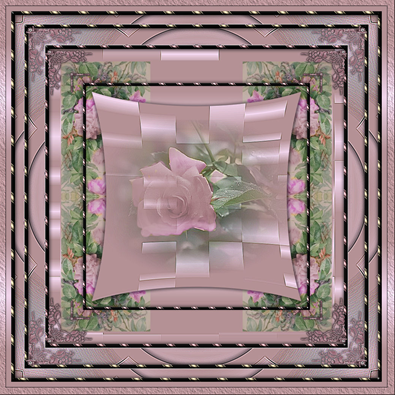
ELIZABETH
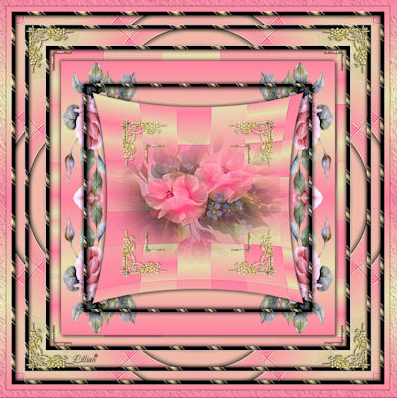
LILLIAN

SHIRLEY

| | | |