Tutorial 2017
This
tutorial is written by
Denise D. on 4th October, 2017
from
my own ideas.
Any
resemblance to other tutorials is
co-incidental and unintentional.
You
may share my tutorials with other
groups.
All I ask is that you advise me
and
credit for the tutorial is given to me and linked to
http://escapingtopsp2.altervista.org/Home/homeb.html
Please
do not upload any of my completed Tutorial images onto sites
such as Fotki, Pinterest, Photobucket or similar
LOVE
PURPLE

http://escapingtopsp2.altervista.org/LovePurple/LovePurple.html

Thank you Inge-Lore for this German translation

Click on the Box to download Supplies
Supplies
Images:
leeloo_AdeleneFletcher_WatercolorFlowers003_JANET.pspimage
You can
join this Group at:
https://fr.groups.yahoo.com/neo/groups/Leelooandco/info
Birds17112014es.pspimage
Tubed
buy Elly S.
I don't have a contact for this tuber
BLueHEARTamg.pspimage
pearl7.png
This image was obtained from the Internet
If you are the owner of this
image, please contact me
so that credit can be given to
you
DeniseD Signature.png
Mask:
Soniamask_0354.jpg
Presets:
D.D.LovePurple
Double Click on the  icon in the Supplies File to install
this Preset in your Plugin. icon in the Supplies File to install
this Preset in your Plugin.
If for some reason this doesn’t work,
I have provided the settings in the Tutorial.
Plugins:
Eye Candy 3 OR Eye Candy 4000
DSB Flux
Neology (Import into Filters Unlimited 2.0)
&<Kaleidoscope> (Import into
Filters Unlimited 2.0)
Simple
Filters Unlimited 2.0
Alien Skin Eye Candy 5/Impact
Found here:
http://www.saturnelladesign.fr/pages/filtres.htm
http://janaly.com/Filtres/Filtre.html
http://www.maidiregrafica.eu/paginafiltri/filtri.html
Notes:
This Tutorial was created in PSP
X9.... other
versions may need adjustment
Some of the graphics may be from Free
to Use sites or Share
Groups.
If you are the creator of one of these
please let me know
so that appropriate credit can be given.
No infringement of
copyright is intended or intentional.
Some
helpful information:
You can change the blend mode, opacity and drop shadow, as
well as colourise
the materials,
according to the tubes/colours you are using.
When applying the Resize with the All Layers option checked, this will
be
informed in the tutorial,
otherwise, apply the resize with this option unchecked.
Remember always to save your work.
Whenever you reduce an image, apply Adjust/Sharpness/Sharpen, to
maintain the
sharpness of the image.
Some tools or features have other names in earlier versions of the PSP.

Before opening PSP, download plugins
and install
Place Pattern in PSP Pattern Folder
Place Mask in PSP Mask Folder
Install Preset
Open graphics in PSP, duplicate (Shift
D) and close the original.
Please
Note: Offset
settings provided in this tutorial may vary according to size of your
image.
Please
adjust to suit.
The
settings remain the same throughout this Tutorial unless otherwise
stated.
Set your Foreground colour to #c1b8e2
Set your Background colour to #553f9b
Step One:
Firstly we will make our pattern
File/New/New Image 250 pixels x 250
pixels as follows:
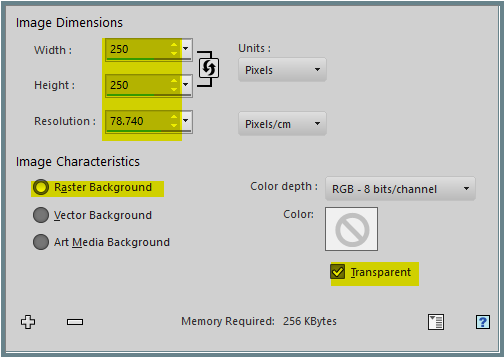
Flood Fill with Foreground Colour
Layers/New Raster Layer
Flood Fill with Background Colour
Step Two:
Layers/Load/Save
Mask/Load Mask Soniamask_0354.jpg from Disk as
follows:
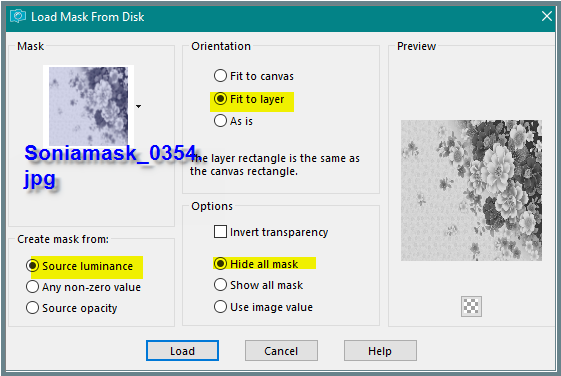
Layers/Merge/Merge Group
Effects/Edge Effects/Enhance
Effects/Plugins/MurA's Seamless/Emboss At Alpha/Default Settings
Effects/Image
Effects/Seamless Tiling as follows:
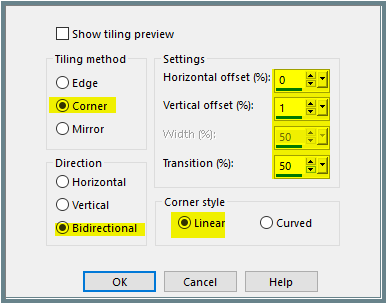
Save your Pattern as a JPG -I have named mine D.D.It'sPurple.jpg
Place Pattern in your
PSP Pattern Folder
Change Background Colour to
D.D.It'sPurple.jpg with the following settings:
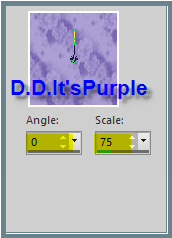
Step Three:
File/New/New Image 850 pixels x 650
pixels as follows:
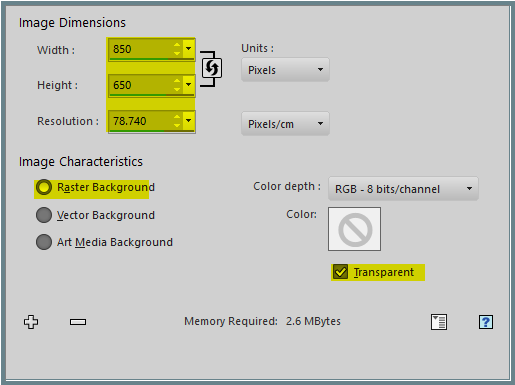 Flood
Fill with Pattern
Effects/Edge Effects/Enhance
Effects/Plugins/AAA Frames/Foto Frame as follows:
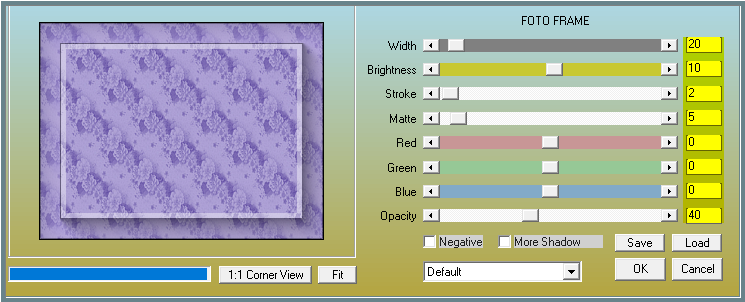
Step Four:
Selection Tool/Custom Selection with the following settings:

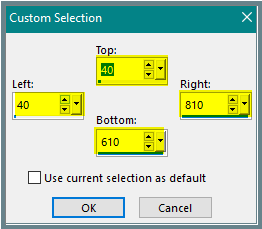
Edit/Clear
Layers/New Raster Layer
Change Foreground Colour to Foreground/Background/Radial Gradient as
follows:
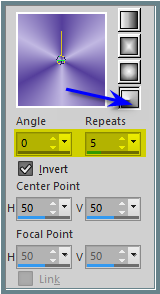
Flood fill with Gradient
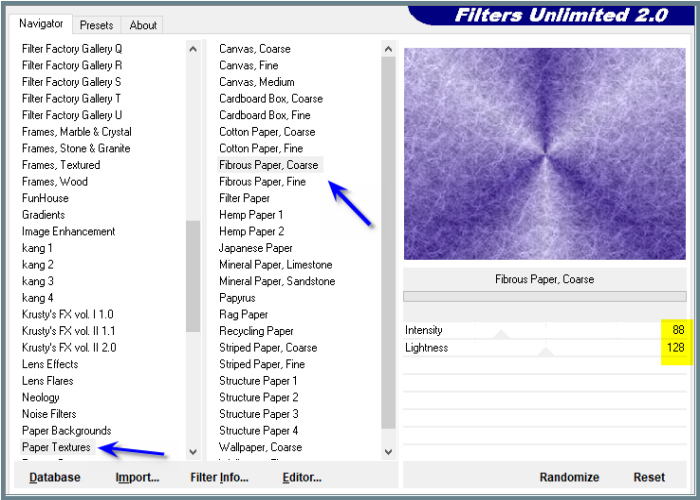
Effects/Plugins/Filters Unlimited 2.0/Paper Textures/Fibrous Paper,
Coarse as follows:
Selections/Modify/Contract 8 pixels
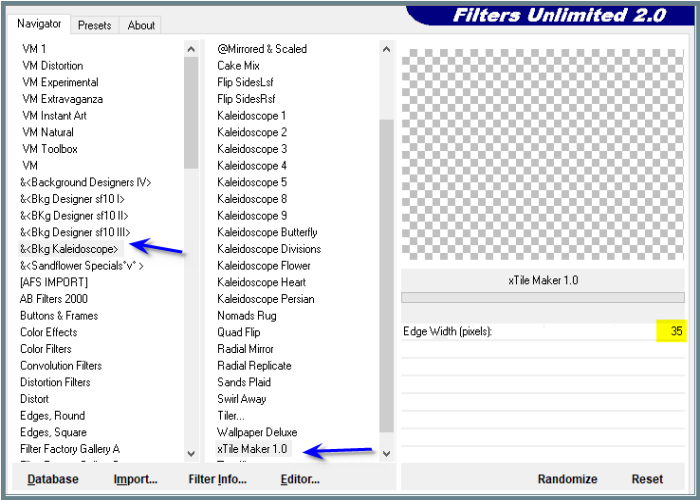
Effects/Plugins/&<Bkg
Kaleidoscope>/x Tile Maker 1as follows:
Effects/Edge Effects/Enhance More
Selections/Modify/Contract 12 pixels
Edit/Clear
Step Five:
Layers/New Raster Layer
Flood Fill with Gradient
Effects/Plugins/Filters
Unlimited 2.0/Paper Textures/Fibrous Paper, Coarse
Selections/Modify/Contract 8 pixels
Edit/Clear
Selections/Modify/Select Selection Borders as follows:
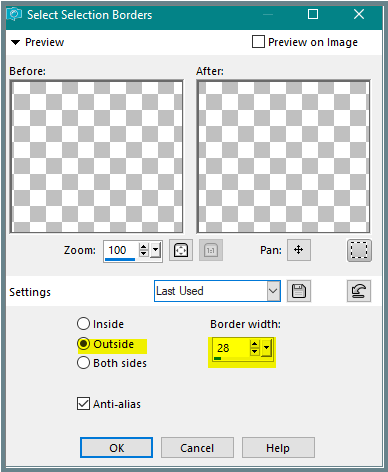
Layers/Merge/Merge Down
Layers/Duplicate
Step Six:
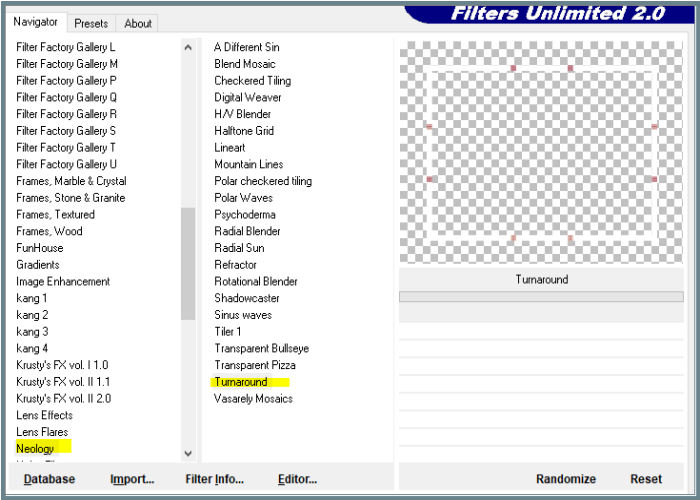
Effects/Plugins/Filters Unlimited 2.0/Neology/Turnaround as
follows:
Selections/Select None
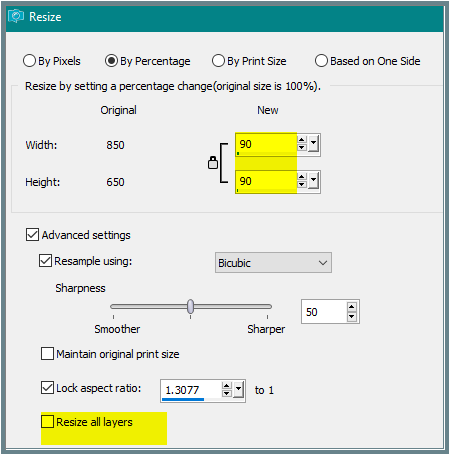
Image/Resize/90% as
follows:
Step Seven:
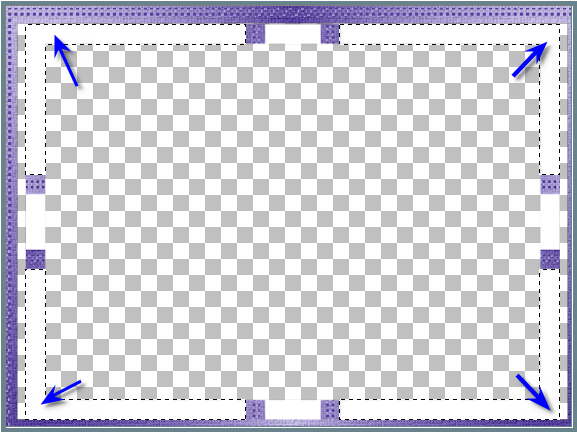
Magic Wand with the following settings:

Select the following areas:
Flood Fill with Gradient
Effects/Plugins/Filters Unlimited 2.0/Paper Textures/Fibrous Paper, Coarse
Selections/Select None
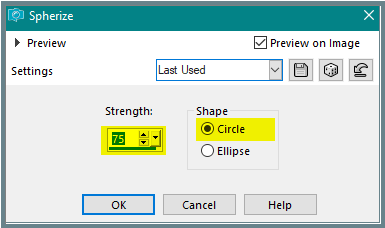
Effects/Geometric Effects/Spherize as follows:
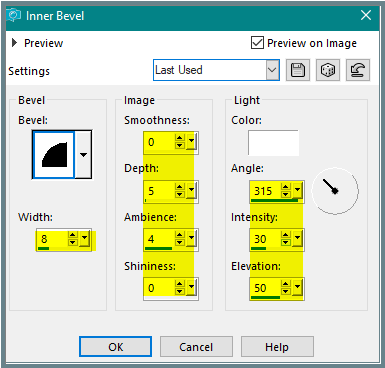
Effects/3D Effects/Inner Bevel as follows:
Step Eight:
Select the centre of the frame with Magic Wand
Selections/Invert
Layers/New Raster Layer
Layers/Arrange/Send to Bottom
Flood Fill with Gradient
Selections/Select None
Select Raster 2
Effects/Plugins/Eye Candy 3.0/Drop
Shadow as follows:
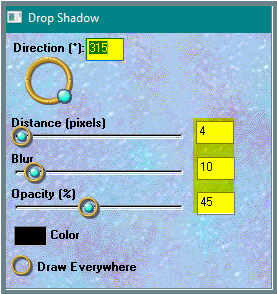
OR
Effects/Plugins/Eye Candy 4000/Shadowlab as follows:

Repeat Drop Shadow/Shadowlab/Direction 135
Step Nine:
Select Copy of Raster 2 Layer
Select the centre of the frame with Magic Wand
Change Foreground Colour Back to Foreground Colour
Change Background Colour back to
Background Colour
Flood Fill with Foreground Colour
Effects/Plugins/Filters Unlimited 2.0/Paper
Textures/Fibrous Paper, Coarse
Layers/New Raster Layer
Flood Fill with Background Colour
Layers/Load/Save
Mask/Load Mask Soniamask_0354.jpg from Disk BUT
tick Invert Transparency Box
Adjust/Sharpness/Sharpen More
Layers/Merge/Merge Group
Effects/Plugins/MuRa's Seamless/Emboss at Alpha/Default Settings
Selections/Select None
Step
Ten:
Maximise leeloo_AdeleneFletcher_WatercolorFlowers003_JANET.pspimage
Edit/Copy Edit/Paste as New Layer
Layers/Arrange/Bring to Top
Image/Resize 60%
Adjust/Sharpness/Sharpen
Effects/Image Effects/Offset as follows:
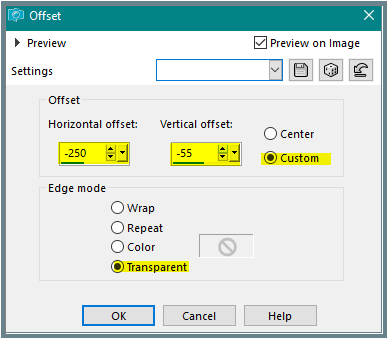
Effects/Plugins/Eye Candy 3.0/Drop Shadow
OR
Effects/Plugins/Eye Candy 4000/Shadowlab
Step Eleven:
Maximise Birds17112014es.png
Edit/Copy
Edit/Paste as New Layer
Effects/Image Effects/Offset as follows:
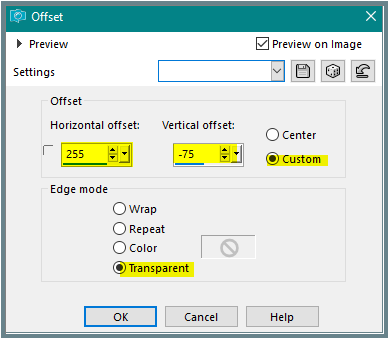
Adjust/Hue and Saturation/Colorize as follows:
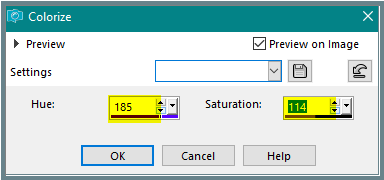
Effects/Plugins/Eye Candy 3.0/Drop Shadow
OR
Effects/Plugins/Eye Candy 4000/Shadowlab
Step Twelve:
Text Tool with the following settings:


Settings may vary according to your version of PSP
Write:
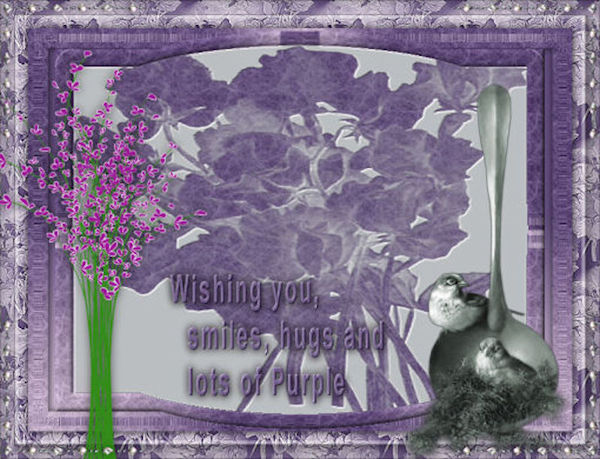
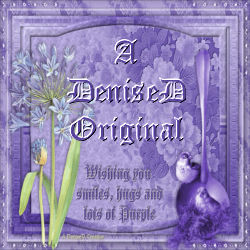
Wishing you,
smiles, hugs and
lots of Purple
Convert to Raster Layer
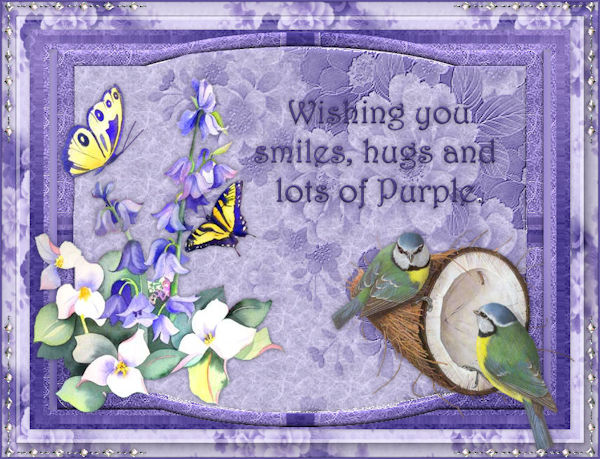
See my image for placement
Effects/Plugins/MuRa's Seamless/Embosa at Alpha/Default Settings
Effects/Plugins/Alien Skin Eye Candy 5/Impact/Extrude/D.D.LovePurple as
follows:
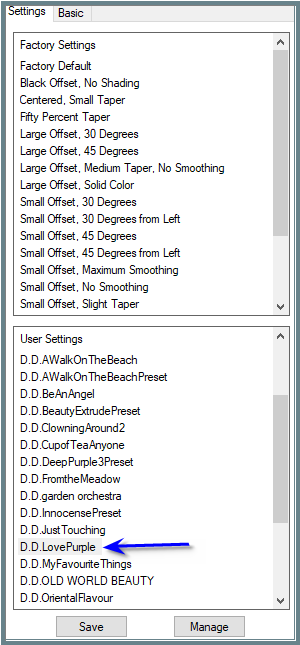 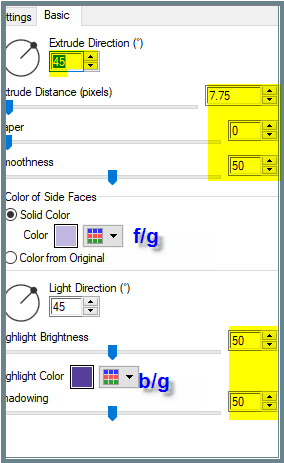
See my image for placement
Step Thirteen:
Maximise pearl7.png
Edit/Copy
Edit/Paste as New Layer
Adjust/Sharpness/Sharpen
Effects/Image Effects/Offset as follows:
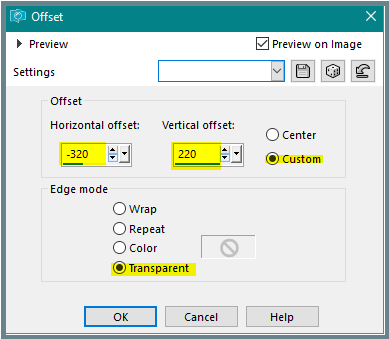
Change Blend Mode to Luminance Legacy
Effects/Plugins/Eye Candy 3.0/Drop Shadow
OR
Effects/Plugins/Eye Candy 4000/Shadowlab
Effects/Plugins/Simple/Top Left Mirror
Maximise DeniseD Signature.png
Edit/Copy Edit/Paste as New Layer
Place at bottom of Layer
Layers/New Raster Layer
Add
your Watermark
Layers/Merge
All Flatten
File/Export/JPEG
Optimiser/Compression Value 20
I
hope you have enjoyed
this tutorial
A
big thank you to the ladies who test my Tutorials
TESTERS'
RESULTS
BETTY
ELIZABETH
FRAN
LILLIAN

SHIRLEY NZ
INGE-LORE
| | | |