Supplies
Images:
JHanna_419 background-a.pspimage
You can join this Group at:
http://groups.yahoo.com/group/JHanna_Tubes
cadre fantaisie.pspimage
You can join this group at:
http://www.monpetitjardin-moi.fr.nf/
dreamingkjun
copyright K.Jun
fly_agaric11-08_06pat.psp
You can join this group at:
http://www.sitevanpatries.nl/dieren%204.htm
Dreaming Faery.pspimage
wave_2.png
text.png
DeniseD Signature.png
This image was obtained from the Internet
If you are the owner of this
image, please contact me
so that credit can be given to
you
Patterns:
D.D.LoveFairies.jpg
cmlstgold001
Plugins:
Eye Candy 3 OR Eye Candy 4000
Filter Factory G
Texture
Found here:
http://www.saturnelladesign.fr/pages/filtres.htm
http://janaly.com/Filtres/Filtre.html
http://www.maidiregrafica.eu/paginafiltri/filtri.html
Notes:
This Tutorial was created in PSP
2018.... other
versions may need adjustment
Some of the graphics may be from Free
to Use sites or Share
Groups.
If you are the creator of one of these
please let me know
so that appropriate credit can be given.
No infringement of
copyright is intended or intentional.
Some
helpful information:
You can change the blend mode, opacity and drop shadow, as
well as colourise
the materials,
according to the tubes/colours you are using.
When applying the Resize with the All Layers option checked, this will
be
informed in the tutorial,
otherwise, apply the resize with this option unchecked.
Remember always to save your work.
Whenever you reduce an image, apply Adjust/Sharpness/Sharpen, to
maintain the
sharpness of the image.
Some tools or features have other names in earlier versions of the PSP.

Before opening PSP, download plugins
and install
Place Pattern in PSP Pattern Folder
Open graphics in PSP, duplicate (Shift
D) and close the original.
Please
Note: Offset
settings provided in this tutorial may vary according to size of your
image.
Please
adjust to suit.
The
settings remain the same throughout this Tutorial unless otherwise
stated.
Set your Foreground colour to #c29c94
Set your Background colour to #b4c8c2
Step One:
File/New/New Image 800 pixels x 550
pixels as follows:
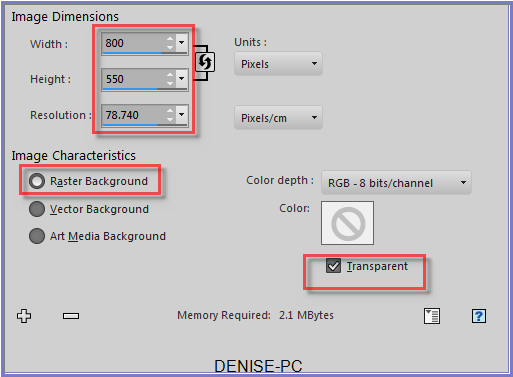 Change Foreground Colour to
Foreground/Background/Linear Gradient as follows:
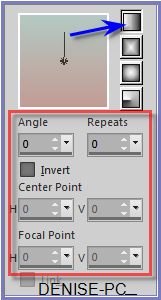
Flood Fill with Gradient
Step Two:
Layers/New Raster Layer
Selections/Select All
Maximise JHanna_419 background-a.pspimage
Edit/Copy
Edit/Paste into Selection
Change Blend Mode to
Overlay
Adjust/Sharpness/Sharpen More
Keep Selected
Maximise cadre fantaisie-1.pspimage
Edit/Copy Edit/Paste into Selection
Selections/Select None
Step Three:
Maximise Text.png
Edit/Copy Edit/Paste as New Layer
Effects/Image Effects/Offset as follows:
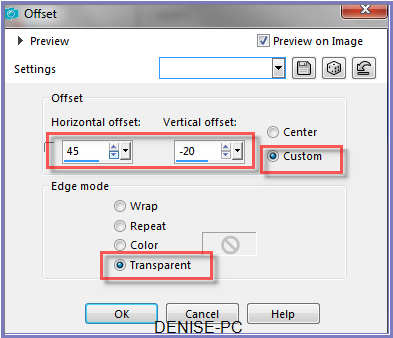
This is the text used if you wish to write it in another Font or colour.
If
You See A Fairy Ring.
Author
Unknown
If
you see a fairy ring
in a field of
grass,
Very
lightly step around,
Tip-Toe as you
pass,
Last
night Fairies frolicked there
And
they're sleeping somewhere near.
If
you see a tiny fairy
lying fast
asleep
Shut
your eyes
and run away,
Do
not stay to peek!
Do not
tell
Or
you'll break a fairy spell
Step
Four:
Image/Add Borders/5 pixels/White
Magic Wand with the following settings:

Select Border
Change Background Colour to Pattern cmlstgold001 as follows:
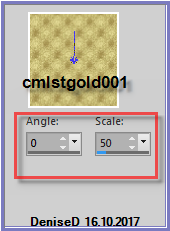
Flood Fill with Pattern
Adjust/Sharpness/Sharpen
Selections/Invert
Effects/3D Effects/Cutout as follows:
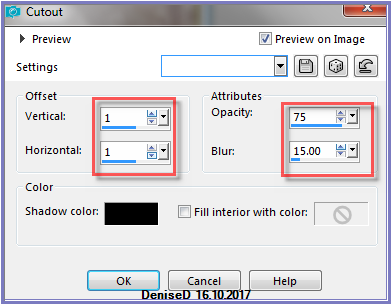
(some versions may need a New Layer here)
Repeat Cutout with -V and H settings
Selections/Select None
Step Five:
Image/Add Borders/8 pixels/Background Colour
Image/Add Borders/8 pixels/Foreground Colour
Magic Wand with the following settings:

Select last border with Magic Wand
Effects/Plugins/Texture/Texturizer/Sandstone as follows:
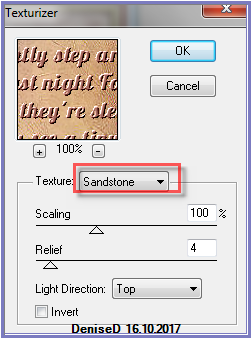
Selections/Select All
Selections/Modify/Contract 16 pixels
Selections/Invert
Effects/3D Effects/Inner Bevel as follows:
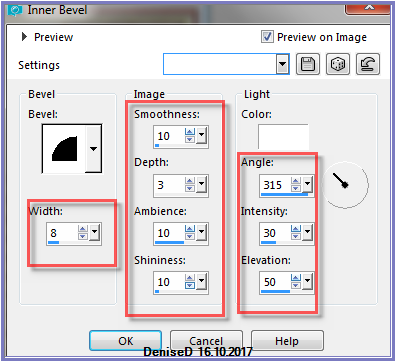
Selections/Select None
Step Six:
Image/Add Borders/5 pixels/White
Select with Magic Wand
Flood Fill with Background Pattern
Adjust/Sharpness/Sharpen
Selections/Select None
Image/Add Borders/30 pixels/White
Select Border with
Magic Wand
Change Foreground Colour to Pattern D.D.LoveFairies.jpg with the
following settings:
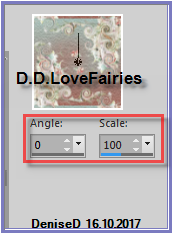
Flood Fill with Pattern.
Adjust/Sharpness/Sharpen More
Effects/3D Effects/Inner Bevel BUT change width to 20 pixels
Effects/Plugins/Eye
Candy 3.0/Drop Shadow as follows:
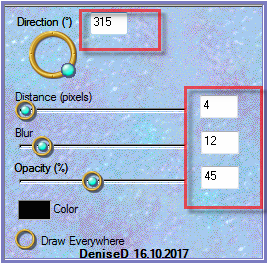
OR
Effects/Plugins/Eye Candy 4000/Shadowlab as follows:
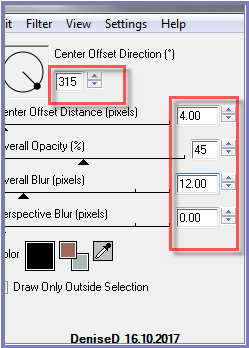
Repeat Drop Shadow/Shadowlab/Direction 135
Selections/Select None
Step Seven:
Image/Add Borders/5 pixels/White
Select with Magic Wand
Flood Fill with Background Pattern
Adjust/Sharpness/Sharpen
Selections/Select None
Promote Background
Layer
Image/Canvas Size as follows:
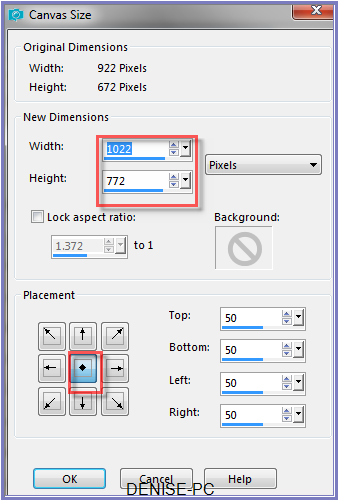
Layers/New Raster Layer
Layers/Arrange/Move Down
Change Foreground Colour back to Gradient
Flood Fill with Gradient
Effects/Plugins/Texture/Texturizer/Sandstone
Layers/New Raster Layer
Selections/Select All
Maximise JHanna_419 background-a.pspimage
Edit/Copy
Edit/Paste into Selection
Change Blend Mode to Overlay
Change Opacity to 75%
Adjust/Sharpness/Sharpen
Selections/Select None
Step Eight:
Select Raster 1
Effects/Plugins/Eye
Candy 3.0/Drop Shadow
OR
Effects/Plugins/Eye Candy 4000/Shadowlab
Repeat Drop Shadow/Shadowlab/Direction 315
Maximise
fly_agaric11-08_06pat.psp
Edit/Copy Edit/Paste as New Layer
Effects/Image Effects/Offset as follows:
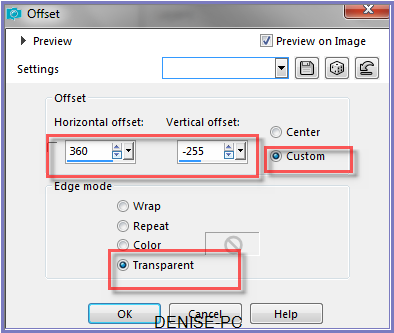
Effects/Plugins/Eye
Candy 3.0/Drop Shadow
OR
Effects/Plugins/Eye Candy 4000/Shadowlab
Step Nine:
Image/Add Borders/8
pixels/White
Select Border with Magic Wand
Flood Fill with Background Pattern
Adjust/Sharpness/Sharpen
Selections/Invert
Effects/3D Effects Cutout
Repeat Cutout +V and H settings
Selections/Select None
Image/Add Borders/40 pixels/White
Select with Magic Wand
Change Background Colour back to Pattern D.D.LoveFairies.jpg
Flood Fill with Background Pattern
Adjust/Sharpness/Sharpen
Effects/3D Effects/Inner Bevel
Effects/Plugins/Eye Candy 3.0/Drop Shadow
OR
Effects/Plugins/Eye Candy 4000/Shadowlab
Repeat Drop Shadow/Shadowlab/Direction 135
Selections/Select None
Step Ten:
Maximise Dreaming
Faery.pspimage
Edit/Copy Edit/Paste as New Layer
Adjust/Sharpness/Sharpen
Image/Mirror/Horizontal OR Image/Mirror
Effects/Image Effects/Offset as follows:
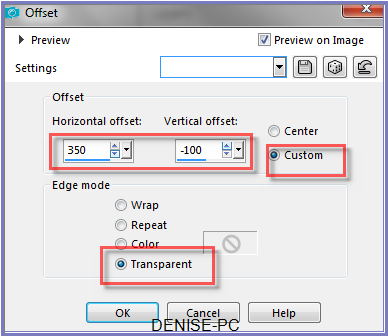
Effects/Plugins/Eye
Candy 3.0/Drop Shadow
OR
Effects/Plugins/Eye Candy 4000/Shadowlab
Step Eleven:
Maximise wave_2.png
Edit/Copy Edit/Paste as New Layer
Effects/Image Effects/Offset as follows:
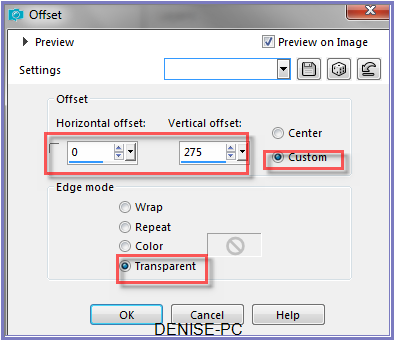
Deform/Pick Tool - drag the sides out to the border as
shown below:
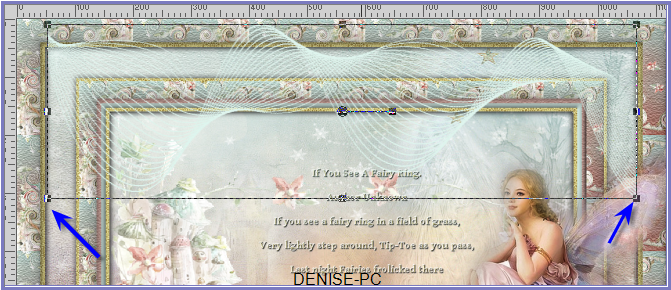
Deselect Deform/Pick Tool
Effects/Plugins/Eye Candy 3.0/Drop Shadow
OR
Effects/Plugins/Eye Candy 4000/Shadowlab
Step Twelve:
Image/Add Borders/5 pixels/White
Select with Magic Wand
Change Background Colour back to Pattern cmlstgold001
Flood Fill with Background Pattern
Adjust/Sharpness/Sharpen
Selections/Select None
Image/Add Borders/50 pixels/White
Select with Magic Wand
Change Foreground Back to Gradient
Flood fill with Gradient
Effects/Texture Effects/Texture/Sandstone
Effects/Plugins/Filter
Factory G/Bevel 1.5 as follows:
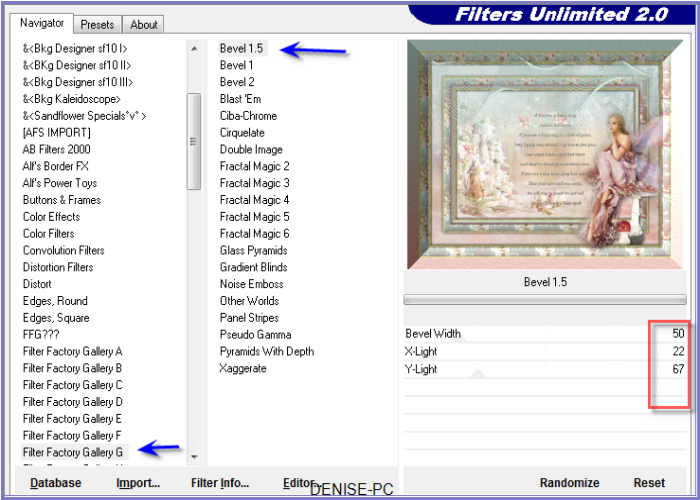
Selections/Select None
Image/Add Borders/1 pixel/Background Colour
Image/Add Borders/8 pixels/White
Select with Magic Wand
Flood fill with Gradient
Effects/3D Effects/Inner Bevel BUT change width to 8
Selections/Select None
Step Thirteen:
Maximise dreamingkjun .pspimage
Edit/Copy Edit/Paste as New Layer
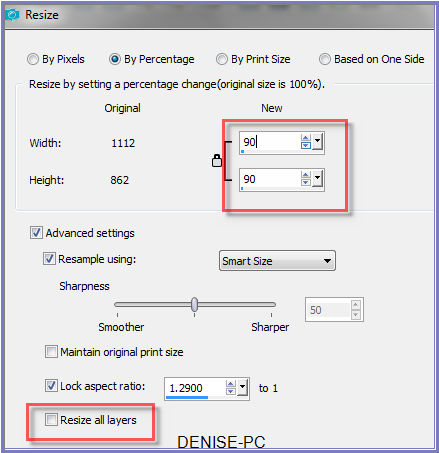
Image/Resize/90% as follows:
Adjust/Sharpness/Sharpen
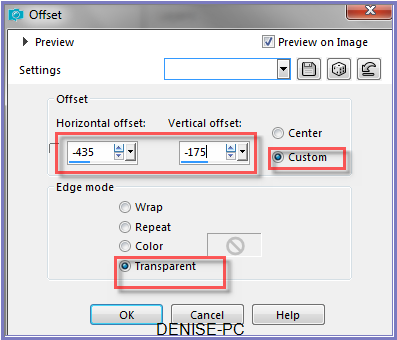
Effects/Image Effects/Offset as follows:
Effects/Plugins/Eye
Candy 3.0/Drop Shadow
OR
Effects/Plugins/Eye Candy 4000/Shadow
Maximise
DeniseD Signature.png
Edit/Copy
Edit/Paste a New Layer
Place at bottom of Layer
Layers/New Raster Layer
Add
your Watermark
Layers/Merge
All Flatten
Image/Resize/850
pixels wide - height will adjust itself
File/Export/JPEG
Optimiser/Compression Value 20
I hope you have
enjoyed
this tutorial
A
big thank you to the ladies who test my Tutorials
TESTERS'
RESULTS

ALICE

ELIZABETH

FRAN

SHIRLEY NZ
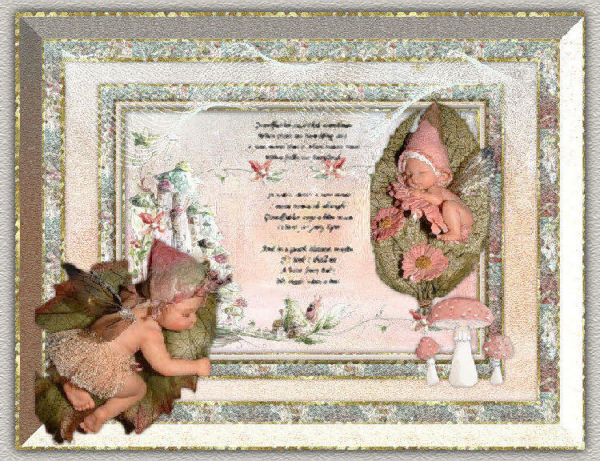
BETTY
