Tutorial 2017
This
tutorial is written by
Denise D. on 19th August 2017
from
my own ideas.
Any
resemblance to other tutorials is
co-incidental and unintentional.
You
may share my tutorials with other
groups.
All I ask is that you advise me
and
credit for the tutorial is given to me and linked to
http://escapingtopsp2.altervista.org/Home/homeb.html
Please
do not upload any of my completed Tutorial images onto sites
such as Fotki, Pinterest, Photobucket or similar
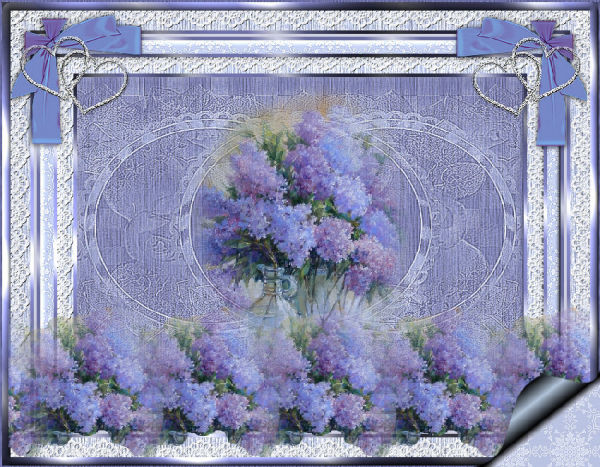
LILACS AND LACE
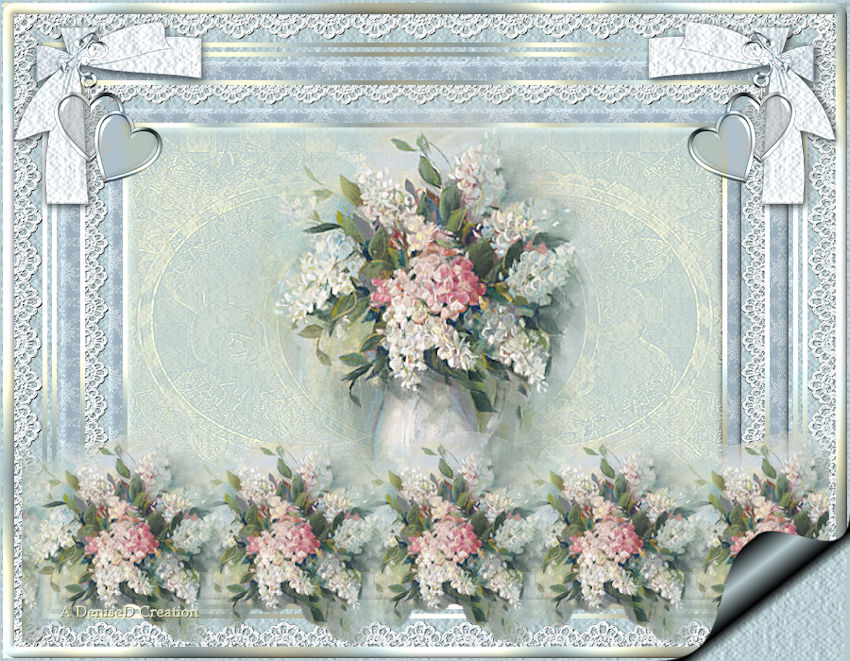
http://escapingtopsp2.altervista.org/LilacsAndLace/LilacsAndLace.html
Use this pencil to follow the steps
hold down left click to grab and move it


Click on the Box to download Supplies
To print click on Printer

Supplies
Images:
Fairymist_tatie_dentelle.pspimage
You can join this Group at:
http://fairymist.pagesperso-orange.fr/
Lilacs_for_Ellyn_CarolRowan_JG.pspimage
Misted
by Joyce (I don't have a contact for this image)
Double Hearts
Cream Bow
If you are
the owner of this
images, please contact me
so that
credit can be given to
you
DeniseD Signature.png
Textures:
hatch fine.bmp
Patterns:
wp_damask_035_tn
Mask:
masque cadre fleuri rect-by-Odet.pspimage
You can join this group at:
http://www.monpetitjardin-moi.fr.nf/
Selections:
D.D.LilacsAndLace
D.D.LilacsAndLace2
Plugins:
Eye Candy 3 OR Eye Candy 4000
&<Sandflower Specials "v">
(Import into Filters Unlimited 2.0)
MuRa's
Seamless
MuRa's Meister
Found here:
http://www.saturnelladesign.fr/pages/filtres.htm
http://www.maidiregrafica.eu/paginafiltri/filtri.html
Notes:
This Tutorial was created in PSP
X9.... other
versions may need adjustment
Some of the graphics may be from Free
to Use sites or Share
Groups.
If you are the creator of one of these
please let me know
so that appropriate credit can be given.
No infringement of
copyright is intended or intentional.
Some
helpful information:
You can change the blend mode, opacity and drop shadow, as
well as colourise
the materials,
according to the tubes/colours you are using.
When applying the Resize with the All Layers option checked, this will
be
informed in the tutorial,
otherwise, apply the resize with this option unchecked.
Remember always to save your work.
Whenever you reduce an image, apply Adjust/Sharpness/Sharpen, to
maintain the
sharpness of the image.

Place Pattern in PSP Pattern Folder
Place Texture in PSP Texture Folder
Place Mask in PSP Mask Folder
Place Selections in PSP Selections Folder
Open graphics in PSP, duplicate (Shift
D) and close the original.
Please
Note: Offset
settings provided in this tutorial may vary according to size of your
image.
Please
adjust to suit.
The
settings remain the same throughout this Tutorial unless otherwise
stated.
Set your Foreground colour to #f6f3d0
Set your Background colour to #b7cbcf
Step One:
File/New/New Image 900 pixels x 700
pixels as follows:
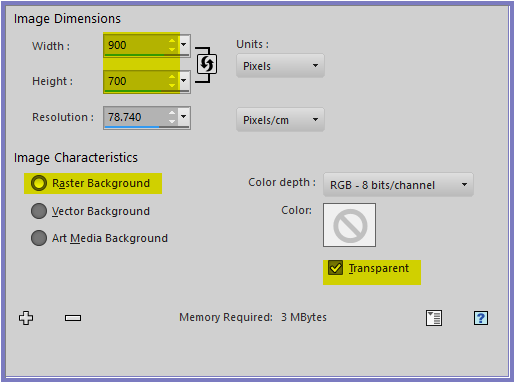
Flood fill with Background Colour
Effects/Texture
Effects/Texture/hatch fine as follows:
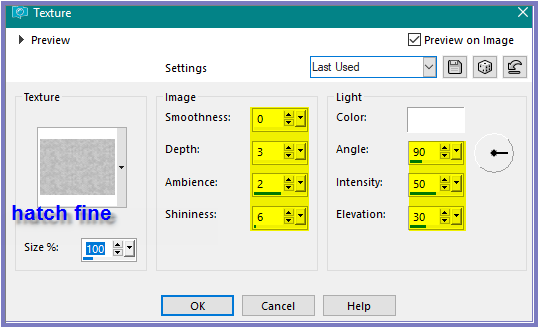
Selections/Select All
Selections/Modify/Contract 3 pixels
Step Two:
Change Foreground to Foreground/Background Linear
Gradient as follows:
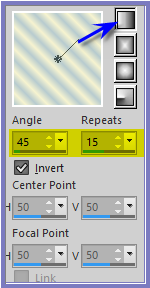
Layers/New Raster Layer
Flood Fill with Gradient
Effects/Plugins/Filters
Unlimited 2/&<Sandflower Specials "v">/Poolshadow
as follows:
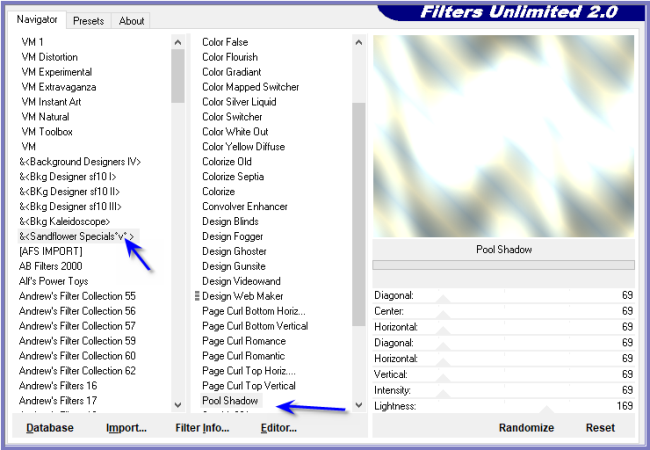 Selections/Modify/Contract
12 pixels
Edit/Clear
Selections/Modify/Select Selection Borders as
follows:
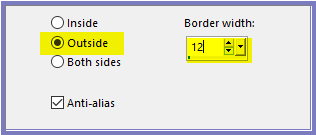
Effects/3D Effects/Inner Bevel as follows:
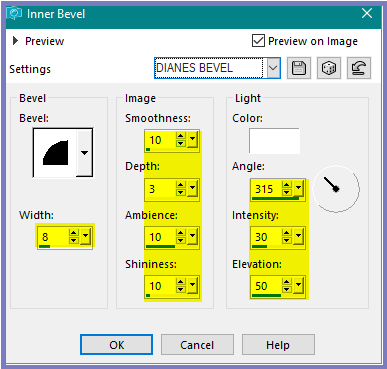 Selections/Select
None
Step
Three:
Magic Wand with the following settings:

Select centre of Layer with Magic Wand
Layers/New Raster Layer
Maximise Fairymist_tatie_dentelle.pspimage
Edit/Copy
Edit/Paste into Selection
Adjust/Sharpness/Sharpen
Adjust/Brightness and Contract/Fill Light/Clarity as follows:
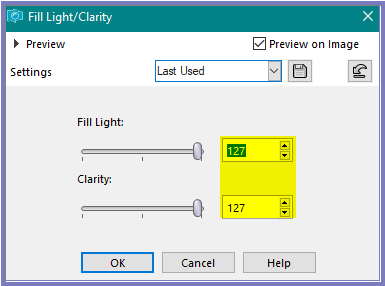
Layers/Duplicate
Layers/Merge/Merge Down
Effects/Plugins/MuRa's Seamless/Emboss at Alpha/Default Settings
Step Four:
Selections/Modify/Contract 30 pixels
Layers/New Raster Layer
Flood Fill with Gradient
Effects/Plugins/Filters
Unlimited 2/&<Sandflower Specials "v">/Poolshadow
Selections/Modify/Contract 5 pixels
Edit/Clear
Selections/Modify/Contract 5 pixels
Layers/New Raster Layer
Flood Fill with
Gradient
Effects/Plugins/Filters
Unlimited 2/&<Sandflower Specials "v">/Poolshadow
Selections/Modify/Contract 5 pixels
Edit/Clear
Selections/Modify/Contract 5 pixels
Step Five:
Change Background
Colour to Pattern wp_damask_035_tn as follows:
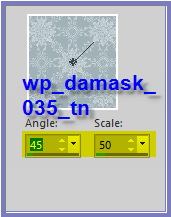
Layers/New Raster Layer
Flood Fill with Pattern
Adjust/Sharpen/Sharpen More
Effects/3D
Effects/Inner Bevel
Selections/Modify/Contract 20 pixels
Layers/New Raster Layer
Flood Fill with Gradient
Effects/Plugins/Filters
Unlimited 2/&<Sandflower Specials "v">/Poolshadow
Selections/Modify/Contract 5 pixels
Edit/Clear
Layers/New Raster Layer
Change Background back to Background Colour
Flood fill with Background Colour
Effects/Texture
Effects/Texture/hatch fine
Layers/New
Raster Layer
Maximise Fairymist_tatie_dentelle.pspimage
Edit/Copy
Edit/Paste into Selection
Adjust/Sharpness/Sharpen
Adjust/Brightness and Contract/Fill Light/Clarity as follows:

Layers/Duplicate
Layers/Merge/Merge Down
Effects/Plugins/MuRa's Seamless/Emboss at Alpha/Default Settings
Step Six:
Selections/Modify/Contract 25 pixels
Change Background Colour back to Pattern
Layers/New Raster Layer
Flood Fill with Pattern
Adjust/Sharpness/Sharpen More
Effects/3D Effects/Inner Bevel
Selections/Modify/Contract 15 pixels
Layers/New Raster Layer
Flood Fill with Gradient
Effects/Plugins/Filters
Unlimited 2/&<Sandflower Specials "v">/Poolshadow
Selections/Modify/Contract 5 pixels
Edit/Clear
Step Seven:
Layers/New Raster Layer
Change Foreground
back to Foreground Colour
Flood Fill with Foreground Colour
Effects/Texture Effects/Texture/hatch fine
Layers/New
Raster Layer
Change Background back to Background Colour
Flood Fill with Background Colour
Layers/Load/Save Mask/Load Mask masque cadre
fleuri rect-by-Odet.pspimage from Disk as follows:
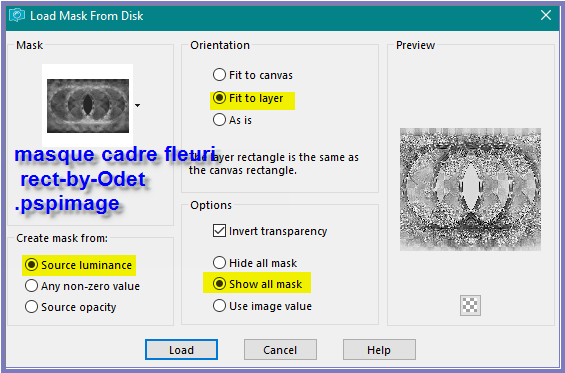
Adjust/Sharpness/Sharpen More
Layers/Merge/Merge Group
Effects/3D Effects/Inner Bevel
Selections/Select None
Step Eight:
Maximise
Lilacs_for_Ellyn_CarolRowan_JG.pspimage
Edit/Copy
Edit/Paste as New Layer
Adjust/Sharpness/Sharpen
Maximise cream
bow.pspimage
Edit/Copy
Edit/Paste as New Layer
Image/Resize/90%
Adjust/Sharpness/Sharpen
Effects/Image Effects/Offset as follows:
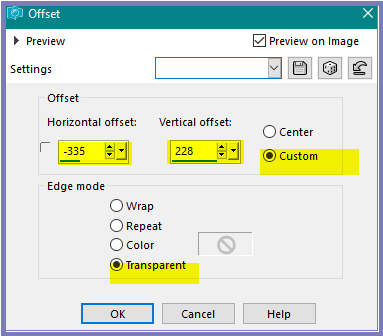
Adjust/Hue and
Saturation/Colorize as follows:
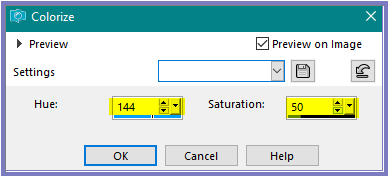
Layers/Duplicate
Image/Mirror/Horizontal OR Image/Mirror
Step
Nine:
Maximise Double
Hearts.pspimage
Edit/Copy
Edit/Paste as New Layer
Effects/Image Effects/Offset as follows:
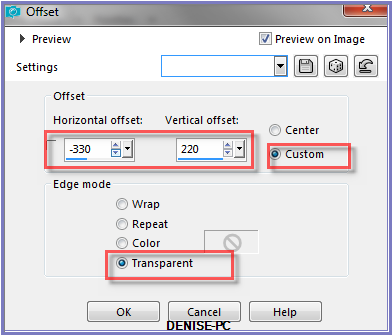
Adjust/Sharpness/Sharpen
Change Blend Mode to Luminance Legacy
Effects/Plugins/Eye
Candy 3.0/Drop Shadow as follows:
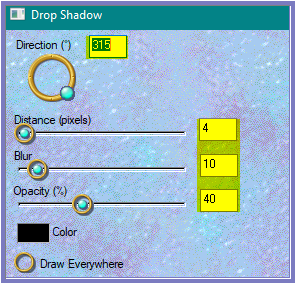
OR
Effects/Plugins/Eye Candy 4000/Shadowlab
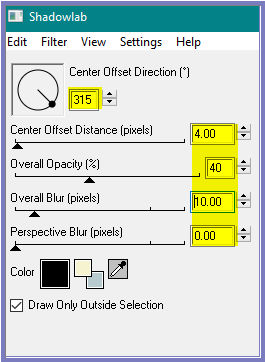 Layers/Duplicate
Image/Mirror/Horizontal OR Image/Mirror
Layers/Merge/Merge Down
Step Ten:
Maximise Lilacs_for_Ellyn_CarolRowan_JG.pspimage
Selections/Load/Save Selection/Load Selection D.D.LilacsAndLace from
Disk as follows:
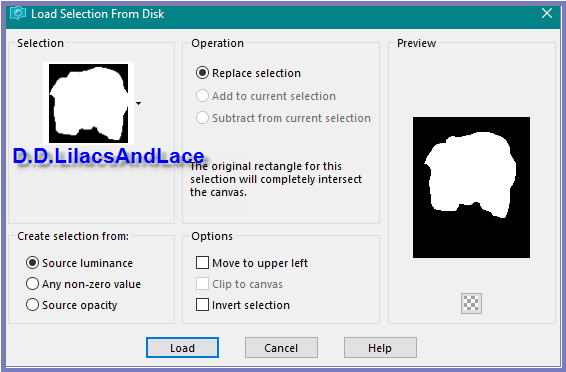
Edit/Copy
Selections/Select None
Back to Original Image
Edit/Paste as New Layer
Image/Resize/85%
Adjust/Sharpness/Sharpen
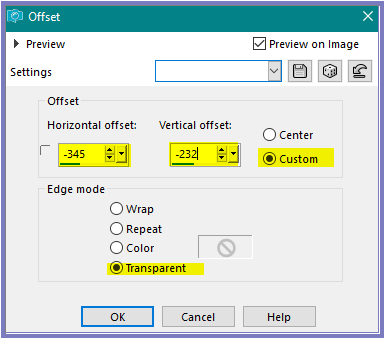
Effects/Image Effects/Offset as follows:
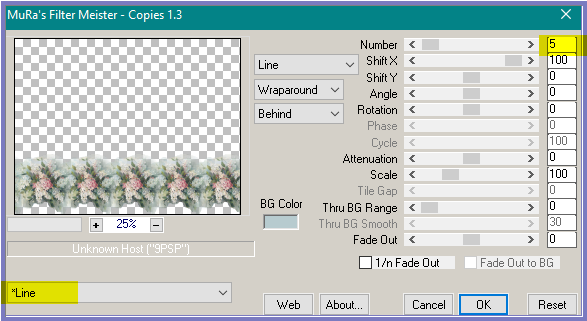
Effects/Plugins/MuRa's Copies as follows:
Image/Resize 95%
Maximise DeniseD Signature.png
Edit/Copy Edit/Paste as New Layer
Place at bottom of Layer
Layers/New Raster Layer
Add
your Watermark somewhere on the left hand side
Layers/Merge
All Flatten
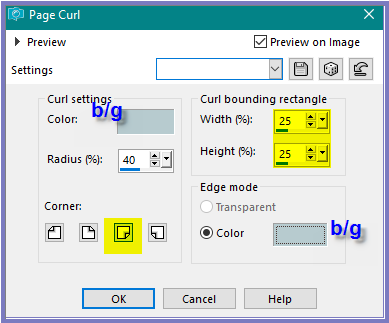
Effects/Image Effects/Page Curl as follows:
Selections/Load/Save Selection/Load Selection D.D.LilacsAndLace2 from
Disk
Effects/Texture Effects/Texture
Selections/Select None
Image/Resize/850
pixels wide - height will adjust itself
File/Export/JPEG
Optimiser/Compression Value 20
I hope you have
enjoyed
this tutorial
A
big thank you to the ladies who test my Tutorials
TESTERS'
RESULTS

ALICE T.
BETTY

ELIZABETH

FRAN
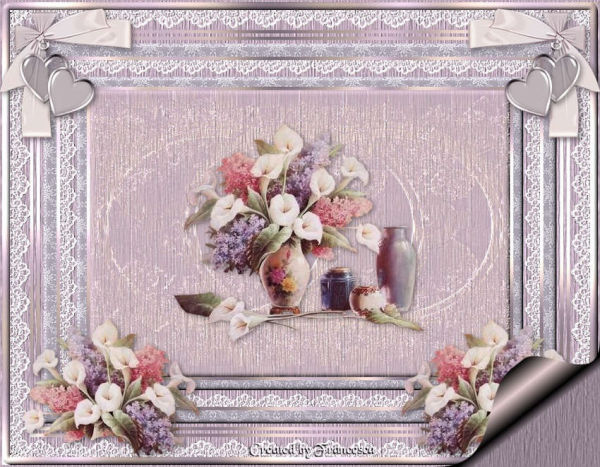
FRAN
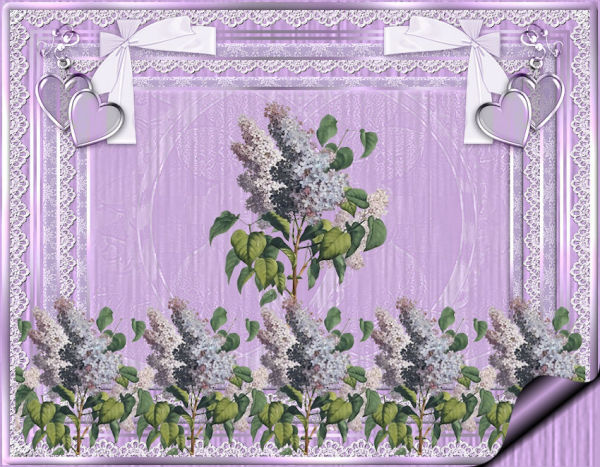
SHIRLEY NZ
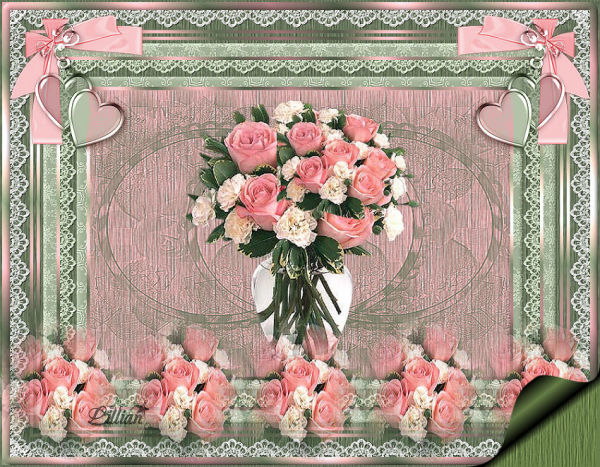
LILLIAN
| | | |