Tutorial 2017
This Tutorial was written by
Denise D on 30th July, 2015
from my own ideas.
Any resemblance to any other tutorial is purely co-incidental
and unintentional.
You may share my Tutorial with others.
All I ask that permission is asked and credit given to the links
below.
http://escapingtopsp2.altervista.org/Home/homeb.html
and
https://groups.yahoo.com/neo/groups/EscapingtoPSP/info
Please do not upload any of my
completed Tutorial images onto sites
such as Fotki, Pinterest,
Photobucket or similar
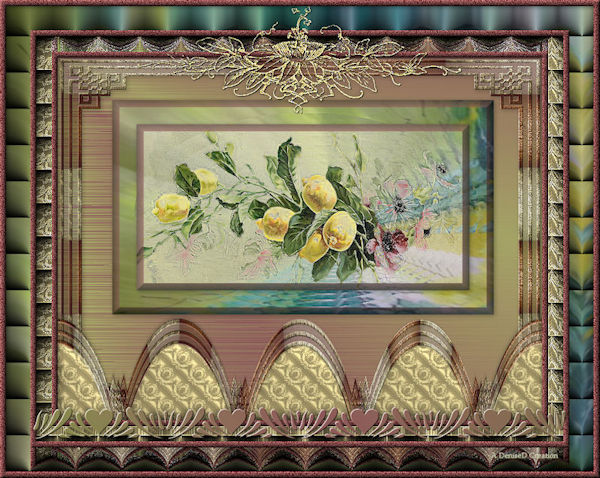
LEMONS AND LIME
![]() To follow Tutorial, hold down pencil - left click to move it
To follow Tutorial, hold down pencil - left click to move it


To print click on Printer

Double Click on the Box to download
 Thank you Franie Margot for your French
Translation
Please go to:
http://franie-margot.eklablog.com/lemons-and-lime-p1309892
Supplies
Images:
D.D.LemonAndLime
lizztish_birthday-three-4
You can join her group at:
https://groups.google.com/forum/?fromgroups#!forum/emotivemists
Gold Element
~de~ ding border2
Obtained through Internet
If this image was created by you,
please let me know
so that appropriate credit can be
given.
Pattern:
Angra11
Mask:
samarkan
Plugins:
MuRa's Seamless
Eye Candy 3.0
Kang2
Penta
VM Toolbox
VM Instant Art
( Import VM
plugins and Kang 2 into Filters Unlimited 2.0)
Found here:
http://www.saturnelladesign.fr/pages/filtres.htm
http://www.violettegraphic.com/02filtres/Filtres.htm
http://janaly.com/Filtres/Filtre.html
http://www.maidiregrafica.eu/paginafiltri/filtri.html
Notes:
This Tutorial was created in PSP
X8.... other
versions may need adjustment
Some of the graphics may be from Free
to Use sites or Share
Groups.
If you are the creator of one of these
please let me know
so that appropriate credit can be given.
No infringement of
copyright is intended or intentional.
Before opening PSP, download plugins
and install
Place Mask in PSP Mask Folder
Open graphics in PSP, duplicate (Shift
D) and close the original.
Please
Note: Offset
settings provided in this tutorial may vary according to size of your
image.
Please
adjust to suit.
The
settings remain the same throughout this Tutorial unless otherwise
stated.
Set your Foreground colour to #a6a566
Set your Background colour to #8e5a5a
Step One:
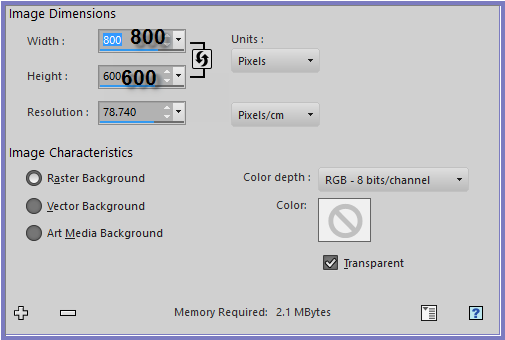
File/New/New Image 800 pixels x 600
pixels as follows:
 Step Two:
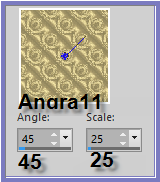
Change Foreground Colour to Pattern
Angra11 as follows:
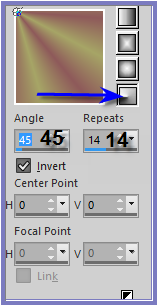
 Change Background Colour to
Foreground/Background/Radial Gradient with the following settings:
 Step Three:
Flood Fill with Foreground Pattern
Layers/Load/Save Mask/Load Mask
samarkan from disk as follows:
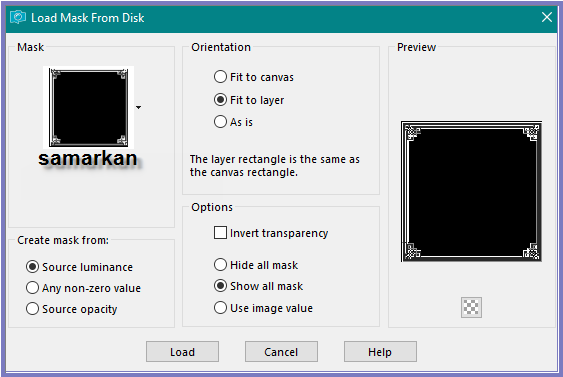 Adjust/Sharpness/Sharpen
Layers/Merge/Merge Group
Layers/Duplicate
Layers/Merge/Merge Down
Effects/Plugins/Filters Unlimited
2.0/Kang2/luxury Cubes as follows:
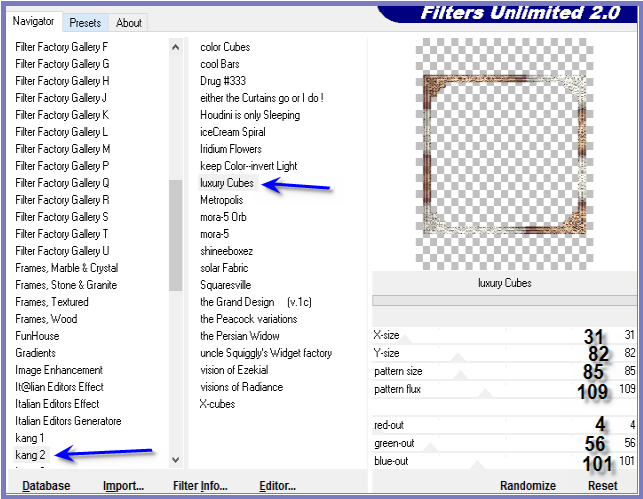 Effects/Plugins/MuRa's Seamless/Emboss
at Alpha with the following settings:
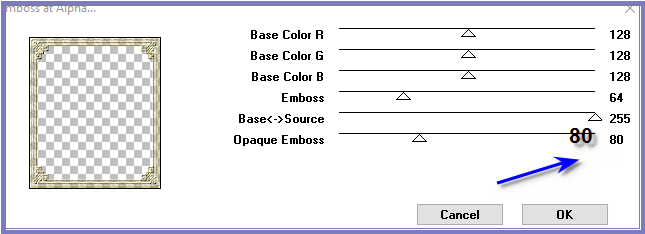 Effects/Plugins/Eye Candy 3.0/Drop
Shadow with the following settings:
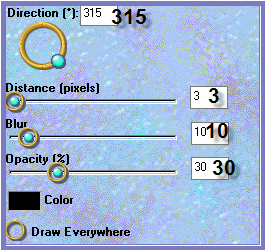 Step
Four:
Layers/Duplicate
Image/Resize/80% as follows:
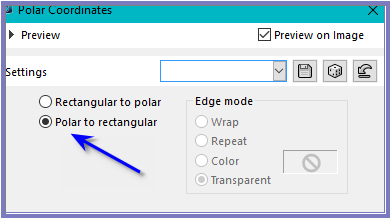
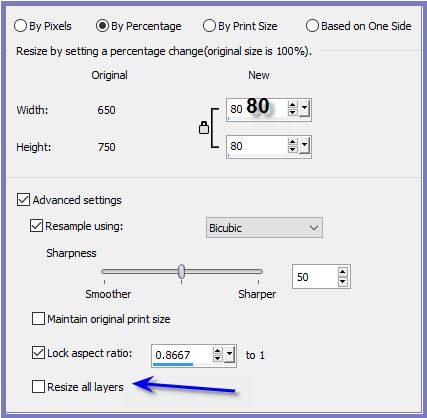 Effects/Distortion Effects/Polar
Co-ordinates as follows:
 Adjust/Sharpness/Sharpen
Step
Five:
Magic Wand with the following settings:
 Select the areas shown below
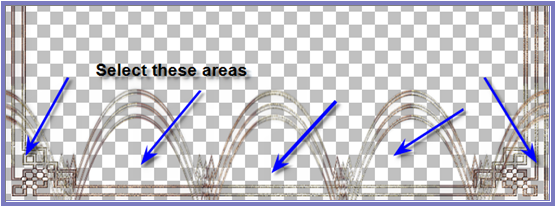 Selections/Modify/Expand 8 pixels
Layers/New Raster Layer
Layers/Arrange/Send to Bottom
Flood Fill with Foreground Pattern
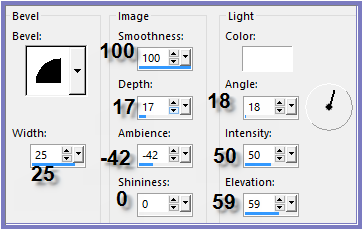
Effects/3D Effects/Inner Bevel as
follows:
 Selections/Select None
Layers/Merge/Merge Visible
Step
Six:
Layers/New Raster Layer
Layers/Arrange/Move Down
Flood Fill with Background Gradient
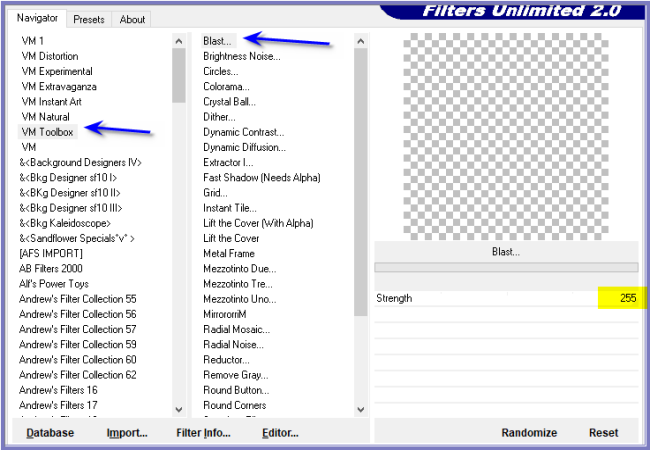
Effects/Plugins/Filters Unlimited
2.0/VM Toolbox/Blast as follows:
 Adjust/Sharpness/Sharpen More
Layers/New Raster Layer
Layers/Arrange/Bring to Top
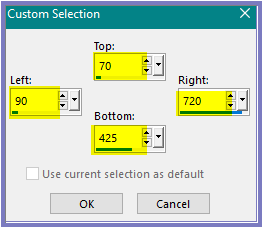
Selections/Custom Selection with the
following settings:
 Maximise lizztish_birthday-three-4
Edit/Copy
Edit/Paste into Selection
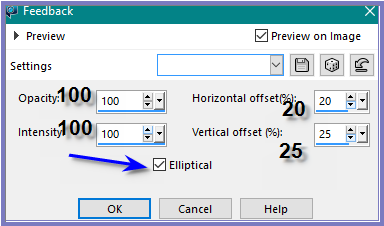
Effects/Reflection Effects/Feedback as
follows;
 Adjust/Sharpness/Sharpen More
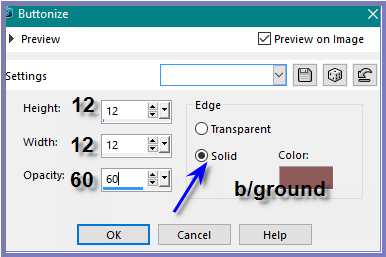
Effects/3D Effects/Buttonize as
follows:
 Effects/Plugins/Eye Candy 3.0/Drop Shadow
Selections/Modify/Contract/40 pixels
Layers/New Raster Layer
Maximise D.D.LemonAndLime
Edit/Copy
Edit/Paste into Selection
Effects/3D Effects/Buttonize
Effects/Plugins/Eye Candy 3.0/Drop Shadow
Selections/Select None
Step Seven:
Image/Add Borders/10 pixels/Background
Colour
Select with Magic Wand
Effects/Plugins/Filters Unlimited
2.0/VM Toolbox/Brightness Noise with the following settings:
Effects/Plugins/Eye Candy 3.0/Drop Shadow
Selections/Modify/Contract/40 pixels
Layers/New Raster Layer
Maximise D.D.LemonAndLime
Edit/Copy
Edit/Paste into Selection
Effects/3D Effects/Buttonize
Effects/Plugins/Eye Candy 3.0/Drop Shadow
Selections/Select None
Step Seven:
Image/Add Borders/10 pixels/Background
Colour
Select with Magic Wand
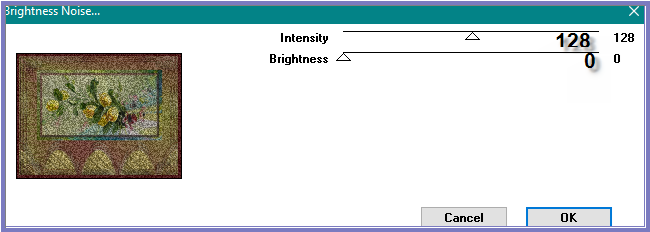
Effects/Plugins/Filters Unlimited
2.0/VM Toolbox/Brightness Noise with the following settings:
 Adjust/Sharpness/Sharpen
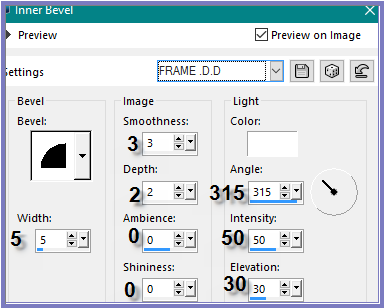
Effects/3D Effects/Inner Bevel with
the following settings:
 Effects/Plugins/Eye Candy 3.0/Drop
Shadow
Repeat Drop Shadow/Direction 135
Selections/Select None
Step Eight:
Image/Add Border/25 pixels/White
Select with Magic Wand
Flood Fill with Foreground Pattern
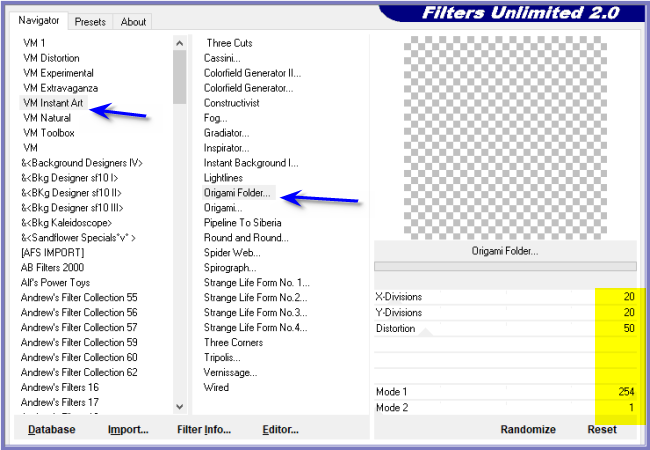
Effects/Plugins/Filters Unlimited
2.0/VM Instant Art/Origami Folder as follows:
 Effects/Edge Effects/Enhance
Selections/Select None
Image/Add Borders/10 pixels/Background
Colour
Select with Magic Wand
Effects/Plugins/Filters Unlimited
2.0/VM Toolbox/Brightness Noise
Effects/3D Effects/Inner Bevel
Effects/Plugins/Eye Candy 3.0/Drop
Shadow
Repeat Drop Shadow/Direction 315
Selections/Select None
Step Nine:
Image/Add Borders/40 pixels/White
Promote Background Layer
Select with Magic Wand
Maximise lizztish_birthday-three-4
Edit/Copy
Edit/Paste into Selection
Effects/Plugins/Filters Unlimited
2.0/VM Instant Art/Origami Folder
Image/Flip
Selections/Select None
Image/Add Borders/10 pixels/Background
Colour
Select with Magic Wand
Effects/Plugins/VM Toolbox/Brightness
Noise
Effects/3D Effects/Inner Bevel
Effects/Plugins/Eye Candy 3.0/Drop
Shadow
Repeat Drop Shadow/Direction 135
Selections/Select None
Step Ten:
Maximise Gold Element
Edit/Copy
Edit/Paste as New Layer
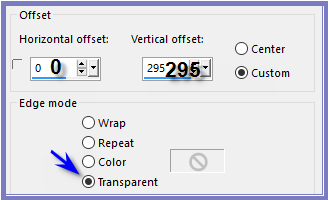
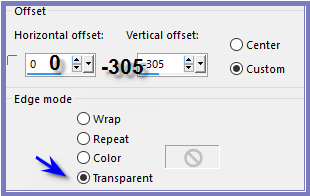
Effects/Image Effects/Offset as
follows:
 Layers/Duplicate
Layers/Merge/Merge Down
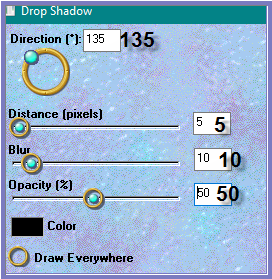
Adjust/Sharpness/Sharpen
Effects/Plugins/Eye Candy 3.0/Drop
Shadow as
follows:
 Step
Eleven:
Maximise ~de~ ding border2
Edit/Copy
Edit/Paste as New Layer
Effects/Image Effects/Offset as follows:
 Change to Target Brush with the following
settings:
 Wipe over the hearts with Background
Gradient
Effects/Plugins/Eye Candy 3.0/Drop Shadow
Step
Twelve
Layers/New
Raster Layer
Add
your Watermark
Layers/Merge
All Flatten
Image/Resize/800
pixels wide - height will adjust itself
File/Export/JPEG
Optimiser/Compression Value 20
I hope you have enjoyed
this tutorial
A
big thank you to Sjoertdje, Gisela, Annie, Lillian, Shirley, Alice T,
Betty and Elizabeth, the ladies who test my Tutorials
TESTERS'
RESULTS
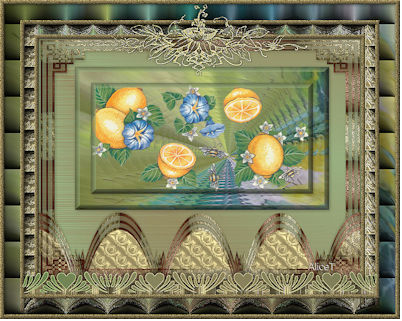
ALICE T.
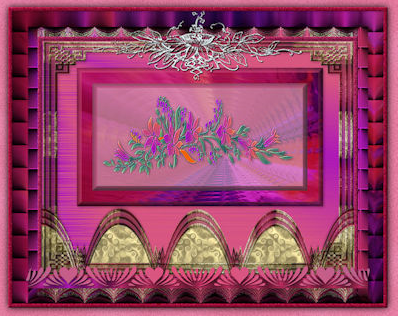
BETTY
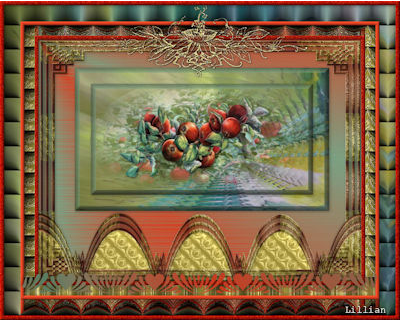
LILLIAN
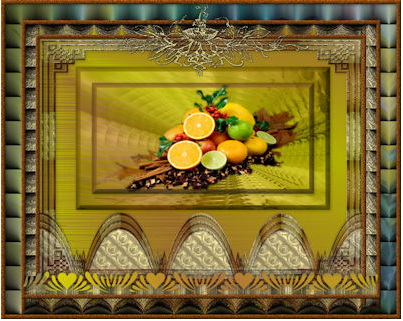
SHIRLEY
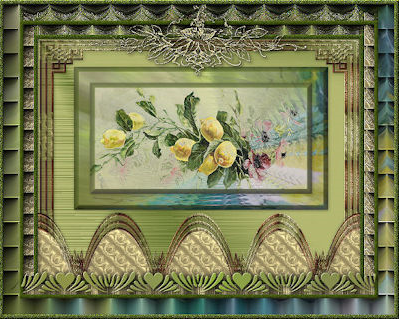
ELIZABETH
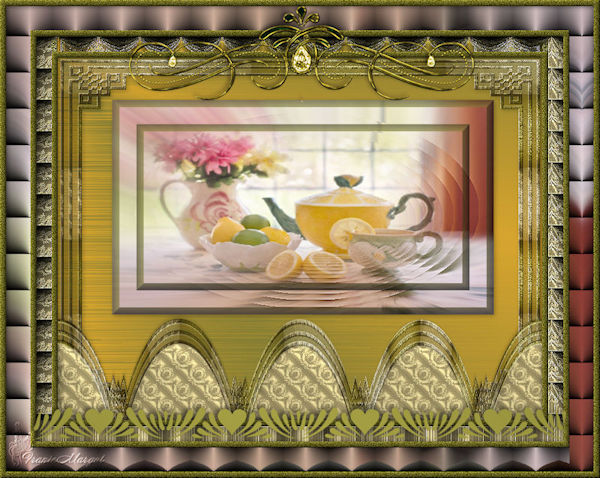
FRANIE MARGOT
FOR
OTHER VERSIONS OF THE TUTORIAL
PLEASE
GO TO
https://goo.gl/photos/KNL43dVHmnGuSBSu9
| | | |