Tutorial 2017
This Tutorial was written by
Denise D on 8th January 2017
from my own ideas.
Any resemblance to any other tutorial is purely co-incidental
and unintentional.
You may share my Tutorial with others.
All I ask that permission is asked and credit given to the links
below.
http://escapingtopsp2.altervista.org/Home/homeb.html
and
https://groups.yahoo.com/neo/groups/EscapingtoPSP/info
Please do not upload any of my
completed Tutorial images onto sites
such as Fotki, Pinterest,
Photobucket or similar
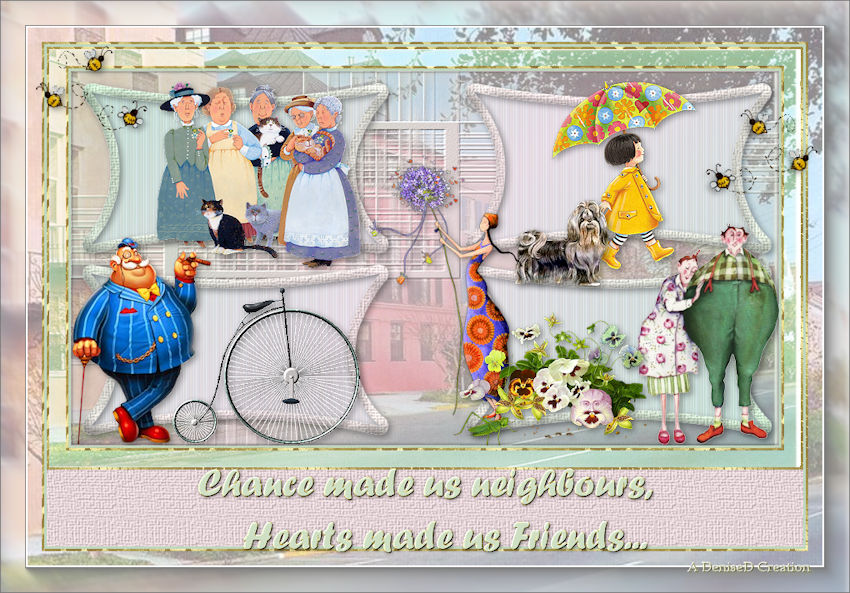
DOWN MY STREET
![]() To follow Tutorial, hold down pencil - left click to move it
To follow Tutorial, hold down pencil - left click to move it


To print click on Printer

Double Click on the Box to download Supplies
Supplies
Images:
JHanna_584¸G.Boissonnard.pspimage
You can join her group at:
http://groups.yahoo.com/group/JHanna_Tubes
JER_FunnyCouple_CThran.psp
You can join her group at:
https://groups.yahoo.com/neo/groups/TagalongTubes/info
Milord-by.jonatan-iversen.pspimage
pensées et insectes-merci
AliceT.pspimage
You can join this group at:
http://www.monpetitjardin-moi.fr.nf/
ccd-0773bicycle_1.pspimage
lshormoneladies.pspimage
CGSS~2011WallCalendar4.pspimage
jcw_shih_tzu.pspimage
Street Image.pspimage
Street Image2.pspimage (Alternate Image)
mbp-buzzybeez.pspimage
Obtained through Internet
If this image was created by you,
please let me know
so that appropriate credit can be
given.
Pattern:
JF_BlueStripe
cmlstgold0034
Texture:
JC_090.psd
Preset
Shape:
AltemusBordersFour_Z
(If you are unable to install the Preset
Shape I have included a completed image in the supplies.
You can copy and paste it into the design)
Mask:
masque_174franie_margot
You can join this Group at:
http://www.tuber1941.web44.net/
Font:
Forte.TTF
Plugins:
Eye Candy 3.0
OR Eye Candy 4000
MuRa's Seamless
Filters Unlimited 2.0
Found here:
http://www.saturnelladesign.fr/pages/filtres.htm
http://janaly.com/Filtres/Filtre.html
http://www.maidiregrafica.eu/paginafiltri/filtri.html
Notes:
This Tutorial was created in PSP
X9.... other
versions may need adjustment
Some of the graphics may be from Free
to Use sites or Share
Groups.
If you are the creator of one of these
please let me know
so that appropriate credit can be given.
No infringement of
copyright is intended or intentional.
Before opening PSP, download plugins
and install
Place Pattern in PSP Pattern Folder
Place Texture in PSP Texture Folder
Place Preset Shape in Preset Shape
Folder
Open graphics in PSP, duplicate (Shift
D) and close the original.
Please
Note: Offset
settings provided in this tutorial may vary according to size of your
image.
Please
adjust to suit.
The
settings remain the same throughout this Tutorial unless otherwise
stated.
Set your Foreground colour to #e4d4d7
Set your Background colour to #bfd7c0
Step One:
File/New/New Image 850 pixels x 450
pixels as follows:
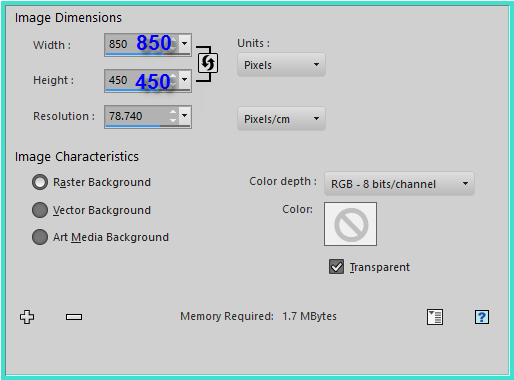 Flood fill with Foreground Colour
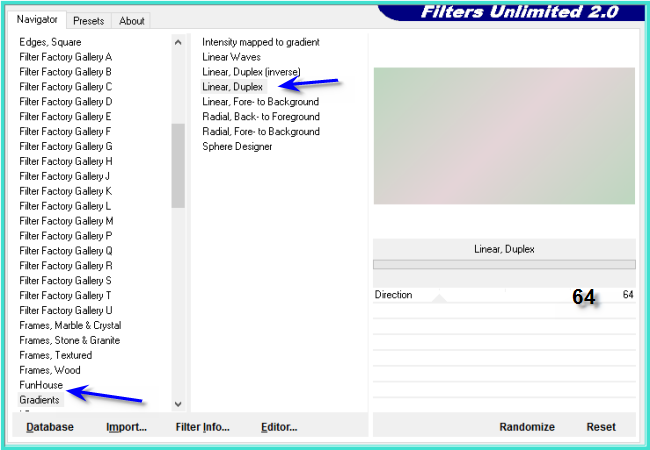
Effects/Plugins/Filters Unlimited
2.0/Gradients/ Linear, Duplex as follows:
 Effects/Plugins/Simple/Quick Tile
Effects/Edge Effects/Enhance More
Repeat Enhance More
Step
Two:
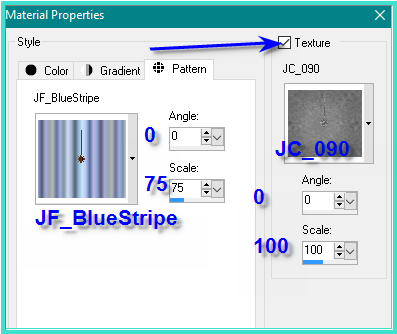
Change Background Colour to Pattern
JF_BlueStripe as follows:
 Still on the Background Colour change
Texture to JC_090 as follows:
PSP
X9 VERSION:
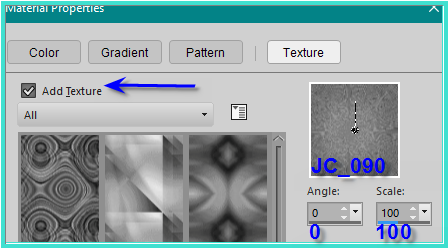
PSP 9 VERSION :
 Layers/New Raster Layer
Flood Fill with
Background/Pattern/Texture
Change Opacity to 80%
Change Blend Mode to Screen
Adjust/Sharpness/Sharpen More
Step Three:
Layers/New Raster Layer
Selections/Select All
Maximise Street Image.pspimage
Edit/Copy
Edit/Paste into Selection
Change Opacity to 80%
Selections/Select None
Layers/New Raster Layer
Flood Fill with Foreground Colour
Effects/Plugins/Filters Unlimited 2.0/Gradients/
Linear, Duplex
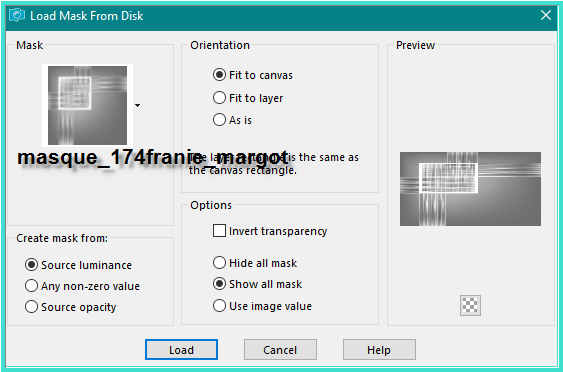
Layers/Load/Save Mask/Load Mask
masque_174franie_margot from Disk as follows:
 Effects/Image Effects/Enhance
Layers/Merge/Merge Group
Effects/Plugins/MuRa's Seamless/Emboss
at Alpha/Default settings
Step
Four:
Layers/New Raster Layer
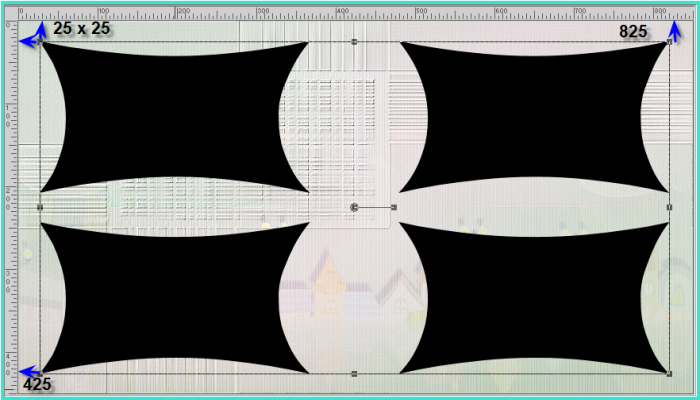
Preset Shape Tool/AltemusBordersFour_Z
with the following settings:
 Starting at 25 x 25 pixels pull out
the shape to 825 pixels across and 425 pixels down as shown below:
 Convert to Raster Layer
Step Five:
Magic Wand with the following settings:
 Select the black images
Layers/New Raster Layer
Flood Fill with Foreground Colour
Effects/Plugins/Filters Unlimited 2.0/Gradients/
Linear, Duplex
Layers/New Raster Layer
Go to the Background Colour settings
and remove the Texture Effect
Flood Fill with Background Pattern
Change Blend Mode to Hard Light
Change Opacity to 65%
Step Six:
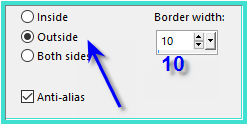
Selections/Modify/Select Selection
Borders with the following settings:
 Layers/New Raster Layer
Flood Fill with Foreground Colour
Effects/Plugins/Filters Unlimited 2.0/Gradients/
Linear, Duplex
Effects/Plugins/Filters Unlimited
2.0/Paper Textures/Canvas, Medium as follows:
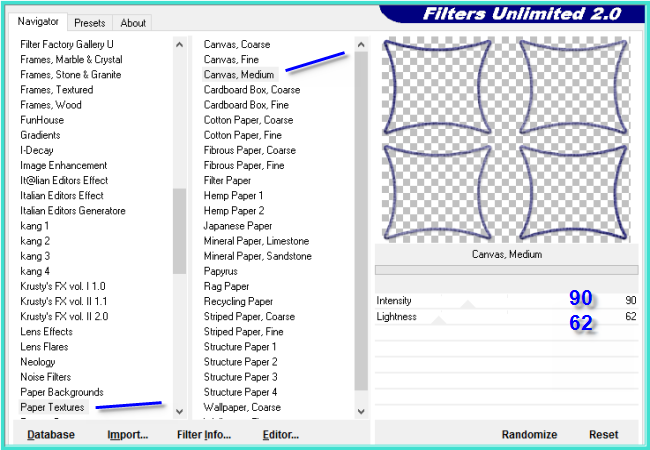 Effects/3D Effects/Inner Bevel as
follows:
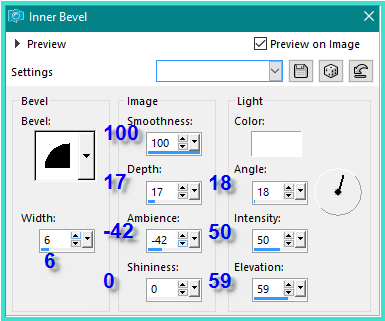 Effects/Plugins/Eye Candy 3.0/Drop
Shadow as follows:
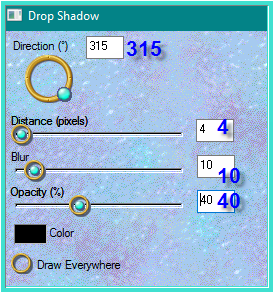 OR
OR
Effects/Plugins/Eye Candy 4000/Shadowlab as follows:
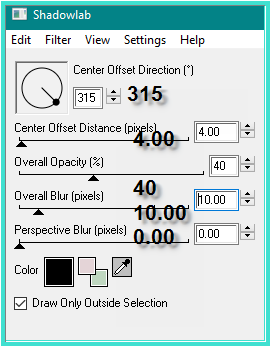
Selections/Select None
Step Seven:
Maximise lshormoneladies.pspimage
Edit/Copy
Edit/Paste as New Layer
Image/Resize 60%
Adjust/Sharpness/Sharpen
Effects/Image Effects/Offset as
follows:
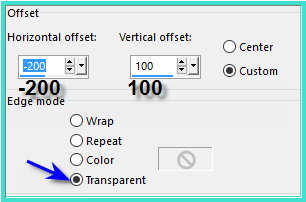 Effects/Plugins/Eye Candy 3.0/Drop
Shadow OR Eye Candy 4000/Shadowlab
Step Eight:
Maximise
CGSS~2011WallCalendar4.pspimage
Edit/Copy
Edit/Paste as New Layer
Image/Resize/40%
Adjust/Sharpness/Sharpen
Effects/Image Effects/Offset as
follows:
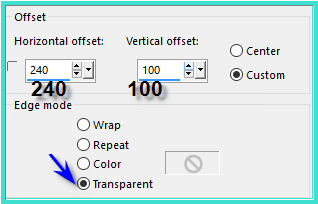 Effects/Plugins/Eye Candy 3.0/Drop
Shadow OR Eye Candy 4000/Shadowlab
Maximise
jcw_shih_tzu.pspimage
Edit/Copy
Edit/Paste as New Layer
Image/Resize/60%
Adjust/Sharpness/Sharpen
Effects/Image Effects/Offset as
follows:
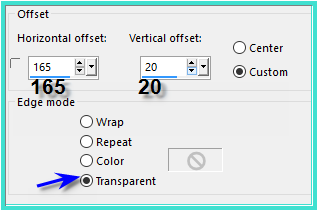 Effects/Plugins/Eye Candy 3.0/Drop
Shadow
OR
Eye Candy 4000/Shadowlab
Step Nine:
Maximise
JHanna_584¸G.Boissonnard.pspimage
Edit/Copy
Edit/Paste as New Layer
Image/Resize/55%
Adjust/Sharpness/Sharpen
Image/Mirror/Horizontal OR Image/Mirror
Effects/Image Effects/Offset as
follows:
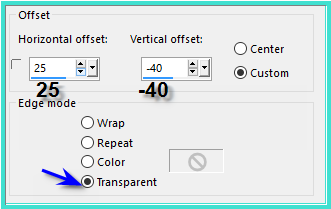 Effects/Plugins/Eye Candy 3.0/Drop
Shadow
OR
Eye Candy 4000/Shadowlab
Maximise JER_FunnyCouple_CThran.psp
Edit/Copy
Edit/Paste as New Layer
Image/Resize/40%
Adjust/Sharpness/Sharpen
Effects/Image Effects/Offset as
follows:
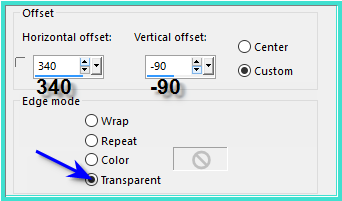 Effects/Plugins/Eye Candy 3.0/Drop
Shadow
OR Eye Candy 4000/Shadowlab
Maximise pensées et insectes-merci
AliceT.pspimage
Edit/Copy
Edit/Paste as New Layer
Image/Resize 40%
Adjust/Sharpness/Sharpen
Effects/Image Effects/Offset as
follows;
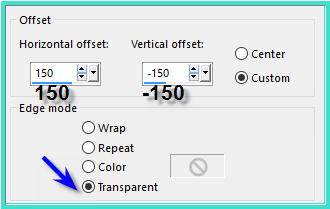 Effects/Plugins/Eye Candy 3.0/Drop
Shadow
OR
Eye Candy 4000/Shadowlab
Step Ten:
Maximise Milord-by.jonatan-iversen.pspimage
Edit/Copy
Edit/Paste as New Layer
Image/Resize/40%
Effects/Image Effects/Offset as
follows:
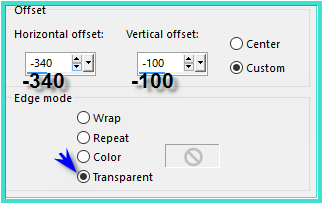 Effects/Plugins/Eye Candy 3.0/Drop
Shadow
Or Eye Candy 4000/Shadowlab
Maximise ccd-0773bicycle_1.pspimage
Edit/Copy
Edit/Paste as New Layer
Image/Resize/75%
Adjust/Sharpness/Sharpen
Effects/Image Effects/Offset as
follows:
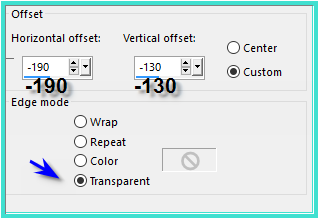 Effects/Plugins/Eye Candy 3.0/Drop
Shadow
OR Eye Candy 4000/Shadowlab
Layers/Merge/Merge All Flatten
Image/Add Borders/3 pixels/Background
Colour
Select with Magic Wand
Selections/Invert
Effects/3D Effects/Cutout as follows:
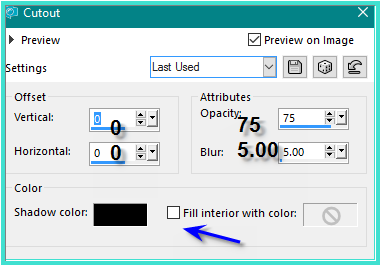 Selections/Select None
PLEASE NOTE: In some
versions of PSP you will need to Add a New Layer before using Cutout
Step
Eleven:
Image/Add Borders/3 pixels/White
Select with Magic Wand
Change Foreground Colour to Pattern
cmlstgold0034 as follows:
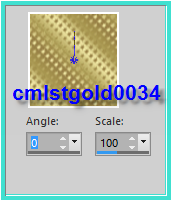 Flood Fill with Pattern
Selections/Select None
Image/Add Borders/20 pixels/Background
Colour
Select with Magic Wand
Promote Selection to Layer
Layers/New Raster Layer
Maximise Street Image.pspimage
Edit/Copy
Edit/Paste into Selection
Change Blend Mode to Overlay
Selections/Select None
Image/Add Borders/3 pixels/White
Select with Magic Wand
Flood Fill with Pattern cmlstgold0034
Selections/Select None
Step
Twelve:
Promote Background Layer
Image/Canvas Size as follows:
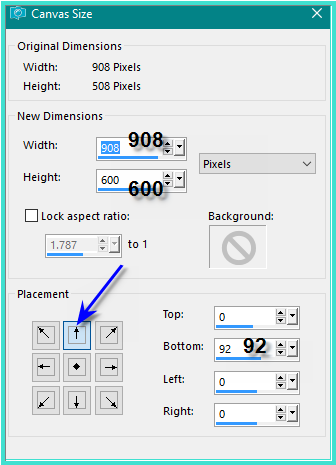 Select the bottom of the image with
Magic Wand
Change Background Colour to #e4d4d7
Flood Fill with Background Colour
Effects/Plugins/Filters Unlimited 2.0/Paper
Texures/Canvas,Medium
Selections/Select None
Image/Add Borders/3 pixels/#bfd7c0
Image/Add Borders/3 pixels/White
Select with Magic Wand
Flood fill with Foreground Pattern
Selections/Select None
Image/ Add Borders/50 pixels/White
Select with Magic Wand
Layers/New Raster Layer
Maximise Street Image.pspimage
Edit/Copy
Edit/Paste into Selection
Change Opacity to 55%
Effects/Plugins/AAA Frames/Foto Frame
as follows:
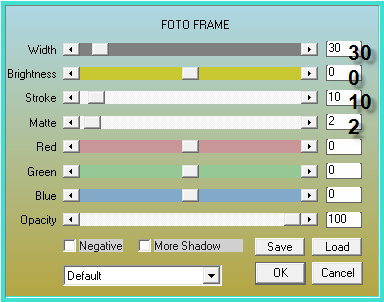 Selections/Select None
Step Thirteen:
Swap the colours in your Materials Box
as follows:
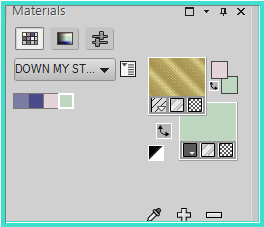 Text Tool with the
following settings:


Some versions of PSP
require a different Size setting. Please adjust to suit
Write:
Chance
made us neighbours,
Hearts made us Friends...
See my
image for placement
Effects/Plugins/MuRa's
Seamless/Emboss at Alpha/Default Settings
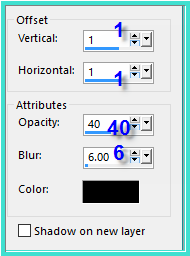
Effects/3D
Effects/Drop Shadow as follows:
 Step Fourteen:
Maximise mbp-buzzybeez.pspimage
Edit/Copy
Edit/Paste as New Layer
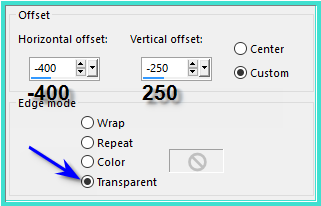
Effects/Image
Effects/Offset as follows:
 Effects/Plugins/Eye
Candy 3.0/Drop Shadow
OR Eye Candy 4000/Shadowlab
Layers/Duplicate
Image/Mirror/Horizontal
OR Image/Mirror
Move down
slightly (see my image for placement)
Layers/New
Raster Layer
Add
your Watermark
Layers/Merge
All Flatten
Image/Resize/850
pixels wide - height will adjust itself
File/Export/JPEG
Optimiser/Compression Value 20
I hope you have enjoyed
this tutorial
A
big thank you to the ladies who test my Tutorials
TESTERS'
RESULTS
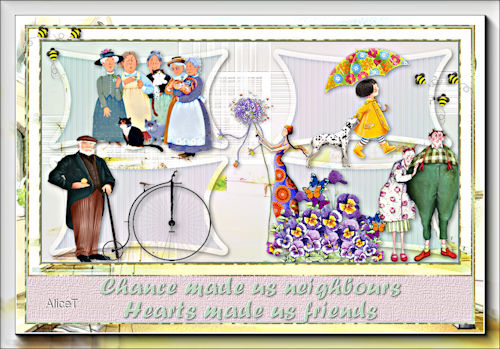
ALICE T.
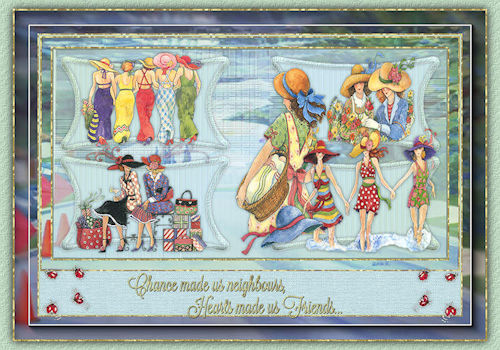
BETTY
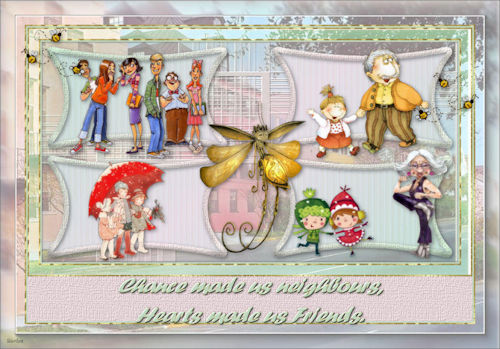
SHIRLEY
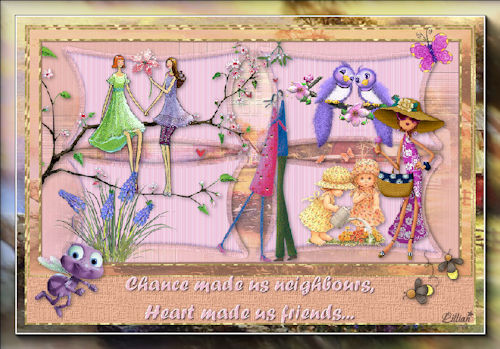
LILLIAN
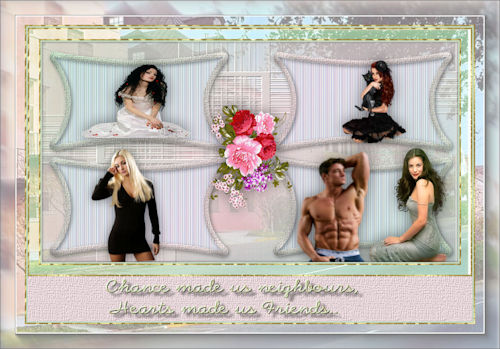
ELIZABETH
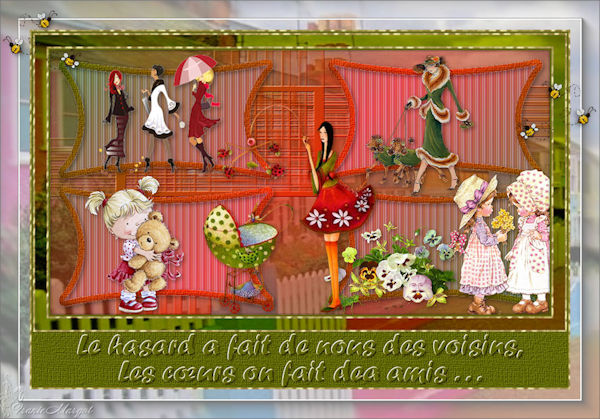
FRANIE MARGOT
FOR
OTHER VERSIONS OF THE TUTORIAL
PLEASE
GO TO:
https://goo.gl/photos/LwUe14zAuhYmui326
\ 
All Rights Reserved
Designed and Maintained by ESCAPING TO PSP GROUP
|
|
|
|
|
|