Tutorial 2017
This
tutorial is written by
Denise D. on 10th February, 2018
from
my own ideas.
Any
resemblance to other tutorials is
co-incidental and unintentional.
You
may share my tutorials with other
groups.
All I ask is that you advise me
and
credit for the tutorial is given to me and linked to
http://escapingtopsp2.altervista.org/Home/homeb.html
Please
do not upload any of my completed Tutorial images onto sites
such as Fotki, Pinterest, Photobucket or similar
DOUBLE
TROUBLE
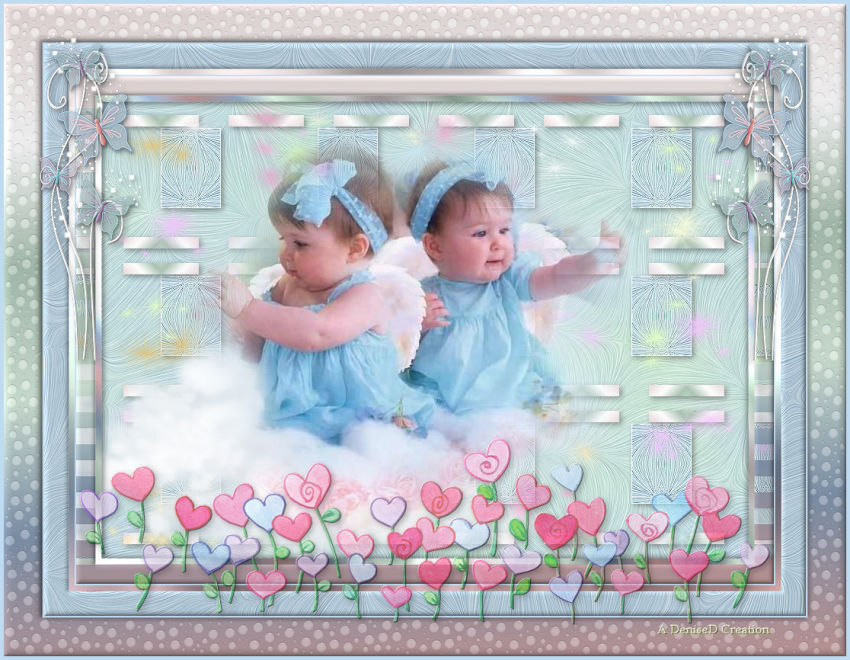
http://escapingtopsp2.altervista.org/DoubleTrouble/DoubleTrouble.html
Use this pencil to follow the steps
hold down left click to grab and move it

Click on the Box to download Supplies
 To print click on Printer

Supplies
Images:
babies-002.pspimage
https://groups.yahoo.com/neo/groups/Safe-Haven-Graphics/
cloud_3.pspimage
pasteltwinkles.pspimage
elementstransbutterfliestem.png
BearHeartFlorals2-kdd.pspimage
DeniseD
Signature.png
This image was obtained from the
Internet
If you are the owner of this
image, please contact me
so that credit can be given to
you
Gradient:
countryfriends.pspGradient
Presets:
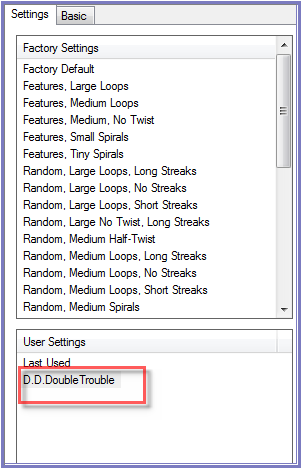
D.D.DoubleTrouble
D.D.DoubleTrouble2
Double Click on the  icon in your supplies folder to install this Preset in your Plugin.
Plugins:
Alien Skin Eye Candy 3.0
OR
Alien Skin Eye Candy 4000
&<Bkg
Designer sf101> (Import into Filters Unlimited 2.0)
MuRa's Meister
MuRa's Seamless
DSB Flux
Simple
&<Sandflower Specials "v">
AAA
Frames
Found here:
http://www.saturnelladesign.fr/pages/filtres.htm
http://janaly.com/Filtres/Filtre.html
http://www.maidiregrafica.eu/paginafiltri/filtri.html
Notes:
This Tutorial was created in PSP
X9.... other
versions may need adjustment
Some of the graphics may be from Free
to Use sites or Share
Groups.
If you are the creator of one of these
please let me know
so that appropriate credit can be given.
No infringement of
copyright is intended or intentional.
Some
helpful information:
You can change the blend mode, opacity and drop shadow, as
well as colourise
the materials,
according to the tubes/colours you are using.
When applying the Resize with the All Layers option checked, this will
be
informed in the tutorial,
otherwise, apply the resize with this option unchecked.
Remember always to save your work.
Whenever you reduce an image, apply Adjust/Sharpness/Sharpen, to
maintain the
sharpness of the image.

Before opening PSP, download plugins
and install
Please
Note: Offset
settings provided in this tutorial may vary according to size of your
image.
Please
adjust to suit.
The
settings remain the same throughout this Tutorial unless otherwise
stated.
Set your Foreground colour to #d2fada
Set your Background colour to #bfdbf2
Step One:
Place Gradient in PSP Gradient Folder
Install Presets
Open graphics in PSP, duplicate (Shift
D) and close the original.
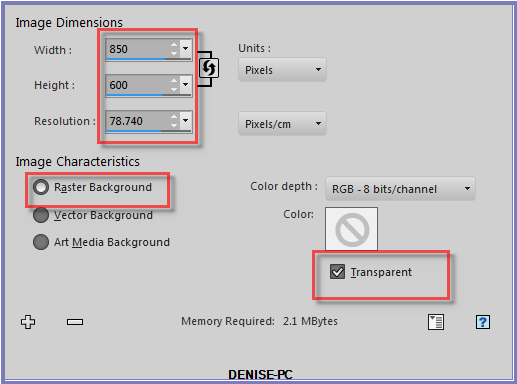
File/New/New Image 850 pixels x 600
pixels as follows:
Effects/Plugins/MuRa's
Meister/Cloud/Default Settings
Step
Two:
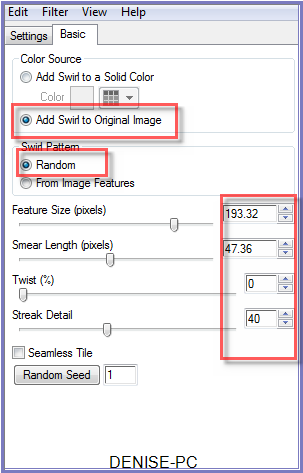
Effects/Plugins/Alien
Skin Eye Candy 5/Textures/Swirl/D.D.DoubleTroublePreset OR as
follows;
Effects/Edge
Effects/Enhance
Layers/Duplicate
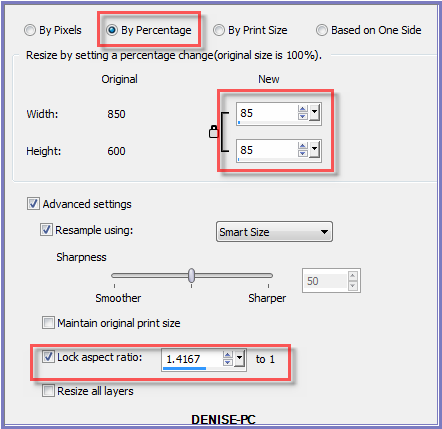
Image/Resize/85% as
follows:
Step Three:
Effects/Edge
Effects/Enhance
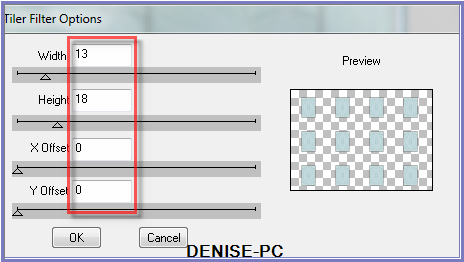
Effects/Plugins/DSB
Flux/Tiler as follows:
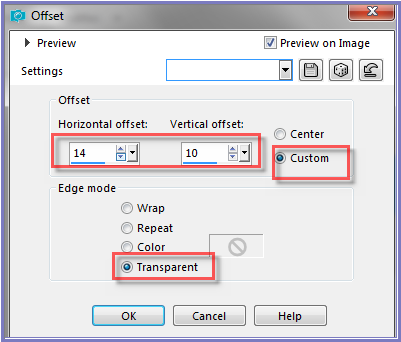
Effects/Image Effects/Offset as follows:
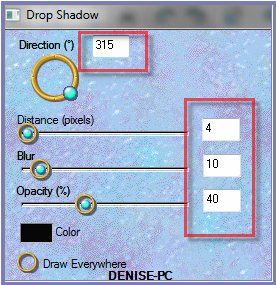
Effects/Plugins/Eye Candy 3.0/Drop Shadow as follows:
OR
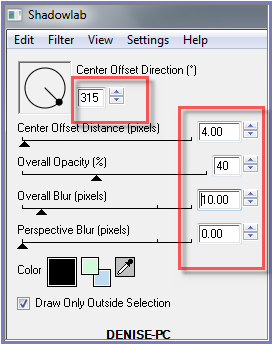
Effects/Plugins/Eye Candy 4000/Shadowlab as follows:
Step Four:
Layers/New Raster Layer
Selection
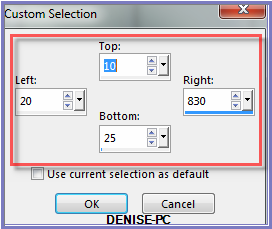
Tool/Custom Selection with the following settings:
Change Foreground Colour to countryfriends.pspGradient/Linear Gradient
as follows:

Flood Fill with Gradient
Selections/Select None
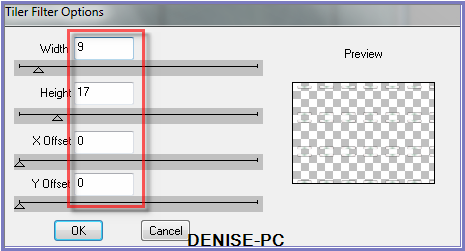
Effects/Plugins/DSB
Flux/Tiler as follows:
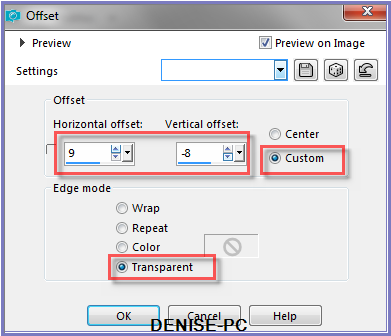
Effects/Image Effects/Offset as follows:
Effects/Plugins/Eye Candy 3.0/Drop Shadow
OR
Effects/Plugins/Eye Candy 4000/Shadowlab
Step Five:
Layers/New Raster Layer
Maximise pasteltwinkles.pspimage
Selections/Select All
Edit/Copy Edit/Paste into Selection
Adjust/Sharpness/Sharpen
Selections/Select None
Maximise cloud_3.pspimage
Edit/Copy Edit/Paste as New Layer
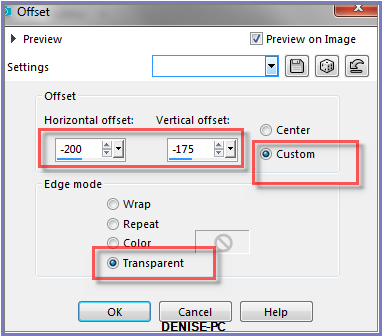
Effects/Image Effects/Offset as follows:
Maximise babies-002.pspimage
Edit/Copy Edit/Paste as New Layer
Leave where it is
Step Six:
Image/Add Borders/8 pixels/White
Magic Wand with the following settings:

Select with Magic Wand
Flood Fill with Gradient
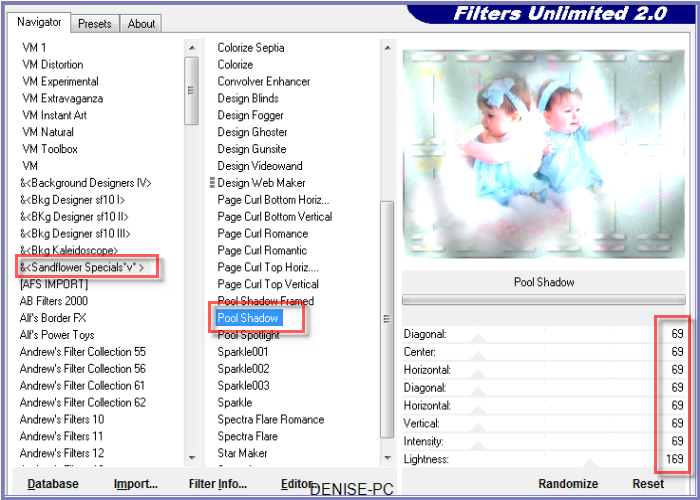
Effects/Plugins/&<Sandflower Specials
"v"> /Poolshadow as follows:
Selections/Invert
Effects/Plugins/Eye Candy 3.0/Drop Shadow
OR
Effects/Plugins/Eye Candy 4000/Shadowlab
Repeat Drop Shadow/Shadowlab/Direction 135
Selections/Select None
Step Seven:
Image/Add Borders/25 pixels/Background Colour
Magic Wand with the following settings:

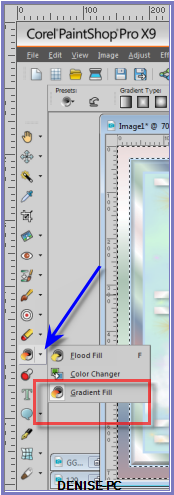
Tools/Floodfill Tools/Gradient Fill (you will find
it here in PSPX9 and upwards) as follows:
left click with Mouse in selected area
Deselect
Gradient Fill Tool
This tool is
only available in PSPX9 and upwards so if you don't have it
make a linear
Gradient from your colours and flood fill with that.
Selections/Select None
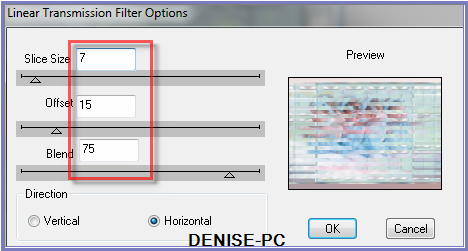
Effects/Plugins/DSB Flux/Linear Transmission as follows:
Adjust/Sharpness/Sharpen
Effects/3D Effects/Inner Bevel as follows:
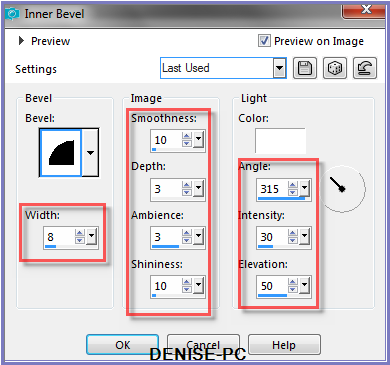
Selections/Select None
Step Eight:
Image/Add
Borders/2 pixels/Background Colour
Image/Add Borders/8 pixels/White
Select with Magic Wand
Tools/Floodfill Tools/Gradient Fill - left click
with Mouse
Deselect Gradient Fill Tool
OR Flood fill with Foreground Gradient
Effects/Plugins/&<Sandflower
Specials "v"> /Poolshadow
Selections/Select None
Image/Add Borders/2 pixel Background Colour
Image/Add Borders/30 pixels/Background Colour
Select with Magic Wand
Effects/Plugins/Alien Skin Eye Candy
5/Textures/Swirl/D.D.DoubleTroublePreset
Effects/Edge Effects/Enhance
Effects/3D Effects/Inner Bevel
Selections/Select None
Step Nine:
Image/Add Borders/3 pixels/Background Colour
Image/Add Borders/50 pixels/White
Select with Magic Wand
Tools/Floodfill
Tools/Gradient Fill - left click with Mouse
Deselect Gradient Fill Tool
OR Flood fill with Foreground Gradient
Effects/Plugins/Alien Skin Eye Candy
5/Nature/Water Drops/D.D.DoubleTrouble2Preset OR
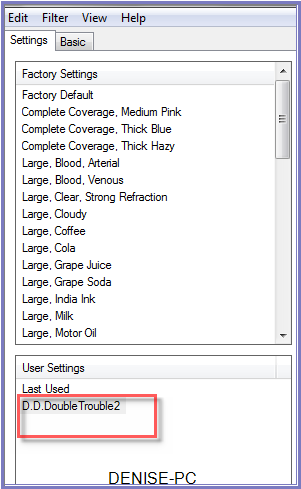 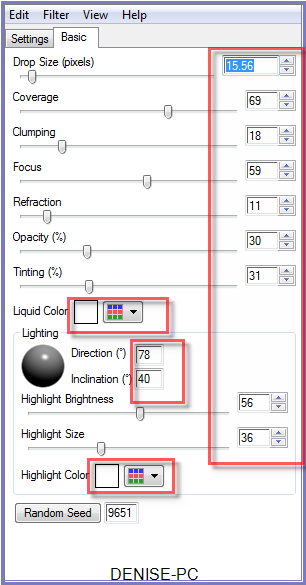
Adjust/Sharpness/Sharpen
Effects/3D Effects/Inner Bevel BUT change width to 12
Selections/Invert
Effects/Plugins/Eye
Candy 3.0/Drop Shadow
OR
Effects/Plugins/Eye Candy 4000/Shadowlab
Repeat Drop Shadow/Shadowlab/Direction 315
Selections/Select
None
Image/Add Borders/5 pixels/Background Colour
Step Ten:
Maximise BearHeartFlorals2-kdd.pspimage
Edit/Copy Edit/Paste as New Layer
Effects/Image Effects/Offset as follows:
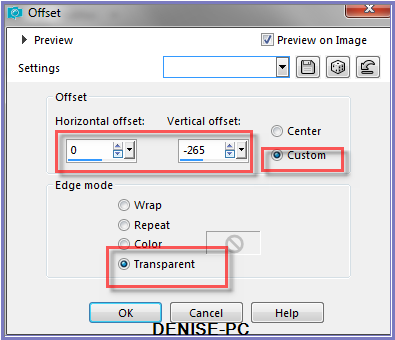
Effects/Plugins/MuRa's Seamless/Emboss at
Alpha/Default Settings
Effects/Plugins/Eye Candy 3.0/Drop Shadow
OR
Effects/Plugins/Eye Candy 4000/Shadowlab
Change Opacity
to 60%
Step
Eleven:
Maximise elementstransbutterfliestem.png
Edit/Copy Edit/Paste as New Layer
Effects/Image Effects/Offset as follows:
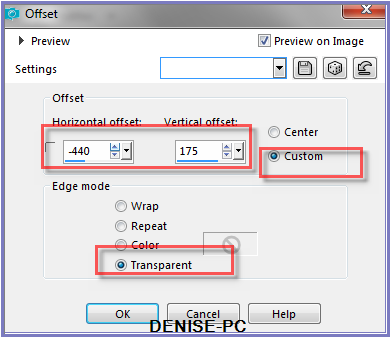
Effects/Plugins/Eye Candy 3.0/Drop Shadow
OR
Effects/Plugins/Eye Candy 4000/Shadowlab
Layers/Duplicate
Image/Mirror/Horizontal OR Image/Mirror
Step
Twelve:
Maximise DeniseD Signature.png
Edit/Copy Edit/Paste as New Layer
Place at bottom of Layer
Layers/New Raster Layer
Add
your Watermark
Layers/Merge
All Flatten
Image/Resize/850
pixels wide - height will adjust itself
File/Export/JPEG
Optimiser/Compression Value 20
I hope you have
enjoyed
this tutorial
A
big thank you to the ladies who test my Tutorials
TESTERS'
RESULTS
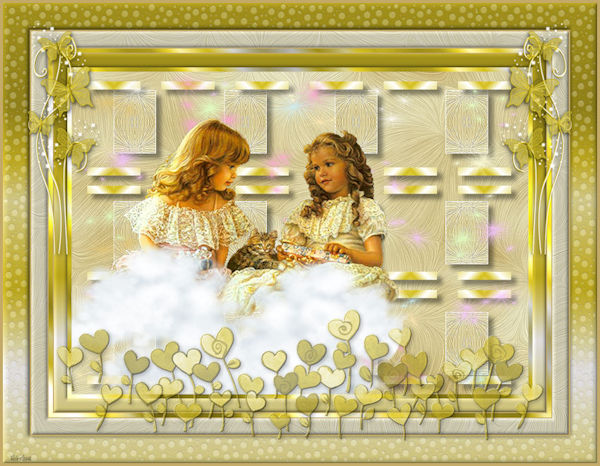
SHIRLEY NZ
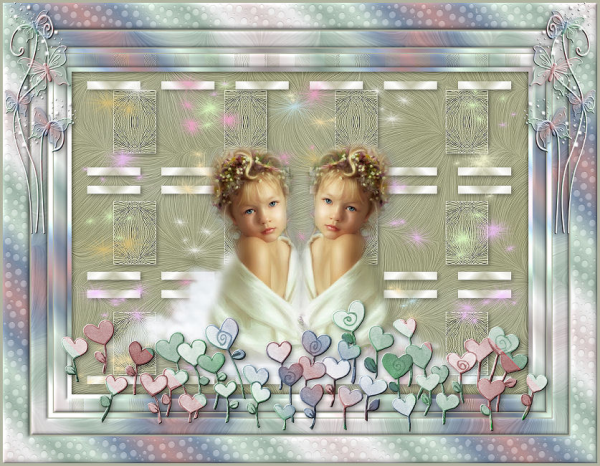
ELIZABETH
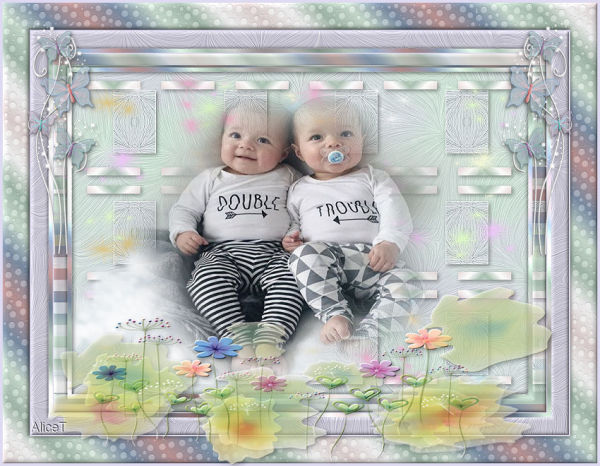
ALICE
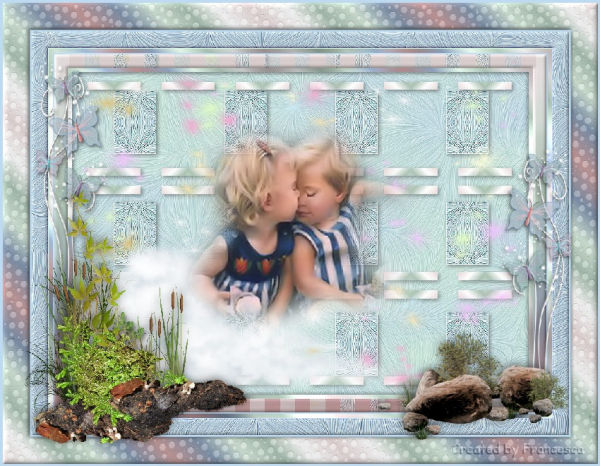
FRAN
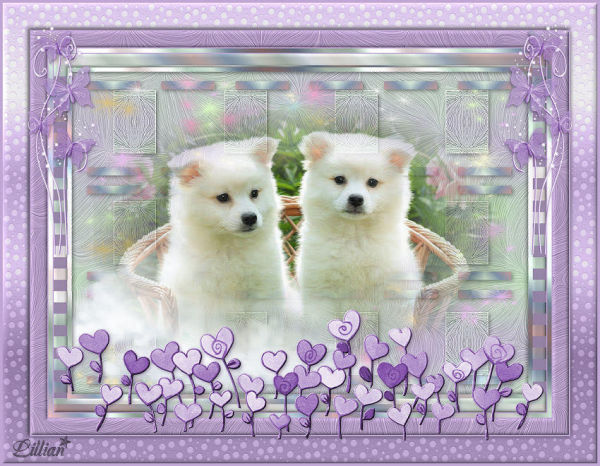
LILLIAN
| | | |