|
This
tutorial is written by
Denise D. on 14th September, 2013
from
my own ideas.
Any
resemblance to other tutorials is
co-incidental and unintentional.
If
you wish to share my Tutorials, you MUST
obtain my permission first.
All I ask is that you advise me
and
credit for the tutorial is given to me and linked to
http://escapingtopsp2.altervista.org/Home/homeb.html
Please
do not upload any of my completed Tutorial images onto sites
such as Fotki, Pinterest, Photobucket or similar
DAISY,
DAISY.
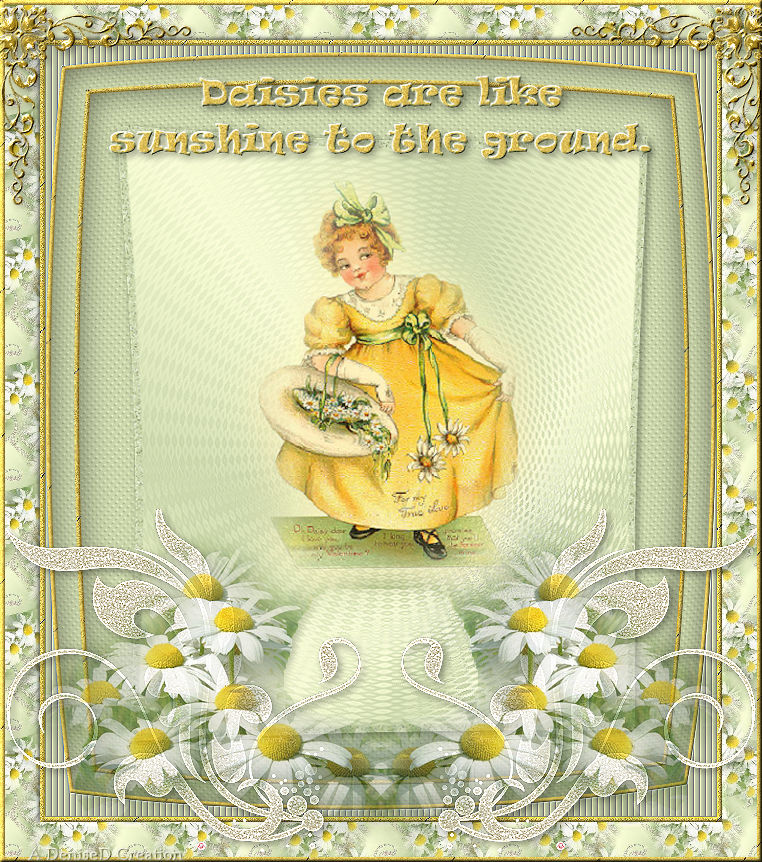
http://escapingtopsp2.altervista.org/DaisyDaisyTutorial/DaisyDaisyTutorial.htm

Thank you Inge-Lore for this German Translation

Click on the Box to download Supplies
Supplies
JC Daisy Girl.psp
Mists by Jan
This group is no longer active
D.D.Signature.png
Pattern:
gold text.jpg
D.D.daisy pattern.jpg
Texture:
8-cmv.bmp
Corner:
Winni a.a.1.pspimage
D.D.daisy.corner.png
Text:
RAVIE.ttf
Plugins:
Simple
Eye Candy3.1
Filters Unlimited 2.0/VM Distortion
MuRa's Seamless
Found here:
 AND
AND

Notes:
This
Tutorial was originally created in PSPX1 and updated in Corel 2020.... other
versions may need adjustment
Some of
the graphics may be from Free
to Use sites or Share
Groups.
If you are
the creator of one of these
please let me know
so that appropriate credit can be given.
No
infringement of
copyright is intended or intentional.
Before
opening PSP, download plugins
and install
Some
helpful information:
You can change the blend mode, opacity and drop shadow, as
well as colourise
the materials,
according to the tubes/colours you are using.
When applying the Resize with the All Layers option checked, this will
be
informed in the tutorial,
otherwise, apply the resize with this option unchecked.
Remember always to save your work.
Whenever you reduce an image, apply Adjust/Sharpness/Sharpen, to
maintain the
sharpness of the image.
Some tools or features have other names in earlier versions of the PSP.
http://escapingtopsp2.altervista.org/Home/homeb.html

Please
Note: Offset
settings provided in this tutorial may vary according to size of your
image.
Please
adjust to suit.
The
settings remain the same throughout this Tutorial unless otherwise
stated.
Set your
Foreground colour to #faffd7
Set your
Background colour to #cdd8ad
Contrast #808080
Step One:
Place Texture in PSP Texture Folder
Place Pattern in PSP Pattern Folder
Install Font
Open
graphics in PSP, duplicate (Shift
D) and close the original.
File/New/New
Image 600 pixels x 700
pixels as follows:
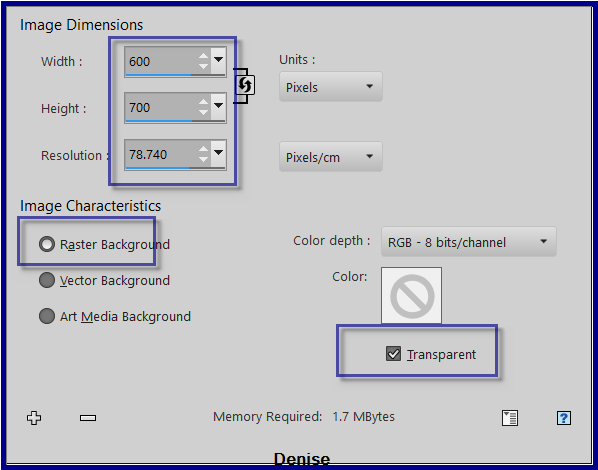
Change Foreground Colour to Foreground/Background/Radial Gradient as
follows:
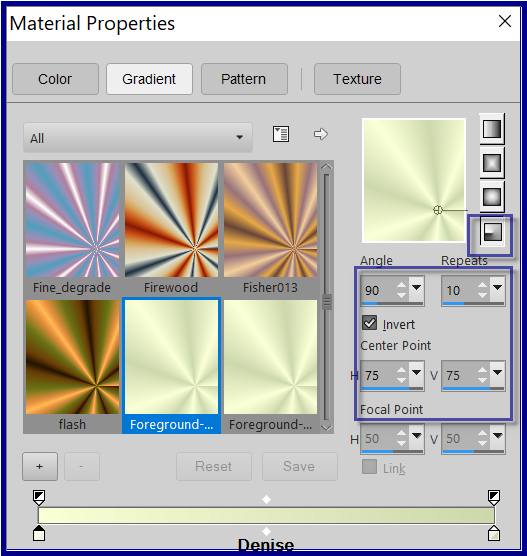
Flood fill with Gradient
Step Two:
Effects/Plugins/Filters
Unlimited 2.0/VM Distortion/Radial Pox as follows:
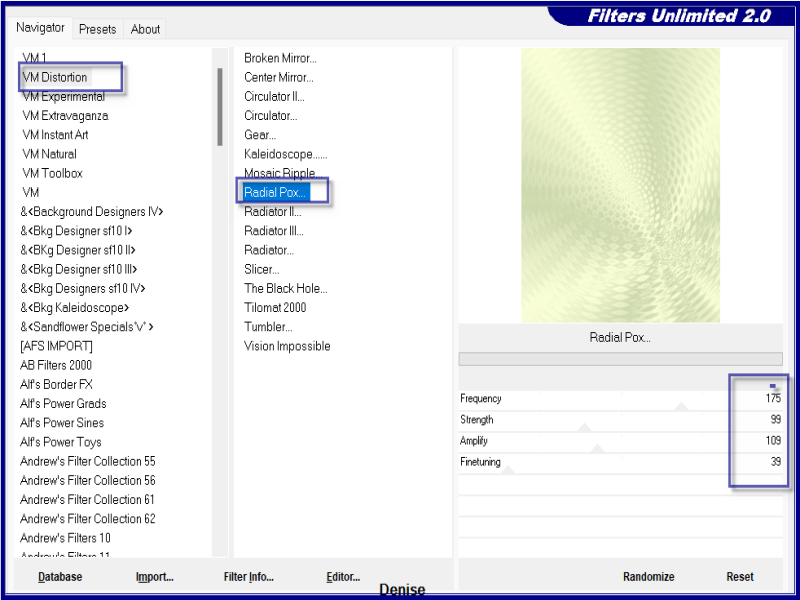
Effects/Edge Effects/Enhance
MaximiseJC Daisy Girl.psp
Edit/Copy Edit/Paste as New Layer
Effects/Image Effects/Offset as follows;
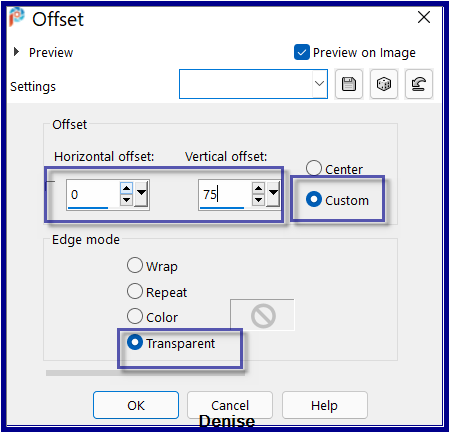
Step Three:
Selections/Select All
Selections/Modify/Select Selections Borders as follows:
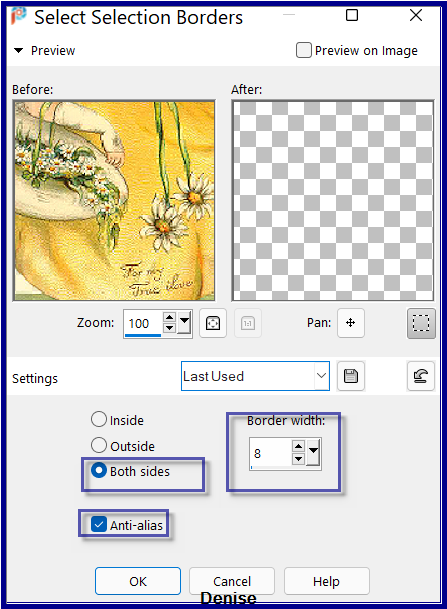
Flood fill with Background Colour
Adjust/Add/Remove Noise/Add Noise as follows:
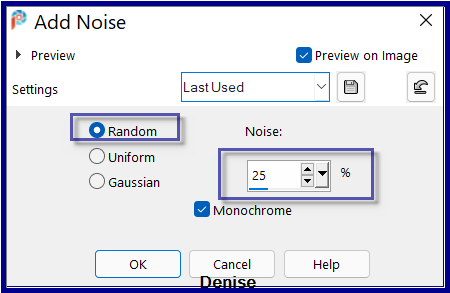
Selections/Select None
Layers/Merge/Merge Visible
Step Four:
Effects/Distortion Effects/Lens Distortion as follows:
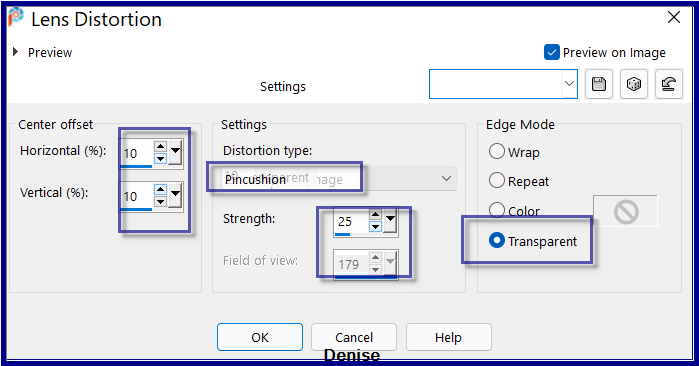
Adjust/Sharpness/Sharpen
Image/Resize/90% as follows:
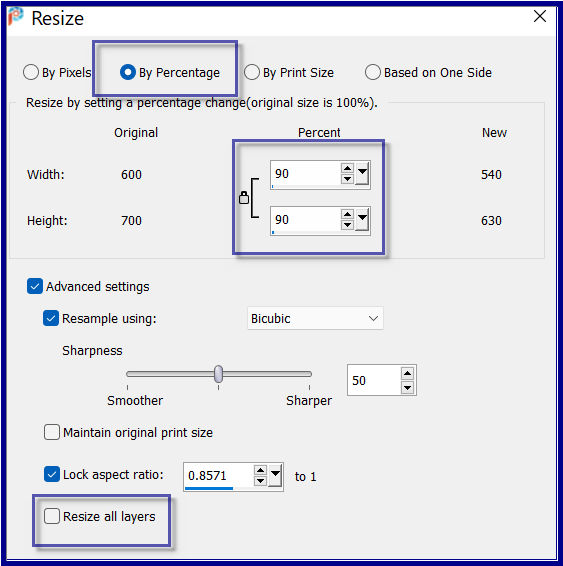
Step Five:
Layers/New Raster Layer
Layers/Arrange/Move Down
Flood fill with Background Colour
Effects/Texture Effects/Texture 8-cmv.bmp as follows:
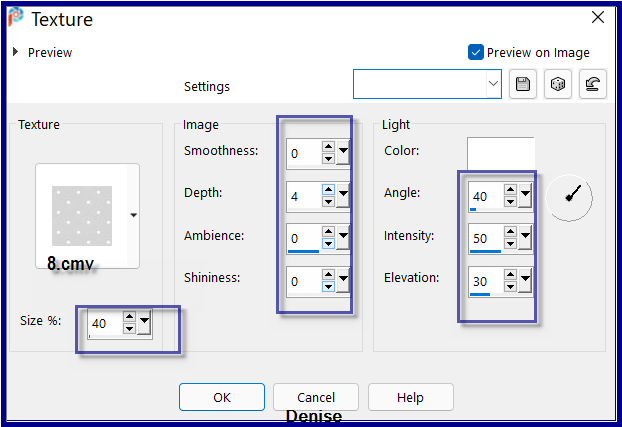
Effects/Plugins/Eye Candy 3.1/Drop Shadow as follows:
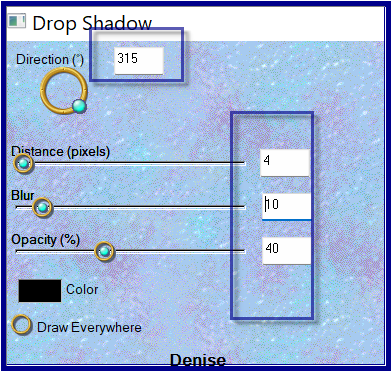
Repeat Drop Shadow/Direction 135
Step
Six:
Change Background Colour to Pattern gold text.jpg as
follows:
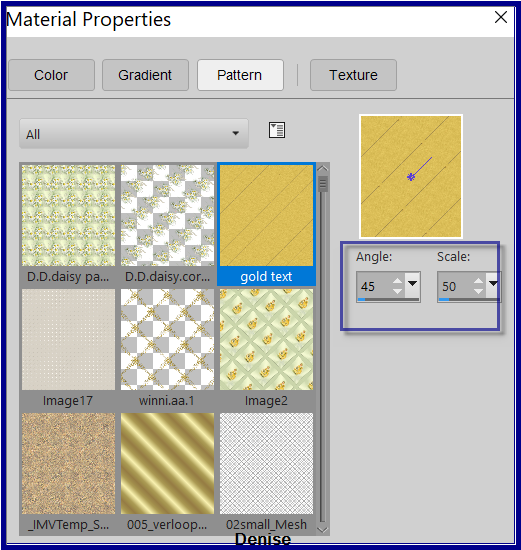
Selections/Select All
Image/Add Borders/5 pixels/White
Selections/Invert
Flood fill with Background Pattern
Effects/Edge Effects/Enhance
Effects/3D Effects/Inner Bevel as follows:
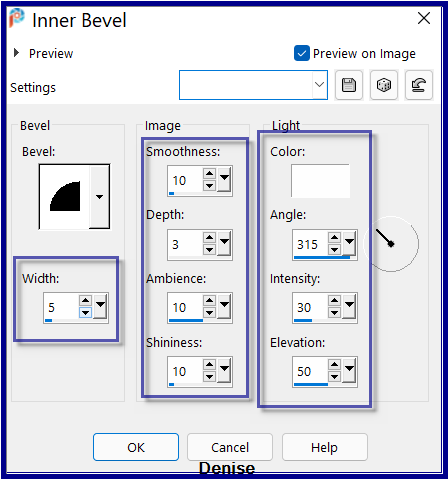
Selections/Select Invert
Step
Seven:
Effects/3D Effects/Cutout as follows:
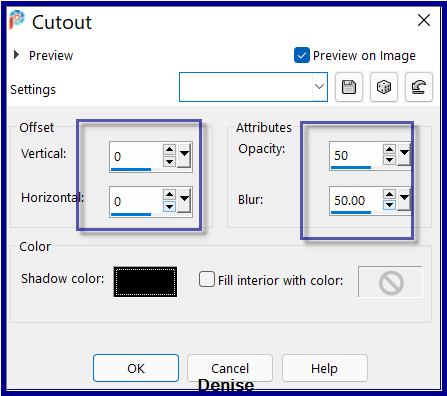
(some versions of PSP may need a new layer for Cutout)
Selections/Select All
Image/Add Borders/25 pixels/Background Colour
Selections/Invert
Effects/Texture Effects/Texture
Selections/Select all
Image/Add Borders/5 pixels/White
Selections/Invert
Flood fill with Background Pattern
Effects/Edge Effects/Enhance
Effects/3D Effects/Inner Bevel
Selections/Invert
Effects/3D Effects/Cutout
Step Nine:
Effects/Distortion
Effects/Lens Distortion/Barrel as follows:
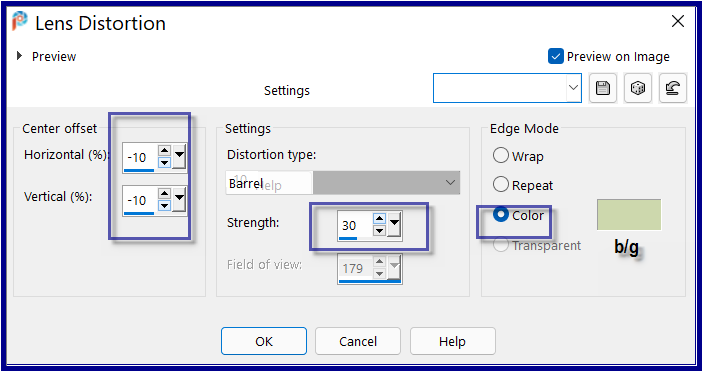
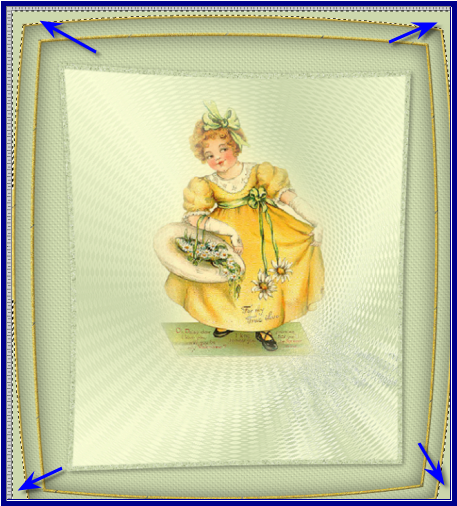
Using the Magic Wand, select the areas as shown below:
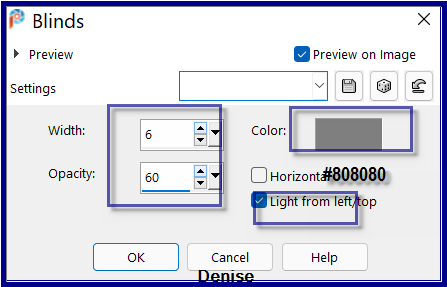
Effects/Texture Effects/Blinds as follows:
Effects/Edge Effects/Enhance
Selections/Select None
Step
Ten:
Image/Add Borders/1 pixel/#808080
Selections/Select All
Image/Add Borders/5 pixels/white
Selections/Invert
Flood fill with Background Pattern
Effects/Edge Effects/Enhance
Effects/3D Effects/Inner Bevel
Selections/Invert
Image/Add Borders/35 pixels/Foreground Colour
Change Foreground Colour to Pattern D.D.daisy pattern.jpg as
follows:
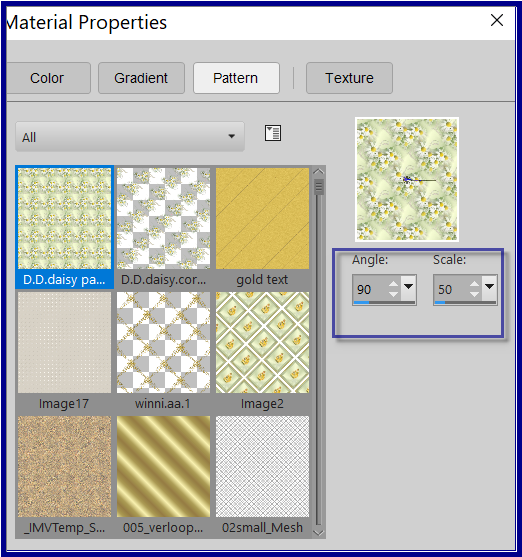
Flood fill with Foreground Pattern
Adjust/Sharpness/Sharpen
Selections/Invert
Image/Add Borders/5 pixels/White
Selections/Invert
Flood fill with Background Pattern
Adjust/Sharpness/Sharpen
Effects/3D Effects/Inner Bevel
Selections/Select All
Step Eleven:
Selections/Modify/Contract 40 pixels
Selections/Invert
Effects/3D Effects/Inner Bevel
Selections/Select None
Maximise D.D.DeniseCorner.png
Edit/Copy Edit/Paste as New Layer
Effects/Image Effects/Offset as follows:

Layers/Duplicate
Image/Mirror/Horizontal OR Image/Mirror
Layers/Merge/Merge Down
Effects/Plugins/Eye Candy 3.1/Drop Shadow
Step Twelve:
Maximise Winni a.a.1.pspimage
Edit/Copy Edit/Paste As New Layer
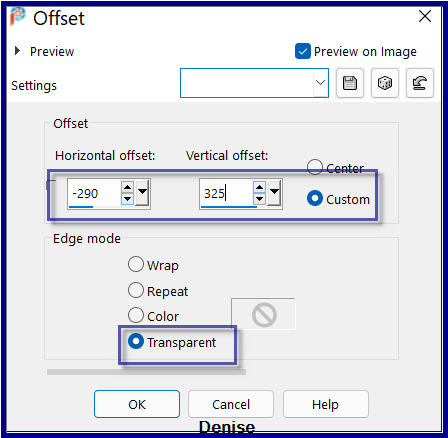
Effects/Image Effects/Offset as follows:
Layers/Duplicate
Image/Mirror Horizontal OR Image/Mirror
Layers/Merge/Merge Down
Effects/Plugins/Eye Candy 3.1/Drop Shadow
Text tool with the following settings:


Some versions of PSP will need other settings.
Please adjust to suit your version
Write:
Daisies
are like
sunshine to the ground.
Convert to
Raster Layer
Objects/Align/Horizontal/Centre
Place at the top of the layer
(see my image for placement)
Effects/Plugins/MuRa's Seamless/Emboss at Alpha
Effects/Plugins/Eye Candy 3.1/Drop Shadow
Step Thirteen:
Maximise Signature.png
Edit/Copy Edit/Paste as New Layer
Place at bottom of Layer
Layers/New
Raster Layer
Add
your Watermark
Layers/Merge
All Flatten
Image/Resize/800
pixels wide - height will adjust itself
File/Export/JPEG
Optimiser/Compression Value 20
I
hope you have enjoyed
this tutorial
A
big thank you to the ladies who test my Tutorials
TESTERS'
RESULTS
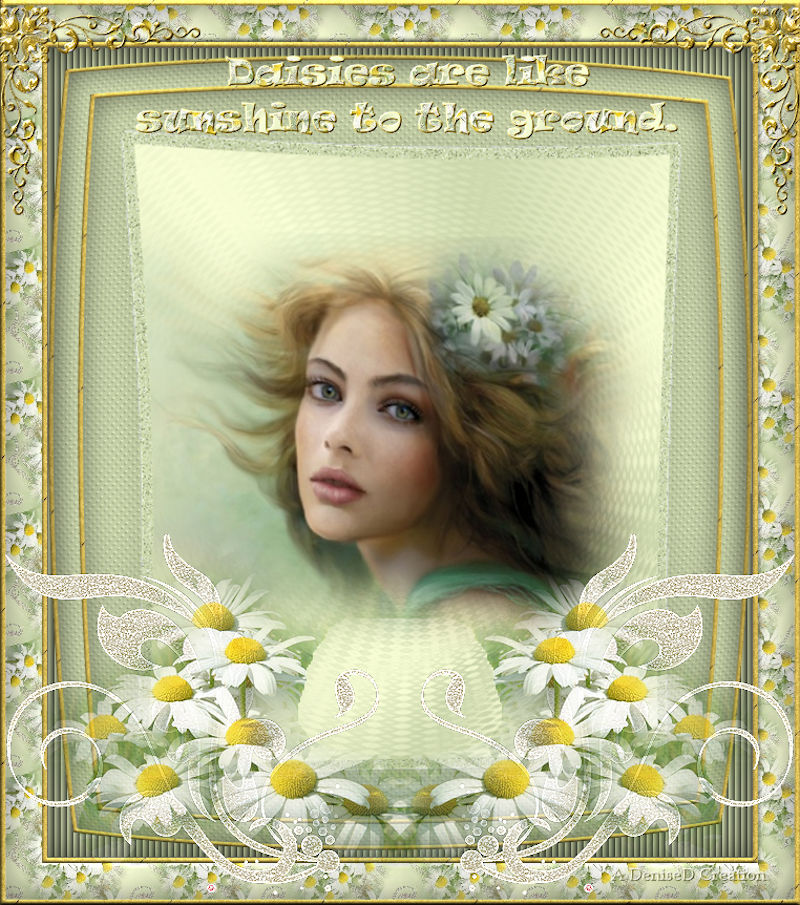
VERSION 2
INGE-LORE

https://escapingtopsp2.blogspot.com/
DeniseD 2022
All Rights Reserved
Designed and Maintained by DeniseD
| | | |