Tutorial 2017
This
tutorial is written by
Denise D. on 2nd March, 2018
from
my own ideas.
Any
resemblance to other tutorials is
co-incidental and unintentional.
You
may share my tutorials with other
groups.
All I ask is that you advise me
and
credit for the tutorial is given to me and linked to
http://escapingtopsp2.altervista.org/Home/homeb.html
Please
do not upload any of my completed Tutorial images onto sites
such as Fotki, Pinterest, Photobucket or similar
CREAM ON CREAM
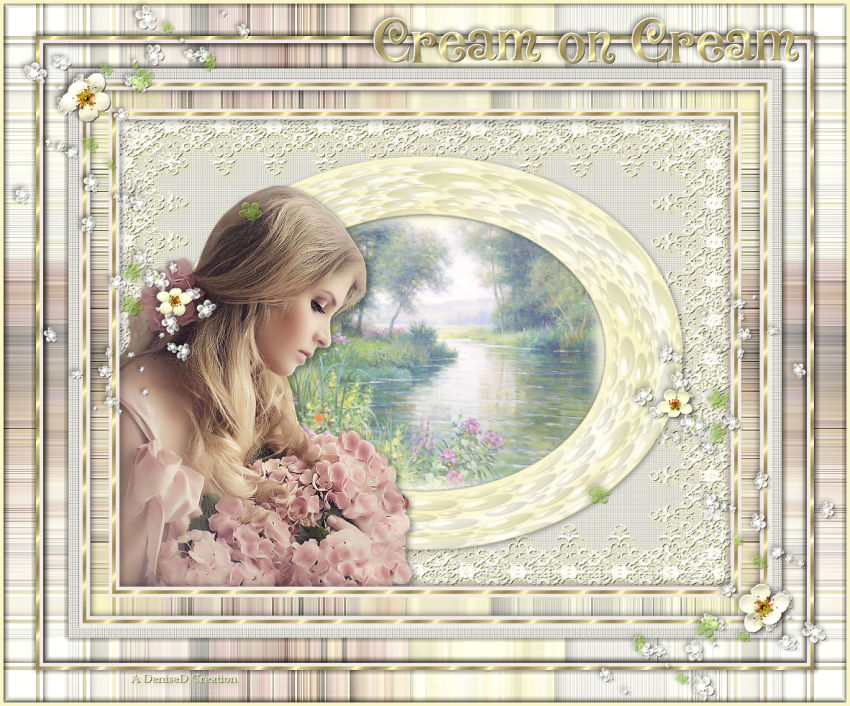
http://escapingtopsp2.altervista.org/CreamOnCream/CreamOnCream.html

Click on the Box to download Supplies
To print click on Printer

Supplies
Images:
lizztish_back-to.2.pspimage
You can join this Group at:
https://groups.google.com/forum/?fromgroups#!forum/emotivemists
Gabry woman
174-17.pspimage
You can join this Group at:
https://groups.google.com/forum/#!forum/psppartagetubesimagesconseils
tube fleurs 1.png
DeniseD Signature.png
This image was obtained from the Internet
If you are the owner of this
image, please contact me
so that credit can be given to
you
Pattern:
02.small_Mesh
D_goldfold
Environmental Map:
Pearl.pspimage
Mask:
ts_mask58
Font:
Blairesque Curley JF.ttf
Colour Swatch
Preset:
D.D.CreamOnCream
Double Click on the  icon in your supplies folder to install this Preset in your Plugin.
Plugins:
Eye Candy 3 OR Eye Candy 4000
Alien Skin Eye Candy 5/Impact
&<Bkg Kaleidoscope>
(Import into Filters Unlimited 2.0)
MuRa's Seamless
Found here:
 AND
AND 
Notes:
This Tutorial was created in PSP
X9.... other
versions may need adjustment
Some of the graphics may be from Free
to Use sites or Share
Groups.
If you are the creator of one of these
please let me know
so that appropriate credit can be given.
No infringement of
copyright is intended or intentional.
Some
helpful information:
You can change the blend mode, opacity and drop shadow, as
well as colourise
the materials,
according to the tubes/colours you are using.
When applying the Resize with the All Layers option checked, this will
be
informed in the tutorial,
otherwise, apply the resize with this option unchecked.
Remember always to save your work.
Whenever you reduce an image, apply Adjust/Sharpness/Sharpen, to
maintain the
sharpness of the image.
Some tools or features have other names in earlier versions of the PSP.
http://escapingtopsp2.altervista.org/Home/homeb.html

Please
Note: Offset
settings provided in this tutorial may vary according to size of your
image.
Please
adjust to suit.
The
settings remain the same throughout this Tutorial unless otherwise
stated.
Set your Foreground colour to #fefdf2
Set your Background colour to #fbf6c7
Step One:
Before opening PSP, download plugins
and install
Place Pattern in PSP Pattern Folder
Place
Mask in PSP Mask Folder
Place Environmental Map in PSP Environmental Map
Folder
Install Font
Open graphics in PSP, duplicate (Shift
D) and close the original.
File/New/New Image 850 pixels x 650
pixels as follows:
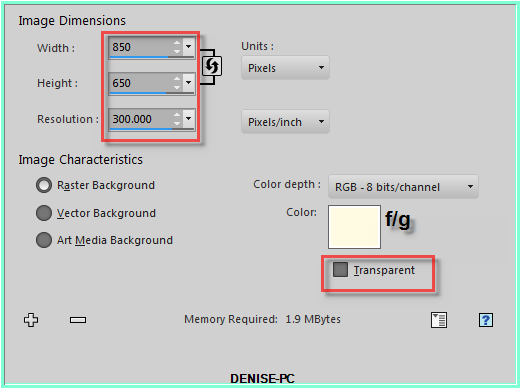
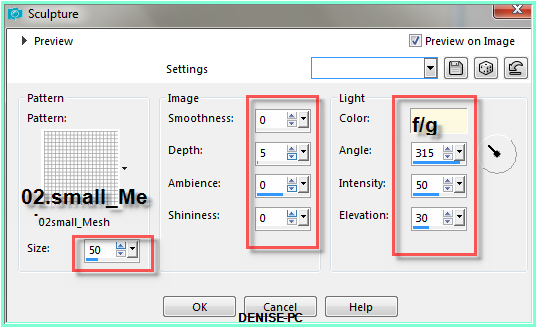
Effects/Texture Effects/Sculpture/02.small_Mesh as
follows:
Adjust/Sharpness/Sharpen
More
Step Two:
Layers/New Raster Layer
Flood Fill with Foreground Colour
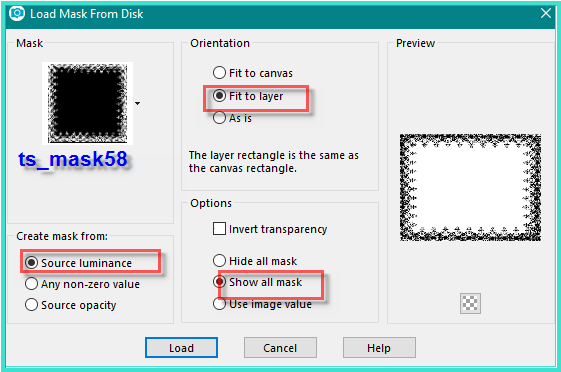
Layers/Load/Save Mask/Load Mask ts_mask58 from Disk as follows:
Adjust/Sharpness/Sharpen More
Layers/Merge/Merge Group
Effects/Plugins/MuRa's Seamless/Emboss at Alpha/Default Settings
Effects/Plugins/Eye
Candy 3.0/Drop Shadow as follows:
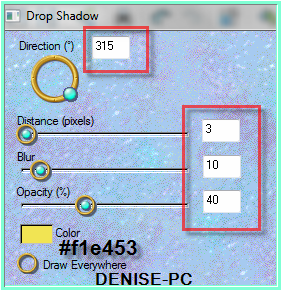
OR
Effects/Plugins/Eye Candy 4000/Shadowlab as follows:
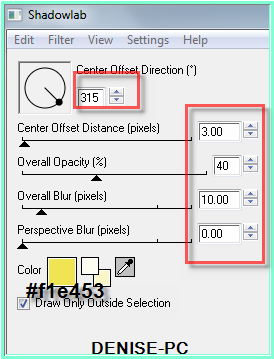
Step Three:
Change Foreground Colour to Foreground/Background/Sunburst Gradient as
follows:
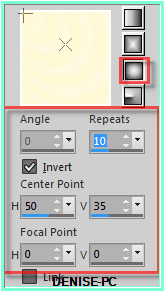
Layers/New Raster Layer
Flood fill with Gradient
Select Deform/Pick Tool
Drag top notch down to 450 pixels as shown below:
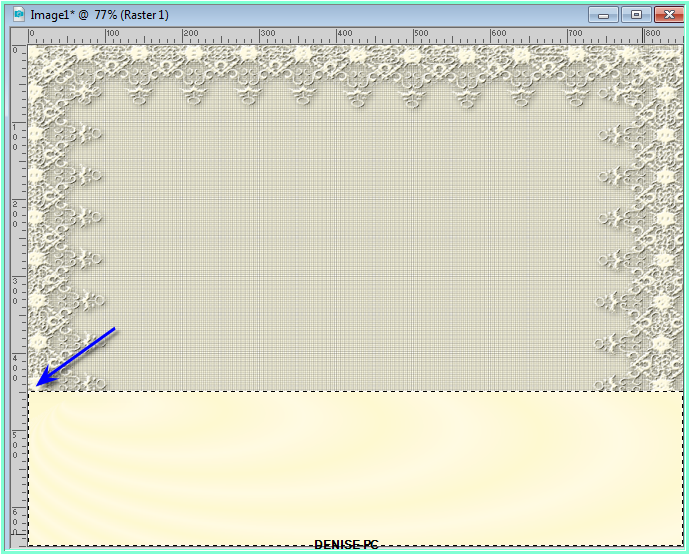
Deselect Deform/Pick Tool
Selections/Select All
Selections/Float
Selections/Defloat
Effects/Artistic Effects/Balls and Bubbles with the following settings:
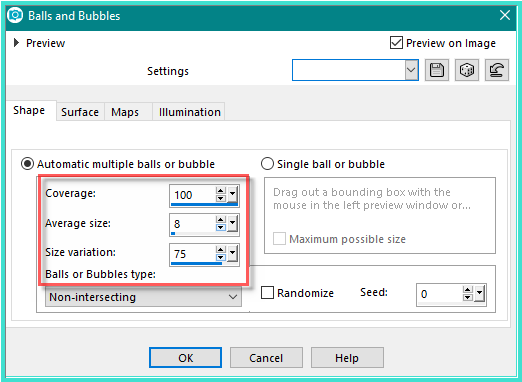
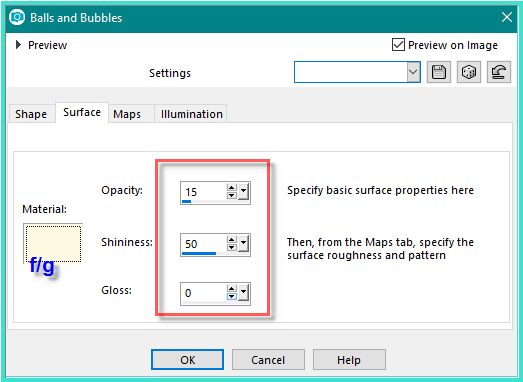
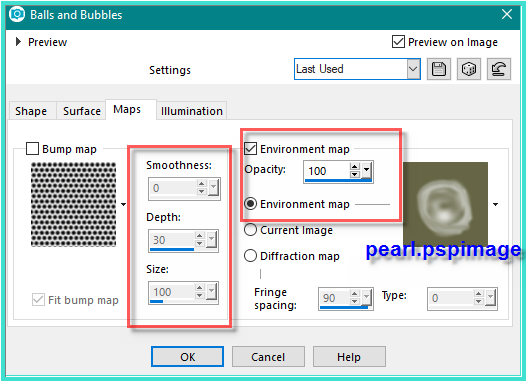
Leave Illumination settings as is
Selections/Select None
Step Four:
Effects/Distortion Effects/Polar Coordinates as follows:
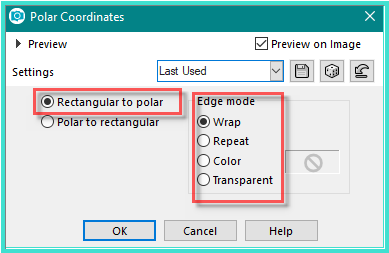
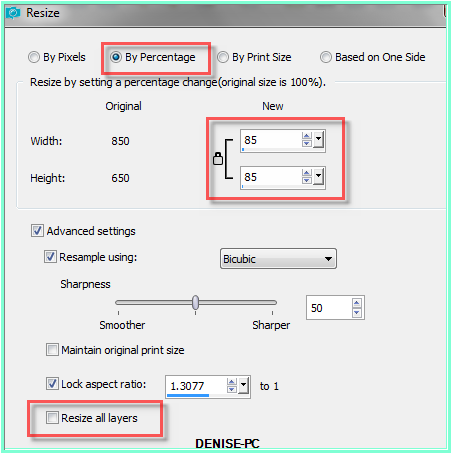
Image/Resize/85% as follows:
Adjust/Sharpness/Sharpen
Step Five:
Magic Wand with the following settings:

Select the centre of the frame
Select Background Layer
Promote Background to Layer
Hit Delete Key
Selections/Select None
Select Raster 1
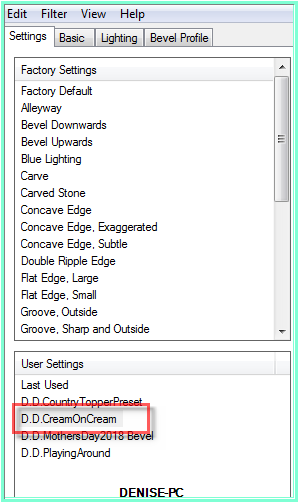
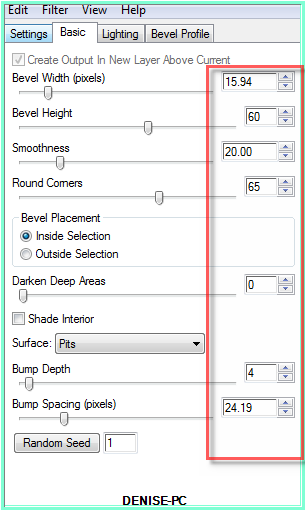
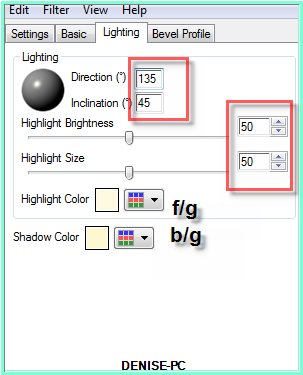
Effects/Plugins/Alien Skin Eye Candy 5/Impact/Bevel D.D.CreamOnCream
Preset OR as follows:
Step Six:
Select the centre of the frame with Magic Wand
Selections/Modify/Expand 10 pixels
Layers/New Raster Layer
Layers/Arrange/Move Down
Flood Fill with Gradient
Layers/New Raster Layer
Maximise lizztish_back-to.2.pspimage
Edit/Copy
Edit/Paste into Selection
Change Opacity to 85%
Selections/Select None
Layers/Merge/Merge Down
Select Raster 1
Effects/Plugins/Eye Candy 3.0/Drop Shadow BUT change colour to Black
OR
Effects/Plugins/Eye Candy 4000/Shadowlab BUT change colour to Black
Step Seven:
Maximise Gabry woman 174-17.pspimage
Edit/Copy Edit/Paste as New Layer
Image/Resize/70%
Adjust/Sharpness/Sharpen
Effects/Image Effects/Offset as follows:
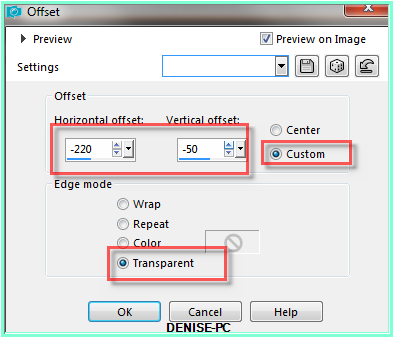
Effects/Plugins/Eye
Candy 3.0/Drop Shadow BUT change Distance to 5
OR
Effects/Plugins/Eye Candy 4000/Shadowlab BUT change Distance to 5
Step Eight:
Change Background Colour to Pattern D_goldfold
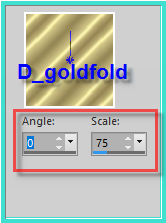
Image/Add Borders 5 pixels #f3ebe9
Select with Magic Wand
Effects/Plugins/Eye Candy 3.0/Drop Shadow
OR
Effects/Plugins/Eye Candy 4000/Shadowlab
Repeat Drop Shadow/Shadowlab/Direction 135
Image/Add Borders/5 pixels/White
Select with Magic Wand
Flood Fill with Background Pattern
Selections/Select None
Image/Add Borders/5 pixel #f3ebe9
Step Nine:
Image/Add Borders/25 pixels/Background Colour
Select with Magic Wand
Effects/Plugins/Filters Unlimited 2.0/&<Bkg
Kaleidoscope>/xTileMaker 1.0 as follows:
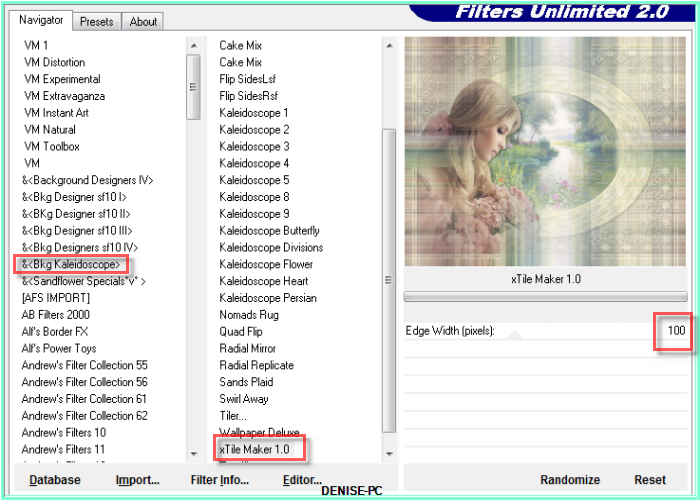
Adjust/Sharpness/Sharpen More
Selections/Select None
Step Ten:
Image/Add Borders/1 pixel/Foreground Colour
Image/ Add Borders/5 pixels/#f3ebe9
Image/Add Borders/5 pixels/White
Select with Magic Wand
Flood Fill with Background Pattern
Selections/Select All
Selections/Select None
Image/Add Borders/5 pixel #f3ebe9
Selections/Select All
Selections/Modify/Contract 15 pixels
Selections/Invert
Effects/Plugins/Eye
Candy 3.0/Drop Shadow
OR
Effects/Plugins/Eye Candy 4000/Shadowlab
Repeat Drop Shadow/Shadowlab/Direction 315
Selections/Select None
Step Eleven:
Image/Add Borders/15 pixels/Foreground Colour
Select with Magic Wand
Effects/Texture Effects/Sculpture
Adjust/Sharpness/Sharpen More
Selections/Select None
Image/Add Borders/35 pixels/Foreground Colour
Select with Magic Wand
Effects/Plugins/Filters Unlimited 2.0/&<Bkg
Kaleidoscope>/xTileMaker 1.0/Edge Width to 200
Effects/3D
Effects/Inner Bevel as follows:
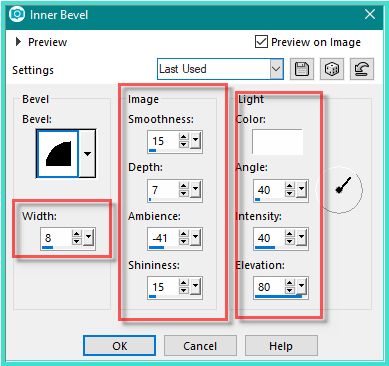
Adjust/Sharpness/Sharpen
Selections/Select None
Image/Add Borders 5 pixels #f3ebe9
Image/Add Borders/5 pixels/White
Select with Magic Wand
Flood Fill with Background Pattern
Selections/Select None
Image/Add Borders/5 pixel #f3ebe9
Selections/Select All
Selections/Modify/Contract 15 pixels
Selections/Invert
Effects/Plugins/Eye
Candy 3.0/Drop Shadow
OR
Effects/Plugins/Eye Candy 4000/Shadowlab
Repeat Drop Shadow/Shadowlab/Direction 135
Selections/Select None
Step Twelve:
Image/Add Borders/40 pixels/Foreground Colour
Effects/Plugins/Filters
Unlimited 2.0/&<Bkg Kaleidoscope>/xTileMaker
1.0/Edge Width to 250
Effects/3D Effects/Inner Bevel
Adjust/Sharpness/Sharpen
More
Selections/Select None
Image/Add Borders/5 pixels/Background Colour
Maximise tube fleurs 1.png
Edit/Copy Edit/Paste as New Layer
Adjust/Sharpness/Sharpen
Manual Color CorrectionTool as follows:
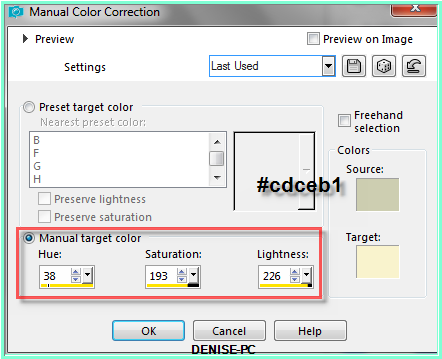
Instructions of how to install this Tool can be found here:
https://groups.yahoo.com/neo/groups/EscapingtoPSP/files/MINI%20TUTORIALS/
Effects/Image Effects/Offset as follows:
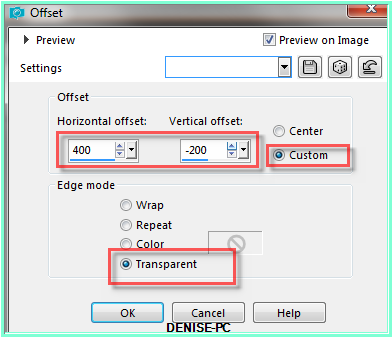
Layers/Duplicate
Image/Mirror/Horizontal OR Image/Mirror
Image/Mirror/Vertical OR Image/Flip
Layers/Merge/Merge Down
Effects/Plugins/MuRa's Seamless/Emboss at Alpha/Default Settings
Effects/Plugins/Eye
Candy 3.0/Drop Shadow
OR
Effects/Plugins/Eye Candy 4000/Shadowlab
Step Thirteen:
Text Tool with
the following settings:


Write:
Cream on Cream (or words of your choice)
See my image for placement
Convert to Raster Layer
Effects/Plugins/MuRa's Seamless/Emboss at Alpha/Default Settings
Effects/Plugins/Eye
Candy 3.0/Drop Shadow
OR
Effects/Plugins/Eye Candy 4000/Shadowlab
Layers/New Raster Layer
Add
your Watermark
Layers/Merge
All Flatten
Image/Resize/850
pixels wide - height will adjust itself
File/Export/JPEG
Optimiser/Compression Value 20
I
hope you have enjoyed
this tutorial
A
big thank you to the ladies who test my Tutorials
TESTERS'
RESULTS
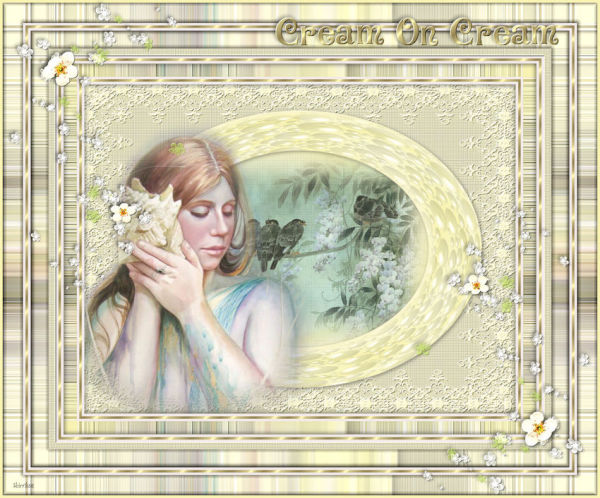
SHIRLEY NZ
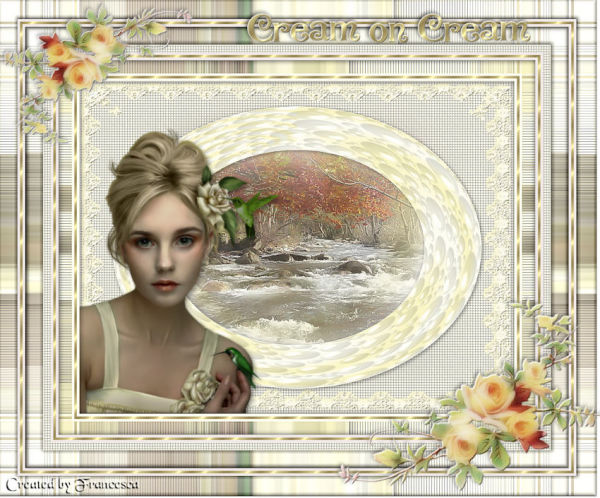
FRAN
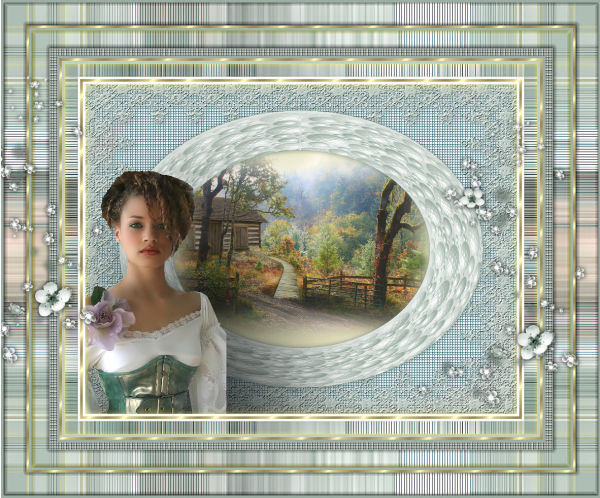
ELIZABETH
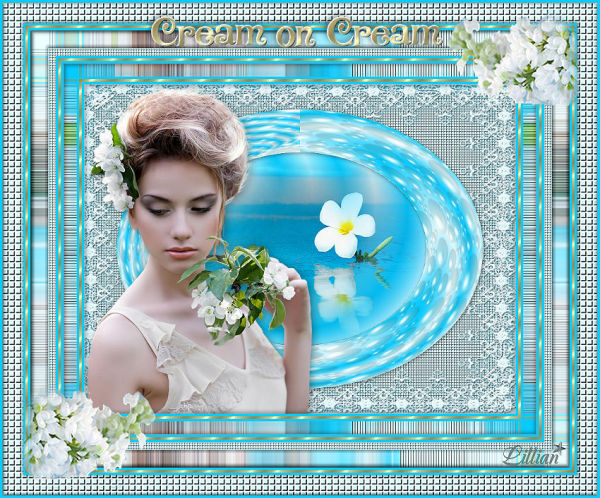
LILLIAN
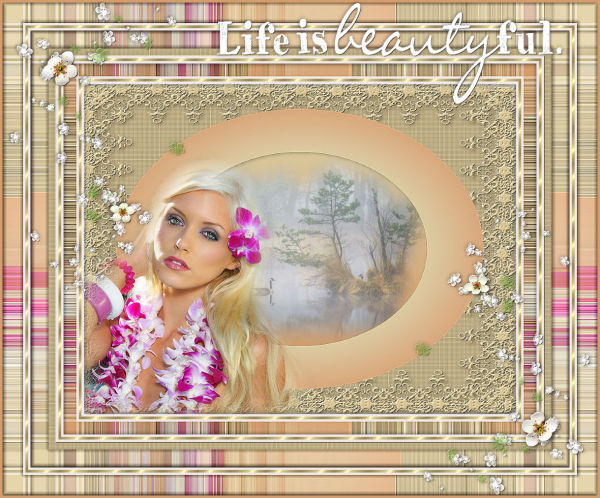
JOYCE
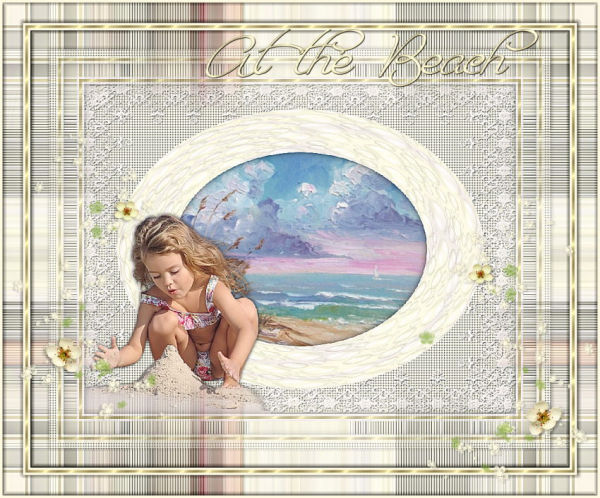
BETTY
FOR
OTHER VERSIONS OF THE TUTORIAL
PLEASE
GO TO:
https://photos.app.goo.gl/9UO6cwgjImS91zyy2

| | | |