Tutorial 2017
This
tutorial is written by
Denise D. on 3rd April, 2018
from
my own ideas.
Any
resemblance to other tutorials is
co-incidental and unintentional.
You
may share my tutorials with other
groups.
All I ask is that you advise me
and
credit for the tutorial is given to me and linked to
http://escapingtopsp2.altervista.org/Home/homeb.html
Please
do not upload any of my completed Tutorial images onto sites
such as Fotki, Pinterest, Photobucket or similar
COUNTRY
TOPPER
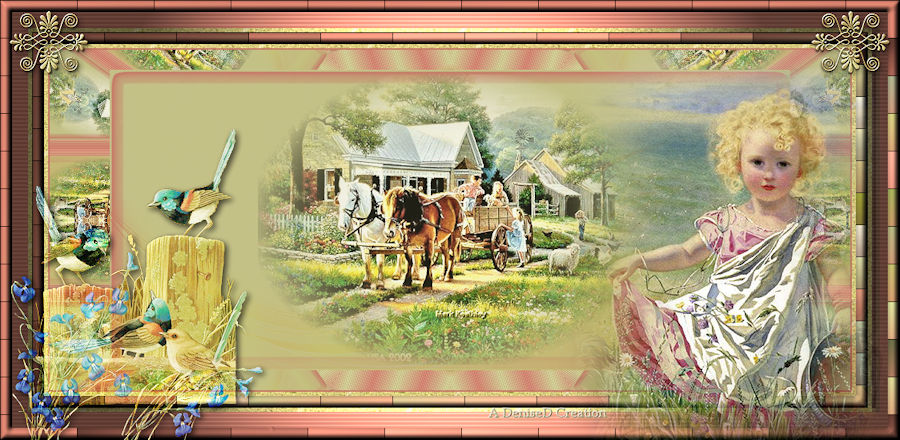
http://escapingtopsp2.altervista.org/CountryTopper/CountryTopper.html
Use this pencil to
follow the steps
hold down left click to
grab and move it


Click on the Box to download Supplies
To print click on Printer

Supplies
Images:
LF-Deco-16.pspimage
You can join this Group at:
http://linda-psp-design-tubes.jouwweb.nl/maskers-masks
in-the-fields2_lizztish.psp
You can join this Group at:
https://groups.google.com/forum/?fromgroups#!forum/emotivemists
Birds & Flowers sm
1_1-03~pjs.psp
Stait_Day at the Fair by Mark Keathley.psp
This image was obtained from the
Internet
If you are the owner of this
image, please contact me
so that credit can be given to
you
Denise D Signature.png
Pattern:
8ec
Mask:
masque_45_franiemargot
Presets:
D.D.CountryTopperPreset
Double Click on the  icon in the Supplies File to install
this Preset in your Plugin. icon in the Supplies File to install
this Preset in your Plugin.
If for some reason this doesn’t work,
I have provided the settings in the Tutorial.
Plugins:
Eye Candy 3 OR Eye Candy 4000
VM Instant Art (import into Filters
Unlimited 2.0)
Carolaine & Sensibility
MuRa's Seamless
Found here:
http://www.saturnelladesign.fr/pages/filtres.htm
http://www.maidiregrafica.eu/paginafiltri/filtri.html
Notes:
This Tutorial was created in PSP
X9.... other
versions may need adjustment
Some of the graphics may be from Free
to Use sites or Share
Groups.
If you are the creator of one of these
please let me know
so that appropriate credit can be given.
No infringement of
copyright is intended or intentional.
Some
helpful information:
You can change the blend mode, opacity and drop shadow, as
well as colourise
the materials,
according to the tubes/colours you are using.
When applying the Resize with the All Layers option checked, this will
be
informed in the tutorial,
otherwise, apply the resize with this option unchecked.
Remember always to save your work.
Whenever you reduce an image, apply Adjust/Sharpness/Sharpen, to
maintain the
sharpness of the image.

Before opening PSP, download plugins
and install
Open graphics in PSP, duplicate (Shift
D) and close the original.
Please
Note: Offset
settings provided in this tutorial may vary according to size of your
image.
Please
adjust to suit.
The
settings remain the same throughout this Tutorial unless otherwise
stated.
Set your Foreground colour to #c4c188
Set your Background colour to #c67866
Step One:
Place Pattern in PSP Pattern Folder
Place Mask in PSP Mask Folder
Install Preset
File/New/New Image 850 pixels x 375
pixels as follows:
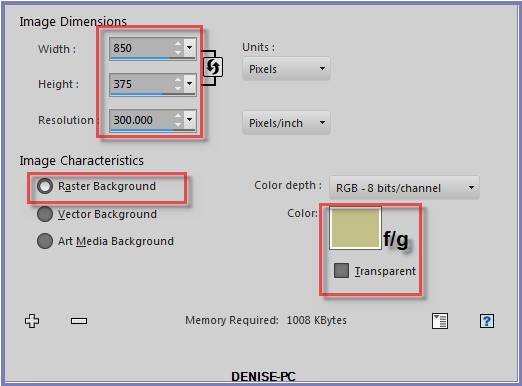
Change Foreground Colour to
Foreground/Background/Linear Gradient as follows:
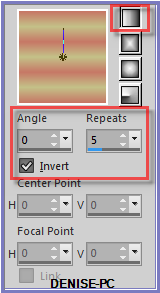
Layers/New Raster Layer
Flood Fill with Gradient
Step Two:
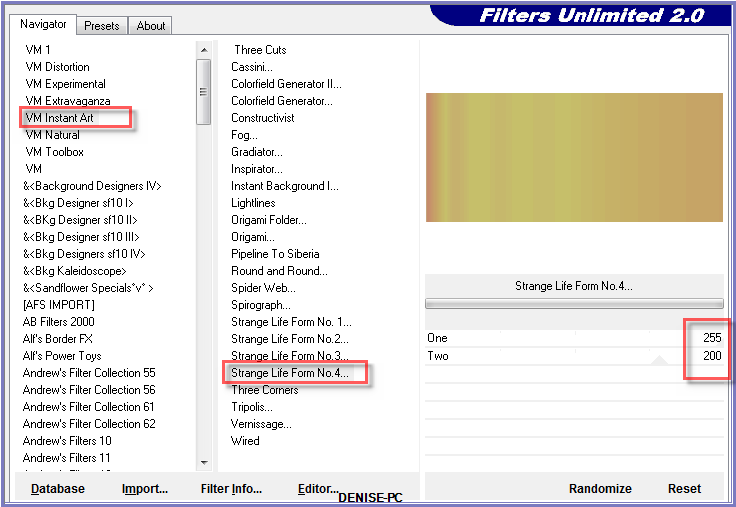
Effects/Plugins/Filters Unlimited 2.0/VM Instant Art/Strange Life Form
No 4 as follows:
Layers/Load/Save Mask/Load Mask masque_45_franiemargot as follows:
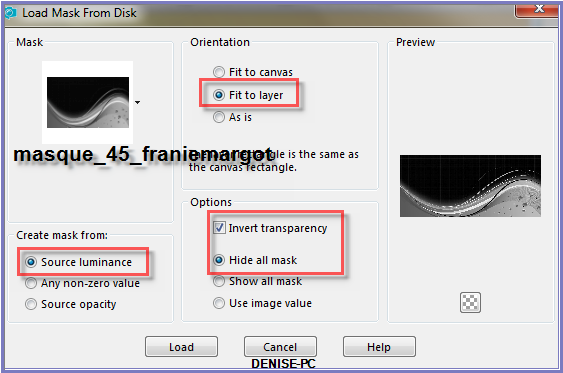
Effects/Edge Effects/Enhance More
Layers/Merge/Merge Group
Layers/Merge/Merge Down
Step Three:
Effects/Plugins/Eye
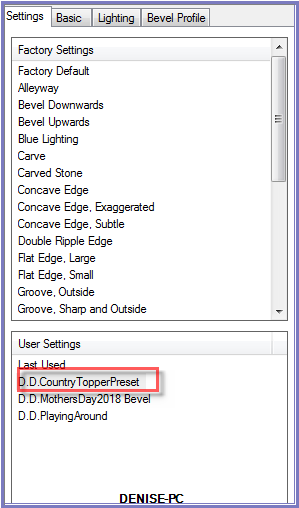
Candy 5/Impact/Bevel/Preset D.D.CountryTopperPreset
OR if you can't install the preset
 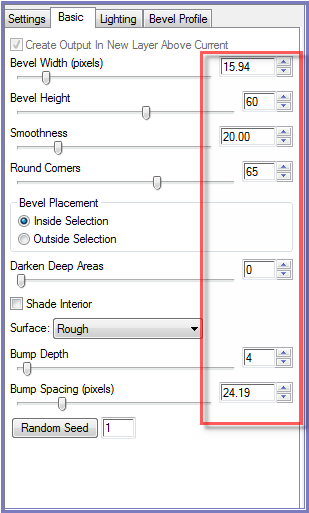 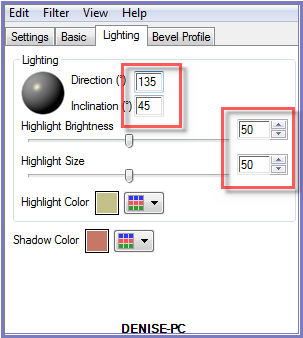
Maximise Stait_Day at the Fair by Mark Keathley.psp
Edit/Copy
Edit/Paste as New Layer
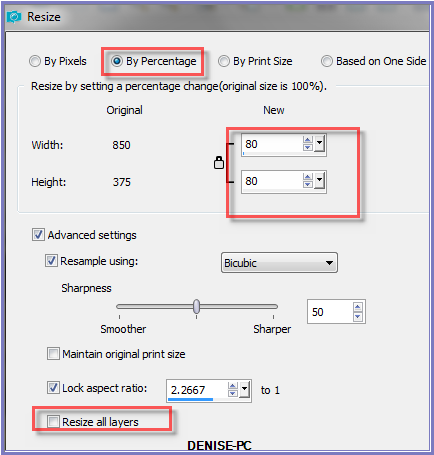
Image/Resize/80% as follows:
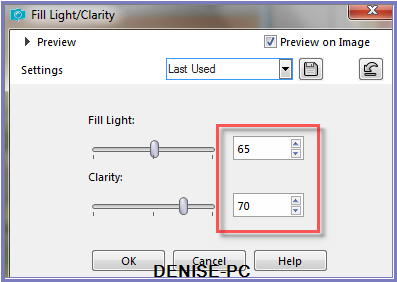
Adjust/Brightness and Contrast/Fill Light/Clarity as follows:
LATER VERSIONS OF PSP
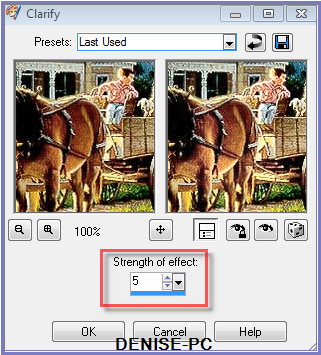
PSP 9 VERSION
Adjust/Brightness and Contrast/Clarify as follows;
Change Opacity to 85%
Step Four:
Layers/Merge/Merge Down
Promote Background to Layer
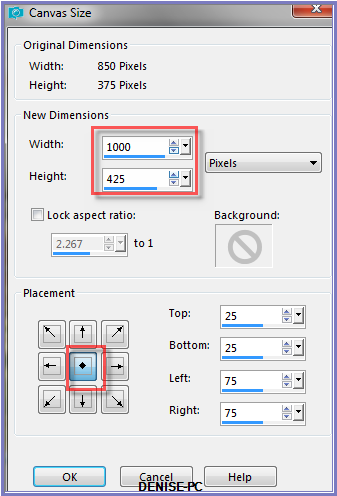
Image/Canvas Size as follows:
Magic Wand with the following settings:

Select the blank border with Magic Wand
Flood Fill with Gradient
Effects/Plugins/Carolaine and Sensibility/CS_texture as follows:
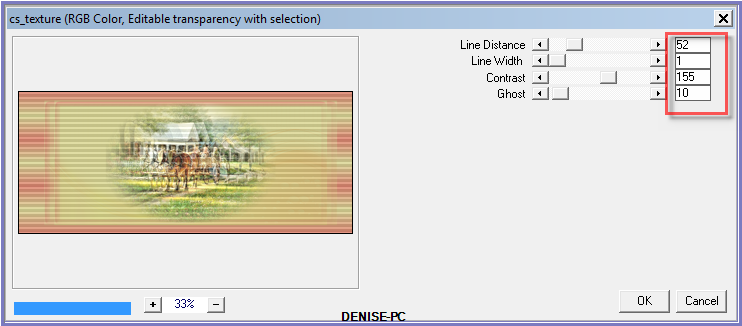
Effects/Reflection Effects/Kaleidoscope as follows:
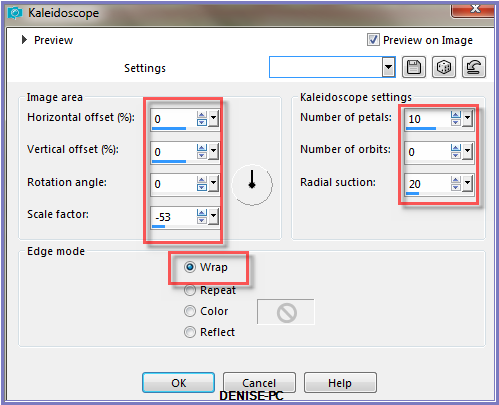
Selections/Select None
Step Five:
Image/Add Borders/2 pixels/Background Colour
Change Background Colour to Pattern as follows:
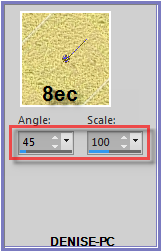
Image/Add Borders/5 pixels/White
Select with Magic Wand
Flood Fill with Background Pattern
Selections/Select None
Image/Add Borders/15 Background Colour
Select with Magic Wand
Effects/Plugins/Carolaine and Sensibility/CS-Reflection as follows:
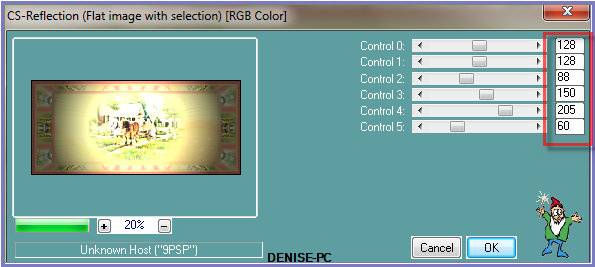
Keep selected
Step Six:
Effects/Plugins/Carolaine and Sensibility/BRectangles as follows:
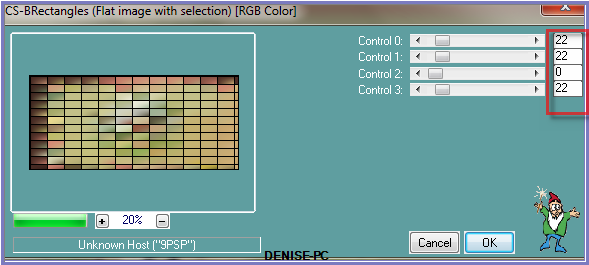
Effects/3D
Effects/Inner Bevel as follows:
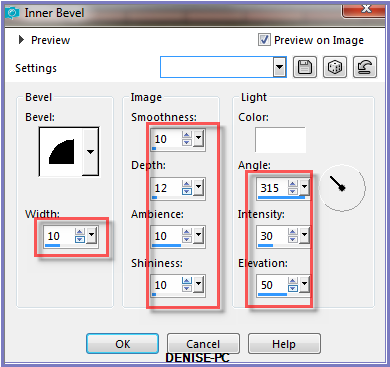
Selections/Select None
Step Seven:
Image/Add Borders/5 pixels White
Select with Magic Wand
Flood Fill with Background Pattern
Effects/Plugins/Carolaine
and Sensibility/CS-Reflection
Selections/Select None
Image/Add Borders/20
pixels/Background Colour
Select with Magic Wand
Effects/Plugins/Carolaine and Sensibility/cs_Texture
Effects/Plugins/Carolaine and Sensibility/CS_Reflection
Selections/Select None
Image/Add Borders/15 pixels/Background Colour
Select with Magic Wand
Effects/Plugins/Carolaine & Sensibility/BR-Rectangles
Effects/3D
Effects/Inner Bevel
Selections/Select None
Step Eight:
Maximise Birds & Flowers sm 1_1-03~pjs.psp
Edit/Copy
Edit/Paste as New Layer
Image/Resize 60%
Adjust/Sharpness/Sharpen
Effects/Image Effects/Offset as follows:
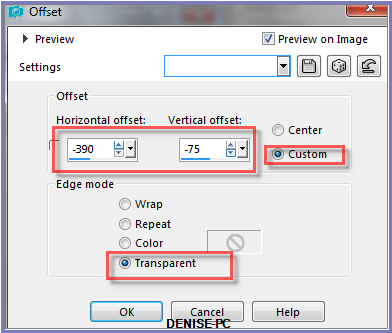
Change Blend Mode to Hard Light OR Blend of your choice
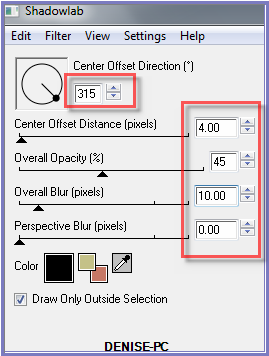
Effects/Plugins/Eye Candy 3.0/Drop Shadow as follows:
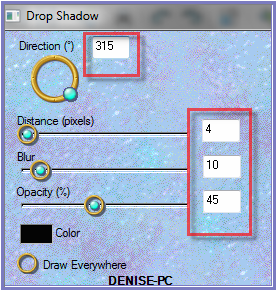
OR
Effects/Plugins/Eye Candy 4000/Shadowlab as follows:
Step Nine:
Maximise in-the-fields2_lizztish.psp
Edit/Copy
Edit/Paste as New Layer
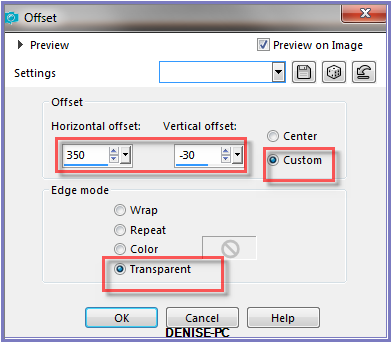
Effects/Image Effects/Offset as follows:
Adjust/Sharpness/Sharpen
Step Ten:
Maximise LF-Deco-16.pspimage
Edit/Copy Edit/Paste as New
Layer
Image/Resize/55%
Adjust/Sharpness/Sharpen
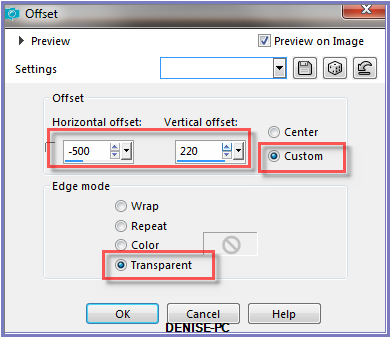
Effects/Image Effects/Offset as follows:
Layers/Duplicate
Layers/Merge/Merge Down
Layers/Duplicate
Image/Mirror/Horizontal OR Image/Mirror
Layers/Merge/Merge Down
Effects/Plugins/MuRa's Seamless/Emboss at Alpha/Default Settings
Effects/Plugins/Eye Candy 3.0/Drop Shadow
OR
Effects/Plugins/Eye Candy 4000/Shadowlab
Step Eleven:
Maximise DeniseD Signature.png
Edit/Copy Edit/Paste as New Layer
Place at bottom of Layer
Layers/New Raster Layer
Add
your Watermark
Layers/Merge
All Flatten
Image/Resize/900
pixels wide - height will adjust itself
File/Export/JPEG
Optimiser/Compression Value 20
I
hope you have enjoyed
this tutorial
A
big thank you to the ladies who test my Tutorials
TESTERS'
RESULTS
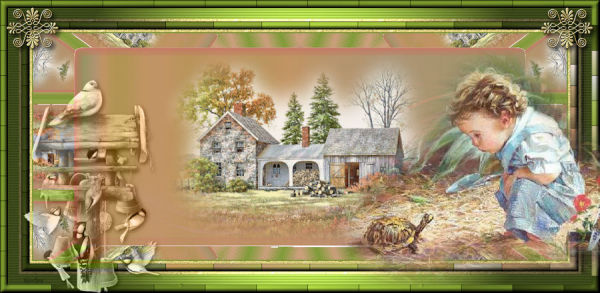
SHIRLEY NZ
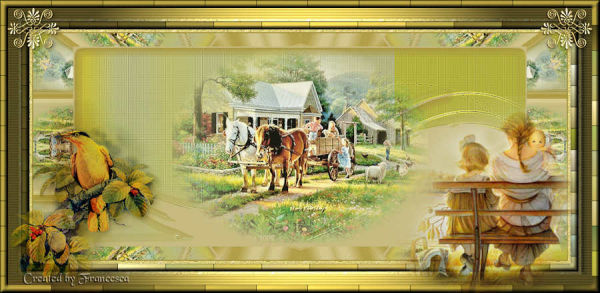
FRAN
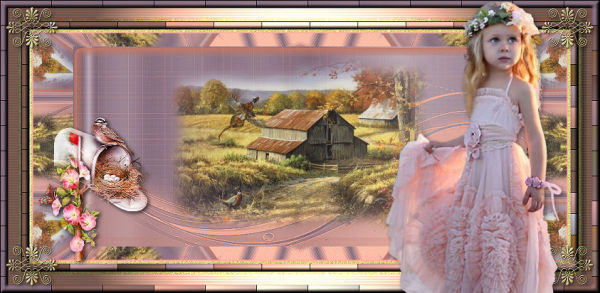
ELIZABETH
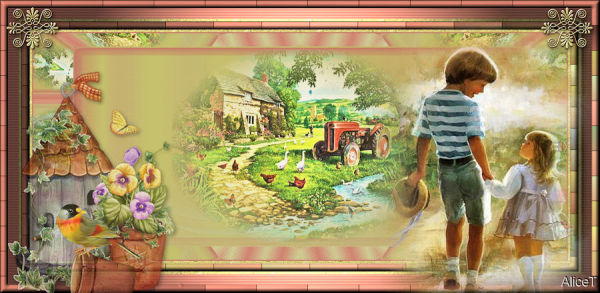
ALICE T.
| | | |