TUTORIAL TEMPLATE
This tutorial is written by
Denise D. on 16th November 2015
from my own ideas.
Any resemblance to other tutorials is co-incidental and unintentional.
You may share my tutorials with other groups. All I ask is
that you advise me
and credit for the tutorial is given to me and linked to
http://escapingtopsp2.altervista.org/Home/homeb.html
Please do not upload
any of my completed Tutorial images onto sites such as
Fotki, Pinterest, Photobucket or similar
CHRISTMAS
WISHES
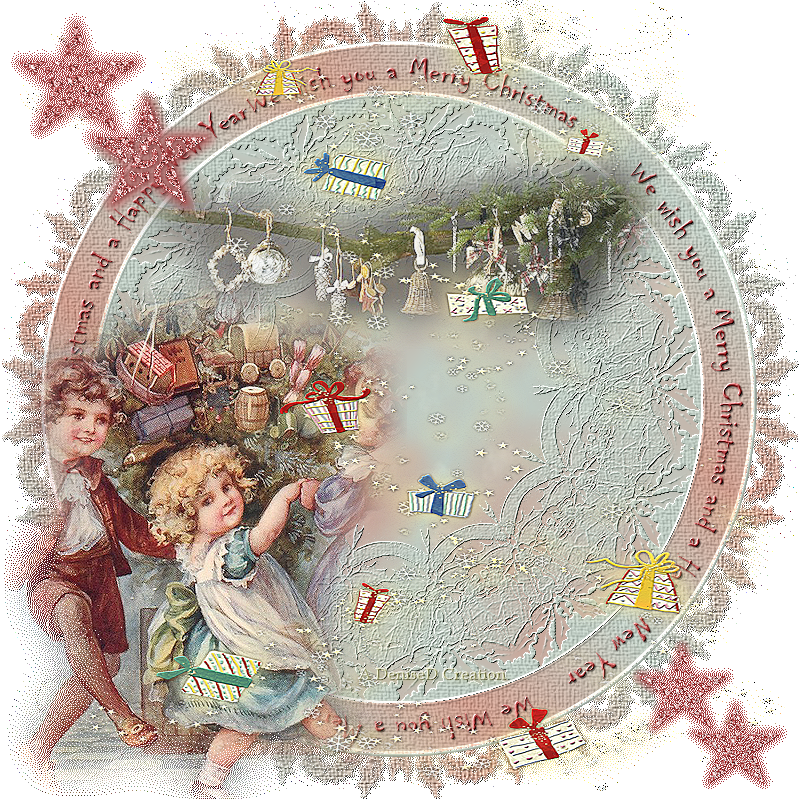
http://escapingtopsp2.altervista.org/ChristmasWishes/ChristmasWishes.html

Thank you Franie Margot for this French translation

Click on the Box to download Supplies
To print click on Printer

Supplies
Images:
LF-ChristmasDeco-09122013
LF-DecoStars-14112014
You
can join this Group at:
http://linda-psp-design.jouwweb.nl/
MKM 2013 DEC SERIES CHRISTMAS-2_T1
You can join this Group at:
https://groups.yahoo.com/neo/groups/montanakates-mists-only/info
ZtampfOverlay_LumozWhimzy_PresentsXmas
Obtained through Group Shares.
If this image was created by you,
please let me know
so that appropriate credit can be
given.
Copy of
Text
Selection:
D.D.ChristmasWishes
Preset:
D.D.ChristmasWishes
Double Click on
the  icon in the Supplies File to install this Preset in your Plugin.
If
for some reason this doesn’t work, copy/paste into the PSP Plugin
Folder where you keep Alien Skin Eye Candy 5.
Mask:
sq.Christmas7
sq.Christma5
Font:
Chiller
Colour Swatch
Plugins:
Filters/Unlimited 2.0
MuRa's Seamless
Eye Candy 3.0
Alien Skin Eye Candy 5.0/Textures
Found here:
http://www.chezviolette17.com/02filtres/Filtres.htm
Notes:
This Tutorial was created in PSP X5
BUT rewritten in PSP2018.... other versions may need adjustment
Some of the graphics may be from Free
to Use sites or Share
Groups.
If you are the creator of one of these
please let me know
so that appropriate credit can be given.
No infringement of
copyright is intended or intentional.
Some
helpful information:
You can change the blend mode, opacity and drop shadow, as
well as colourise
the materials,
according to the tubes/colours you are using.
When applying the Resize with the All Layers option checked, this will
be
informed in the tutorial,
otherwise, apply the resize with this option unchecked.
Remember always to save your work.
Whenever you reduce an image, apply Adjust/Sharpness/Sharpen, to
maintain the
sharpness of the image.
Some tools or features have other names in earlier versions of the PSP.

Before opening PSP, download plugins
and install
Place Selection in PSP Selection Folder
Place Masks in PSP Mask Folder
Install Preset
Open graphics in PSP, duplicate (Shift
D) and close the original.
The
settings remain the same throughout this Tutorial unless otherwise
stated.
Set your Foreground colour to #cd9c8d
Set your Background colour to #bfccc3
Text
Colour #ac4042
View/Rulers
Step One:
File/New/New Image 800 pixels x 800
pixels as follows:
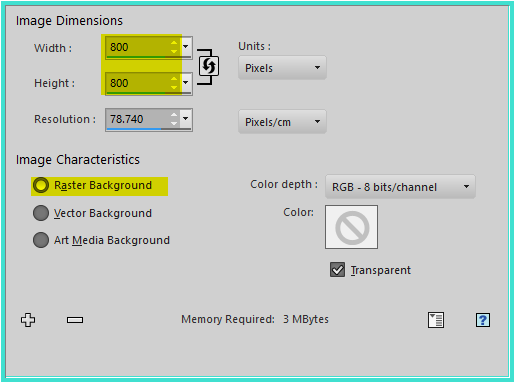 Selections/Load/Save
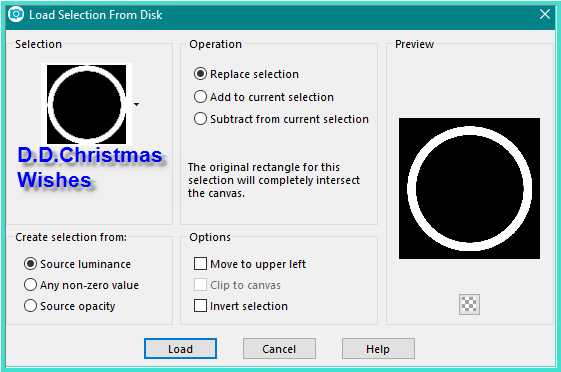
Selection/Load Selection D.D.ChristmasWishes from Disk as follows:
 Step
Two:
Change Foreground Colour to
Foreground/Background/Linear Gradient as follows:
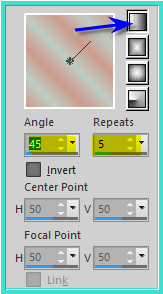 Flood Fill Selection with Gradient
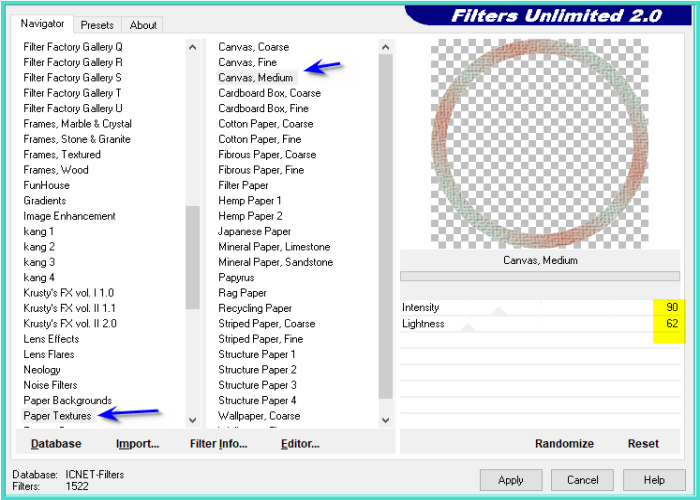
Effects/Plugins/Filters Unlimited
2.0/Paper Textures/Canvas, Medium as follows:
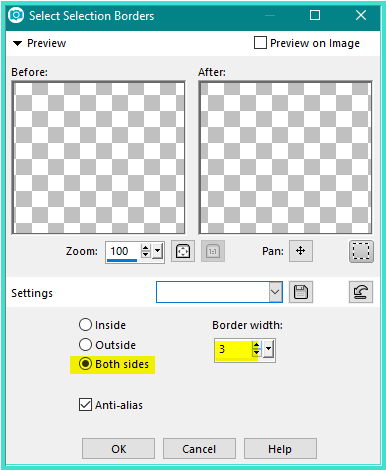
 Selections/Modify/Select Selection
Borders as follows:
 Layers/New Raster Layer
Flood Fill with Background Colour
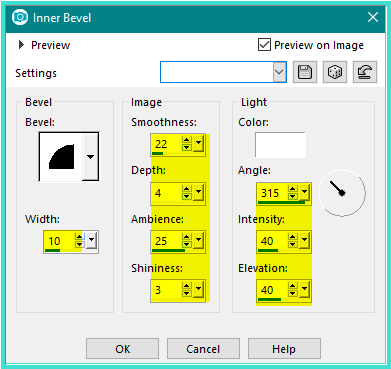
Effects/3D Effects/Inner Bevel as
follows:
 Selections/Select None
Step
Three:
Preset ShapeTool/Ellipse/Circle with
the following settings:

 Move Rulers to 650 pixels x 650
pixels.
Layers/New Raster Layer
Starting in the top left corner, pull
out circle as follows:
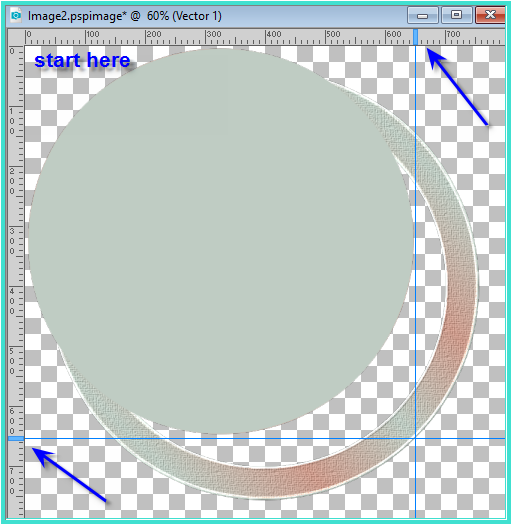
Objects/Align/Centre in Canvas
Step
Four:
Return Rulers to original position
Text Tool with the following settings:

 Settings may vary according to your
version of Psp
Change Background Colour to #ac4042
Select Raster 1
New
Raster Layer
Place the curser under the circle
until you get this image
 Write:
We
wish you a Merry Christmas We
wish you a Merry Christmas and a Happy New Year We Wish you a Merry Christmas
We Wish you a Merry Christmas and a
Happy New Year
You will have to adjust your words to
fit in what ever way you can. The spacing in the wording above worked
for me.
Close off Vector 1 Layer
Convert Vector 2 to Raster Layer
Effects/Plugins/MuRa's Seamless/Emboss
at Alpha/Default Settings
Effects/3D Effects/Drop Shadow as
follows:
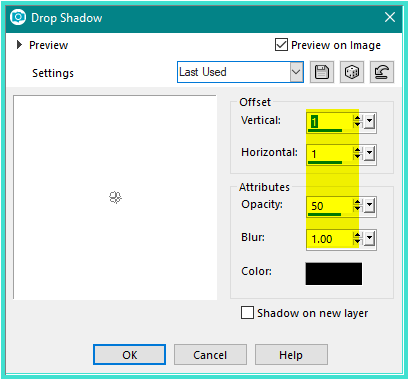 Delete Vector 1
Layers/Merge/Merge VISIBLE
Step Five:
Magic Wand with
the following settings:
 Select the centre
of the circle
Layers/New Raster
Layer
Layers/Arrange/Move
Down
Selections/Modify/Expand
3 pixels
Flood Fill with
Foreground Gradient
Effects/Plugins/Alien
Skin Eye Candy 5.0/Textures/Marble/D.D.Christmas Wishes OR
If you were unable
to install Preset these are the settings:
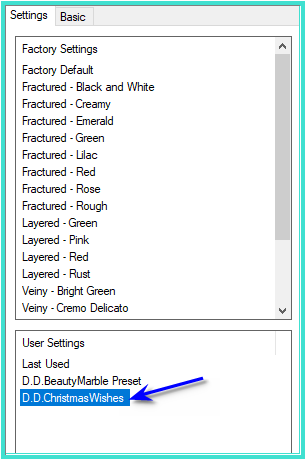 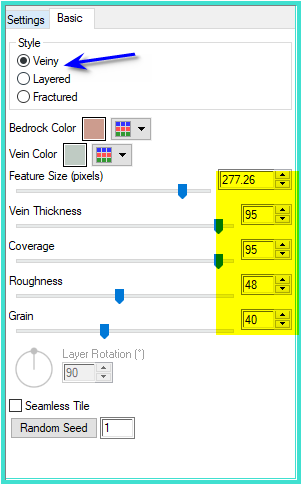 Change Background
back to Background Colour
Layers/New Raster
Layer
Flood Fill with
Background Colour
Effects/Plugins/Filters
Unlimited 2.0/Paper Textures/Canvas, Medium
Layers/Load/Save
Mask/Load sq.Christmas7 Mask from Disk as follows:
 Layers/Merge/Merge
Group
Effects/Plugins/MuRa's
Seamless/Emboss at Alpha/Default Settings
Selections/Select
None
Step Six:
Maximise
LF-ChristmasDeco-09122013
Edit/Copy
Edit/Paste as New Layer
Layers/Arrange/Bring to Top
Effects/Image
Effects/Offset as follows:
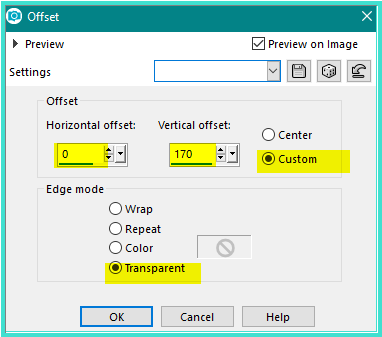 Effects/Edge
Effects/Enhance
Change
Opacity to 90% as follows:
Step
Seven:
Maximise MKM 2013 DEC SERIES
CHRISTMAS-2_T1
Edit/Copy
Edit/Paste as New Layer
Layers/Arrange/Bring
to Top
Image/Resize/80%
as follows:
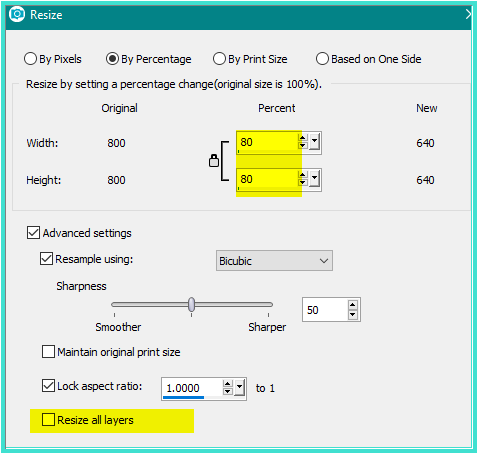 Adjust/Sharpness/Sharpen
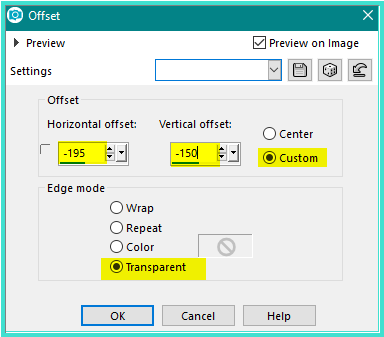
Effects/Image
Effects/Offset as follows:
 Step Eight:
Layers/New
Raster Layer
Selections/Select
All
MaximiseZtampfOverlay_LumozWhimzy_PresentsXmas
Edit/Copy
Edit/Paste into Selection
Selections/Select
None
Effects/Edge
Effects/Enhance
Step Nine:
Layers/New
Raster Layer
Layers/Arrange/Send
to Bottom
Flood Fill with
Gradient
Effects/Plugins/Filters
Unlimited 2.0/Paper Textures/Canvas, Coarse
Layers/Load/Save
Mask/Load Mask sq.Christmas5 from Disk INVERT TRANSPARENCY
BOX TICKED
Layers/Merge/Merge
Group
Effects/Plugins/MuRa's
Seamless/Emboss at Alpha/Default Settings
Effects/3D
Effects/Drop Shadow
Step Ten:
Maximise
LF-DecoStars-14112014
Edit/Copy
Edit/Paste as New Layer
Layers/Arrange/Bring
to Top
image/Resize/75%
Adjust/Sharpness/Sharpen
More
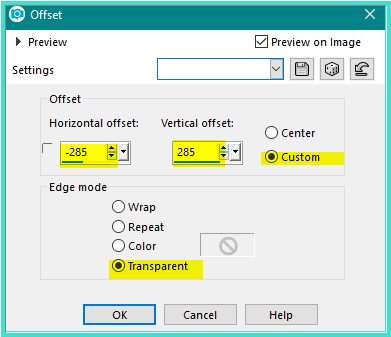
Effects/Image
Effects/Offset as follows:
 Change Background
back to #ac4042
Change of Target
Tool as follows:
 Wipe over the
stars with Background Colour
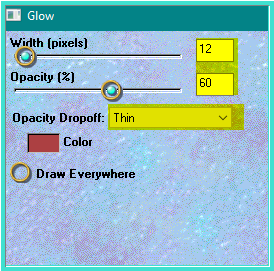
Effects/Plugins/Eye
Candy 3.0/Glow as follows;
 OR
OR
Effects/Plugins/Eye
Candy 4000/Gradient Glow as follows:
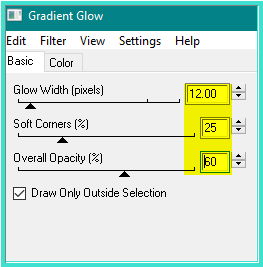 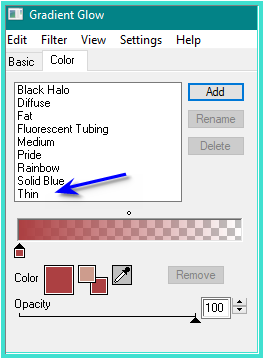 Step
Eleven:
Layers/Duplicate
Image/Resize/75%
Adjust/Sharpness/Sharpen
Effects/Image
Effects/Offset as follows:
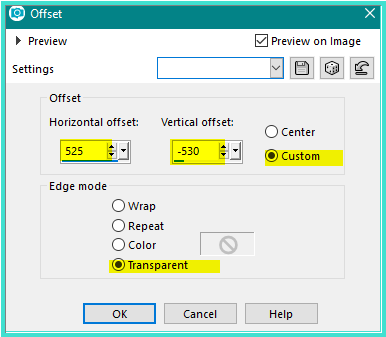 Step Twelve:
Maximise
DeniseD Signature.png
Edit/Copy
Edit/Paste as New Layer
Place at bottom of Layer
Layers/New
Raster Layer
Add
your Watermark
Layers/Merge
VISIBLE
File/Export/PNG
OPTIMIZER
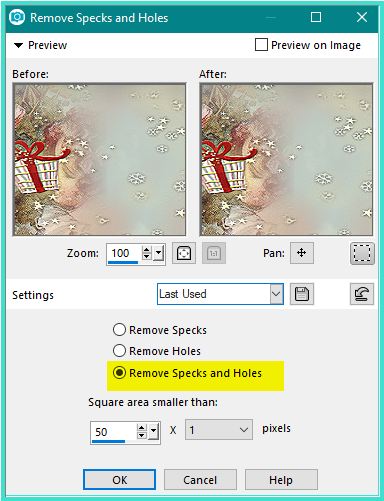
NOTE: If you find you have lot of specks in the
final result you can do the following:
Selections/Select All
Selections/Modify/Remove Specks and Holes/Remove Specks and Holes as
follows:
I hope you
have enjoyed this tutorial
A big thank you to the
ladies who test my Tutorials

| | | |