Tutorial 2017
This
tutorial is written by
Denise D. on 6th January, 2015
from
my own ideas.
Any
resemblance to other tutorials is
co-incidental and unintentional.
You
may share my tutorials with other
groups.
All I ask is that you advise me
and
credit for the tutorial is given to me and linked to
http://escapingtopsp2.altervista.org/Home/homeb.html
Please
do not upload any of my completed Tutorial images onto sites
such as Fotki, Pinterest, Photobucket or similar
BIRDS
OF A FEATHER
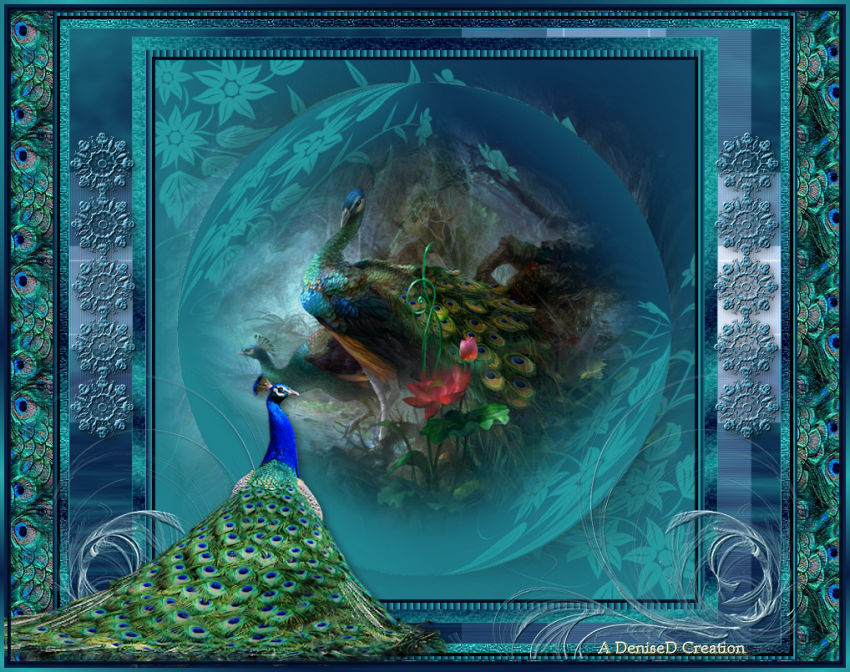
http://escapingtopsp2.altervista.org/BirdsOfAFeather/BirdsOfAFeather.html

Thank you Franie Margot for this French Translation
Use this pencil to follow the steps
hold down left click to grab and move it


Click on the Box to download Supplies
To print click on Printer

Supplies
Images:
mentali-misted562.pspimage
You can join this Group at:
https://groups.yahoo.com/neo/groups/Creative_for_fun/info
12926131203_animaux_nikita.pspimage
You can join this Group at:
http://www.reveries.fr/accueil.php
D.D.peacock.element.pspimage
crocelibertas.pspimage
Obtained through Group Shares.
If this image was created by you, please let me know
so that appropriate credit can be given.
DeniseD Signature.png
Pattern:
D.D.peacocks.pattern.jpg
Mask:
claire_mask_grass_fond.jpg
Colour Swatch
Plugins:
Filters Unlimited 2.0
Eye
Candy 3.0
Xenofex 2
MuRa's Seamless
Found here:
http://www.saturnelladesign.fr/pages/filtres.htm
http://janaly.com/Filtres/Filtre.html
http://www.maidiregrafica.eu/paginafiltri/filtri.html
Notes:
This Tutorial was originally created
in PSPX7 and reworked in PSP
X9.... other
versions may need adjustment
Some of the graphics may be from Free
to Use sites or Share
Groups.
If you are the creator of one of these
please let me know
so that appropriate credit can be given.
No infringement of
copyright is intended or intentional.
Before opening PSP, download plugins
and install
Some
helpful information:
You can change the blend mode, opacity and drop shadow, as
well as colourise
the materials,
according to the tubes/colours you are using.
When applying the Resize with the All Layers option checked, this will
be
informed in the tutorial,
otherwise, apply the resize with this option unchecked.
Remember always to save your work.
Whenever you reduce an image, apply Adjust/Sharpness/Sharpen, to
maintain the
sharpness of the image.
Some tools or features have other names in earlier versions of the PSP.

Please
Note: Offset
settings provided in this tutorial may vary according to size of your
image.
Please
adjust to suit.
The
settings remain the same throughout this Tutorial unless otherwise
stated.
Set your Foreground colour to #2ba9a9
Set your Background colour to #012245
Step One:
Before opening PSP, download
plugins and install
Place Patterns in PSP
Pattern Folder
Place Mask in PSP Mask
Folder
Open graphics in PSP,
duplicate (Shift D) and close the original.
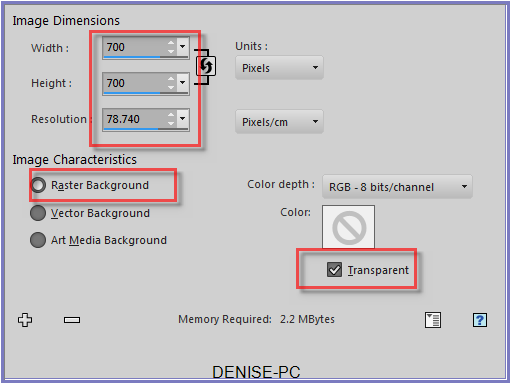
File/New/New Image 700 pixels x 700
pixels as follows:
Step Two:
Flood
Fill with Foreground Colour
Layers/New Raster Layer
Flood Fill with Background Colour
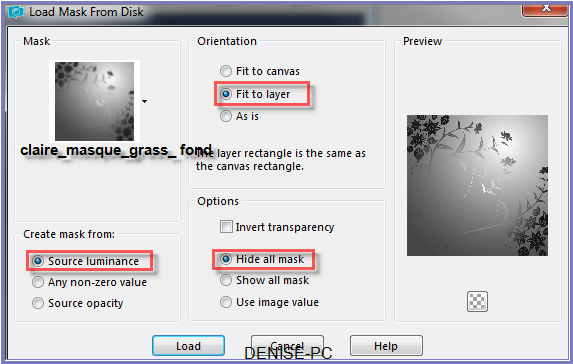
Layers/Load/Save/Mask/Load
Mask from Disk as follows:
Layers/Merge/Merge Group
Step Three:
Maximise
mentali-misted562
Edit/Copy
Edit/Paste as
New Layer
Layers/Merge/Merge All Flatten
Layers/Duplicate
Close off Copy of Background Layer
Select Background Layer
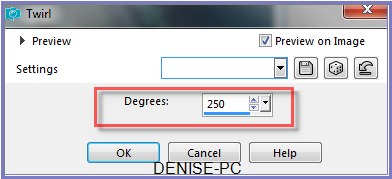
Effects/Distortion Effects/Twirl as follows:
Open
Copy of Background Layer
Select Copy of Background Layer
Effects/Geometric Effects/Circle/Transparent
Image/Resize/85% as follows:
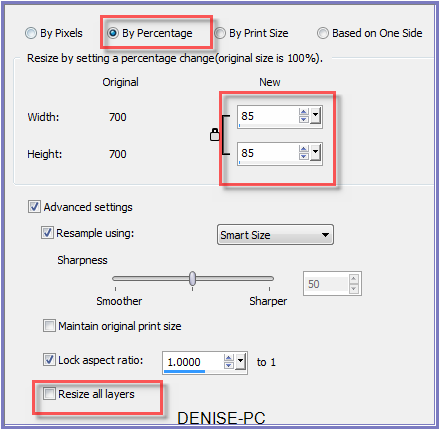
Open
Background Layer
Step
Four:
Change
Foreground Colour to
Foreground/Background/Sunburst Gradient as follows:
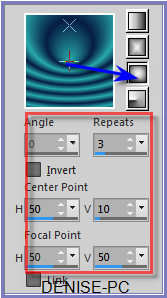
Layers/New
Raster Layer
Flood Fill with Gradient
Effects/Plugins/Filters Unlimited/Paper Textures/Hemp Paper
2 as follows:
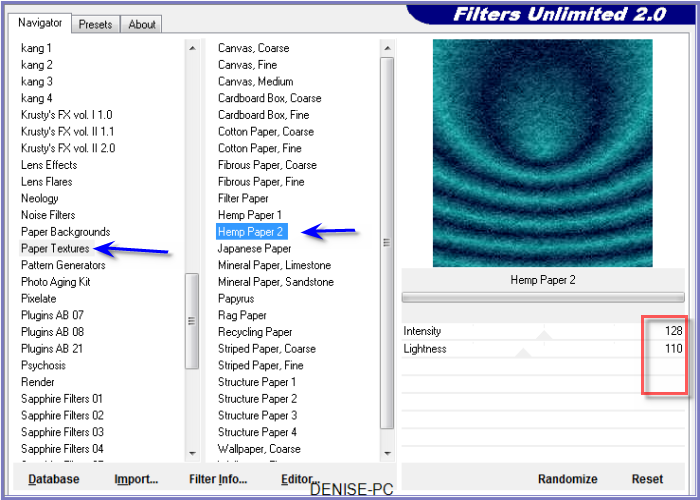
Selections/Select
All
Selections/Modify/Contract 15 pixels
Edit/Clear
Step Five:
Layers/New
Raster Layer
Flood Fill with Background Colour
Effects/Texture Effects/Blinds as follows:
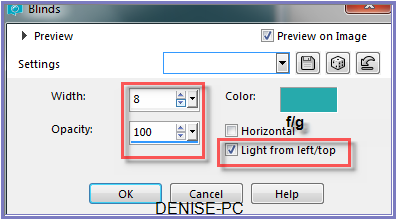
Selections/Modify/Contract
12 pixels
Edit/Clear
Layers/New Raster Layer
Flood Fill with Gradient
Effects/Plugins/Filters Unlimited 2.0/Paper Textures/Hemp Paper 2
Selections/Modify/Contract 10 pixels
Edit/Clear
Effects/3D Effects/Chisel as follows:
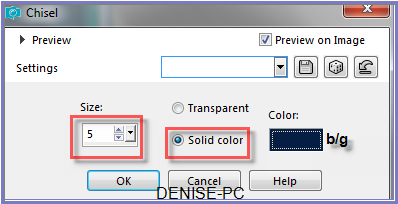 Selections/Select
None
Step Six:
Layers/Merge/Merge All Flatten
Image/Add Borders/1 pixel/Foreground Colour
Image/Add Borders/as follows:
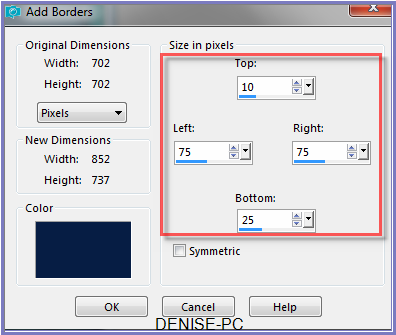
MagicWand
with the following settings:

Select Border with Magic Wand
Effects/Plugins/Xenofex 2/Little Fluffy Clouds as follows:
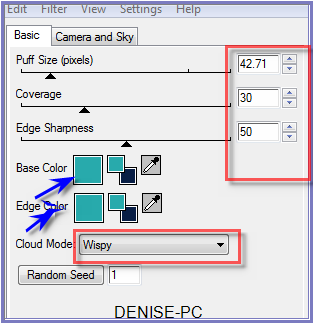 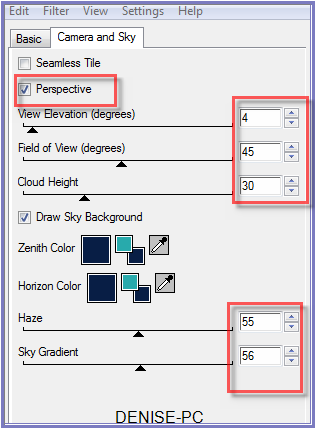
Step
Seven:
Layers/New
Raster Layer
Maximise crocelibertas
Edit/Copy
Edit/Paste into Selection
Adjust/White Balance as follows:
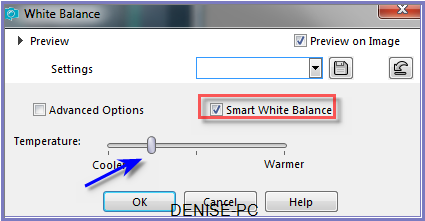
Selections/Select
None
Step Eight:
Image/Add Borders 1 pixels/Foreground Colour
(Symmetric Box ticked)
Image/Add
Borders/10 pixels/White
Select with Magic Wand
Flood Fill with Gradient
Effects/Plugins/Filters Unlimited 2.0/Paper Textures/Hemp Paper 2
Effects/Edge Effects/Enhance
Selections None
Image/Add Borders/8 pixels/Background Colour
Select with Magic Wand
Effects/Texture Effects/Blinds
Selections/Invert
Effects/3D Effects/Chisel
Selections/Select None
Step Nine:
Maximise swirls 66
Edit/Copy
Edit/Paste as New Layer
Image/Resize/80%
Adjust/Sharpness/Sharpen
Effects/Image Effects/Offset as follows:
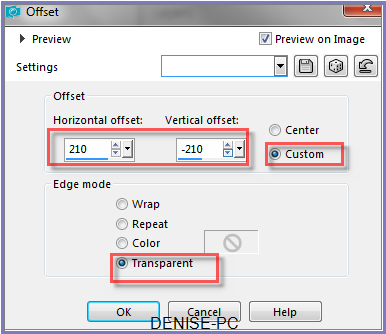
Adjust/Hue
and Saturation/Colorize as follows:
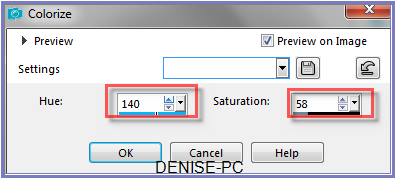
Effects/Plugins/MuRa's
Seamless/Emboss at Alpha/Default Settings
Layers/Duplicate
Image/Mirror/Horizontal OR Image/Mirror
Step Ten:
Image/Add
Borders/1
pixels/Background Colour
Image/Add Borders as follows:
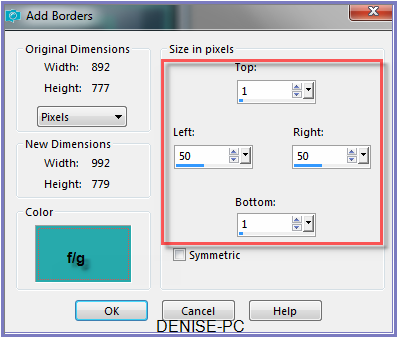
Select
Border with Magic Wand
Change Background Pattern to D.D.peacock.pattern as follows:
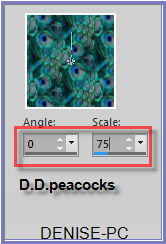
Flood
Fill with Pattern
Adjust/Sharpness/Sharpen
Selections/Select None
Image/Add Borders/8 pixels/Background Colour (Symmetric box
ticked)
Step
Eleven:
Maximise 12926131203_animaux_nikita
Edit/Copy
Edit/Paste as New Layer
Image/Resize 125%
Adjust/Sharpness/Sharpen
Image/Mirror/Horizontal OR Image/Mirror
Effects/Image
Effects/Offset as follows:
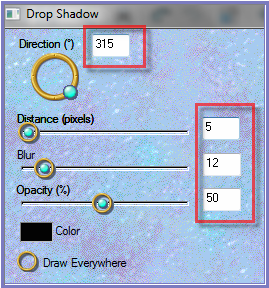
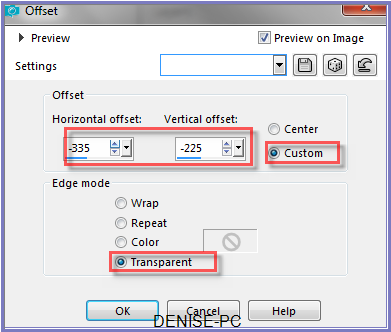 Effects/Plugins/Eye
Candy 3.0/Drop Shadow Direction 315 as
follows:
Image/Add
Borders/5 pixels/White
Select with Magic Wand
Flood Fill with Gradient
Selections/Select None
Step Twelve:
Maximise
D.D.peacock.element
Edit/Copy
Edit/Paste as New Layer
Adjust/Sharpness/Sharpen
Effects/Image Effects/Offset as follows:
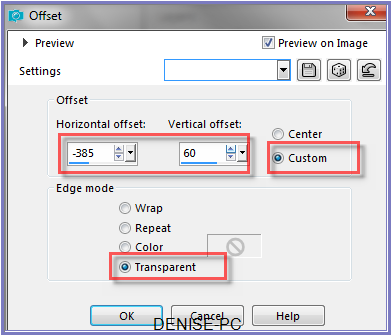
Layers/Duplicate
Image/Mirror/Horizontal OR Image/Mirror
Layers/Merge/Merge Down
Effects/Plugins/MuRa's Seamless/Emboss at Alpha/Default Settings
Effects/Plugins/Eye Candy 3.0/Drop Shadow
Step
Thirteen:
Selections/Select All
Selections/Modify/Contract 13 pixels
Effects/3D Effects/Chisel
Selections/Select None
Maximise DeniseD Signature.png
Edit/Copy Edit/Paste as New Layer
Place at bottom of Layer
Layers/New
Raster Layer
Add
your Watermark
Layers/Merge
All Flatten
Image/Resize/850
pixels wide - height will adjust itself
File/Export/JPEG
Optimiser/Compression Value 20
I hope you have enjoyed
this tutorial
A
big thank you to the ladies who test my Tutorials
| | | |