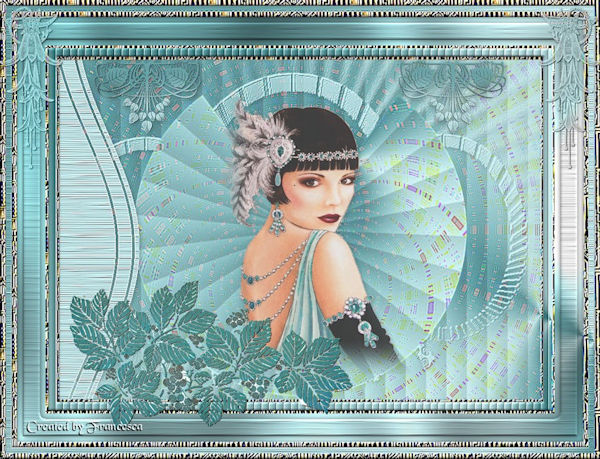
Supplies Images: D.D.ArtDecoLady7 D.D.ArtDeco.Element.png element deco
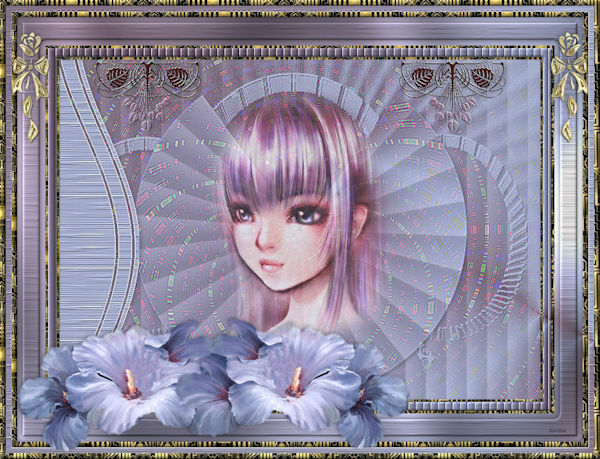
nicole-fleur-2013.png
Some of these image were obtained from the Internet If you are the owner of this
image, please contact me so that credit can be given to
you
Textures:
winni.text.39
Patterns:
D.D.ArtDeco2.jpg Mask: Gertje_16 Selections:
D.D.ArtDeco1
Plugins: &<Bkg Designer sf101>
(Import into Filters Unlimited 2.0)
MuRa's Meister
MuRa's Seamless
&<Sandflower
Specials"v">
Filters Unlimited 2.0 Found here: http://www.saturnelladesign.fr/pages/filtres.htm http://www.maidiregrafica.eu/paginafiltri/filtri.html Notes: This Tutorial was created in PSP
X9.... other
versions may need adjustment Some of the graphics may be from Free
to Use sites or Share
Groups. If you are the creator of one of these
please let me know
so that appropriate credit can be given. No infringement of
copyright is intended or intentional. Before opening PSP, download plugins
and install Please
Note: Offset
settings provided in this tutorial may vary according to size of your
image. Please
adjust to suit. The
settings remain the same throughout this Tutorial unless otherwise
stated. Set your Foreground colour to #d4b2c1 Set your Background colour to #b6c6e4
Step One: Place Pattern in PSP Pattern Folder
Place Mask in PSP Mask Folder
Place Texture in PSP Texture Folder
Place Selection in PSP Selection Folder Open graphics in PSP, duplicate (Shift
D) and close the original.
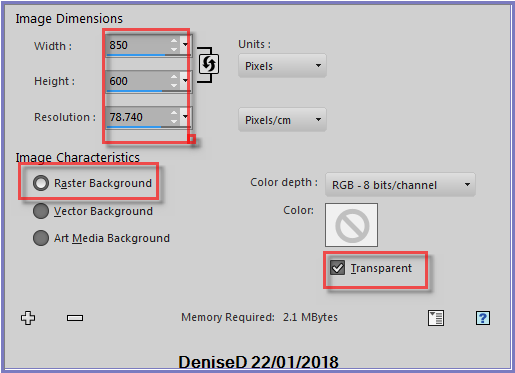
File/New/New Image 850 pixels x 600
pixels as follows:
Change
Foreground Colour to
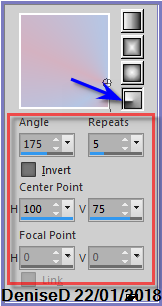
Foreground/Background/Radial Gradient as follows:
Step Two:
Flood Fill with Gradient
Layers/Duplicate
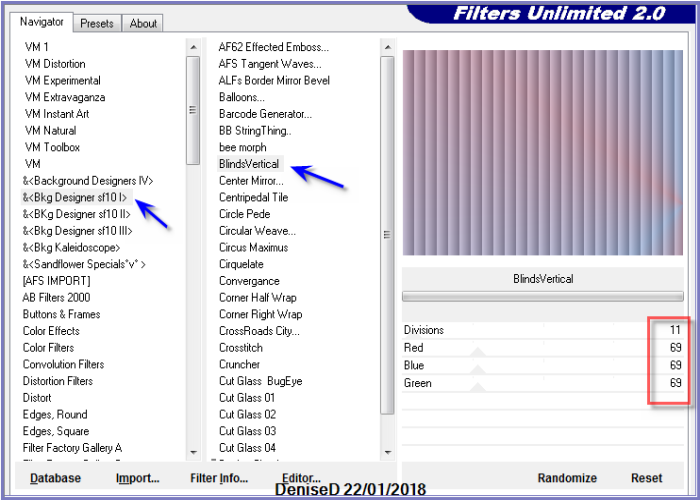
Effects/Plugins/Filters Unlimited 2.0/&<Bkg Designer
sf101>/Circular Weave as follows;
Select Copy of Raster 1
Change Opacity to 85%
Layers/Merge/Merge Down
Step Four:
Layers/Duplicate
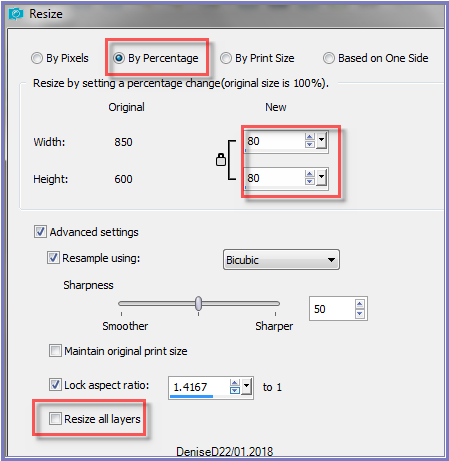
Image/Resize/80% as follows:
Adjust/Sharpness/Sharpen
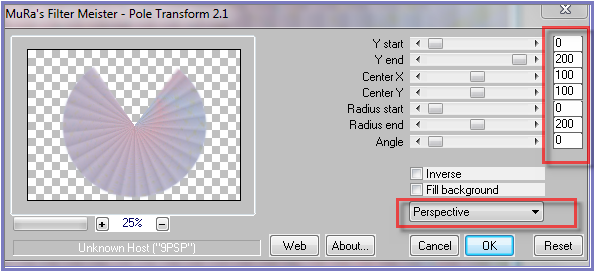
Effects/Plugins/MuRa's Meister/Pole Transform as follows:
Step Five:
Layers/New Raster Layer
Layers/Arrange/Move Down
Flood Fill with Background Colour
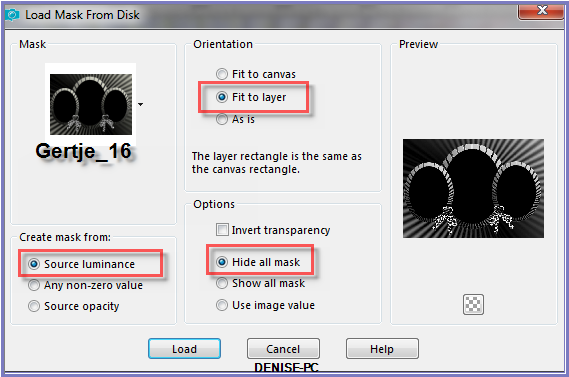
Layers/Load/Save Mask/Load Mask Gertje_16 from Disk as follows:
Adjust/Sharpness/Sharpen
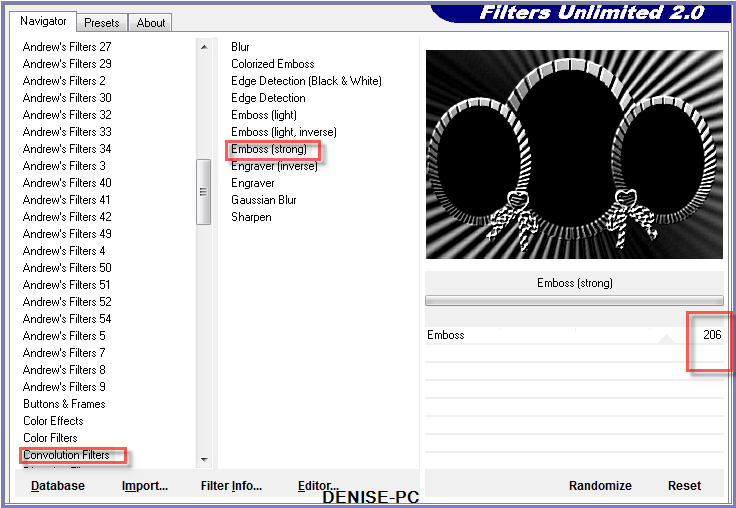
Effects/Plugins/Filters Unlimited 2.0/Convolution Filters/Emboss
(strong) as follows:
Repeat Once
Layers/Merge/Merge Group
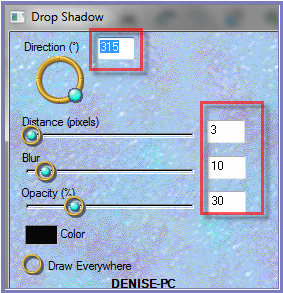
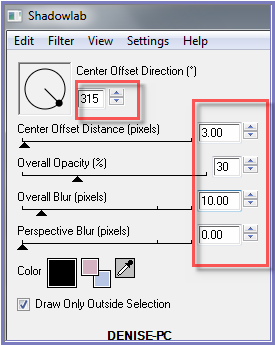
Effects/Plugins/Eye
Candy 3.0/Drop Shadow as follows:
OR
Effects/Plugins/Eye Candy 4000/Shadowlab as follows:
Step Six:
Layers/New Raster Layer
Layers/Arrange/Bring to Top
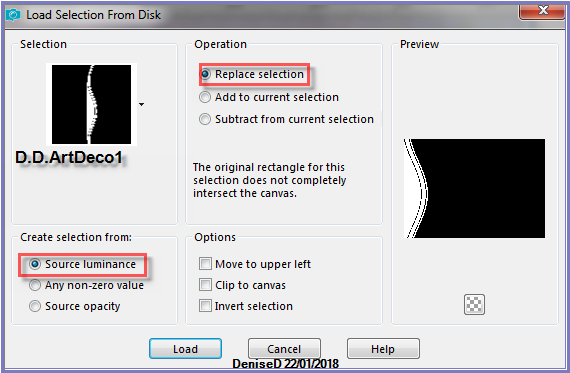
Selections/Load/Save Selection/Load Selection/D.D.ArtDeco1 from Disk as
follows:
Flood Fill with Background Colour
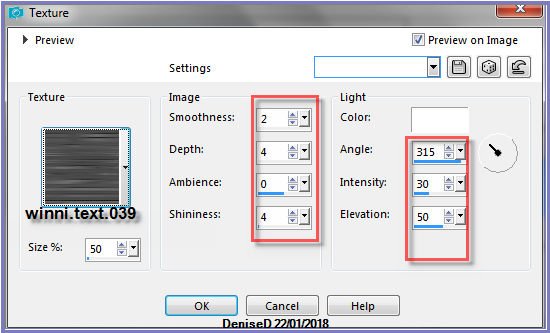
Effects/Texture Effects/Texture/winni.text.39 as follows:
Step Seven:
Maximise
D.D.ArtDecoLady7.pspimage
Edit/Copy Edit/Paste as New Layer
Image/Resize/80%
Adjust/Sharpness/Sharpen More
Maximise D.D.ArtDeco.Element.png
Edit/Copy Edit/Paste as New Layer
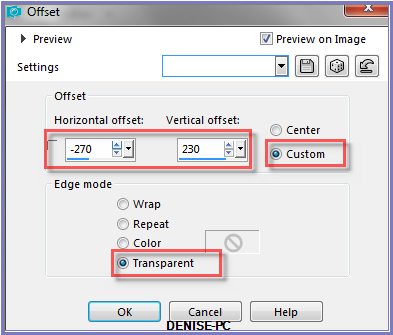
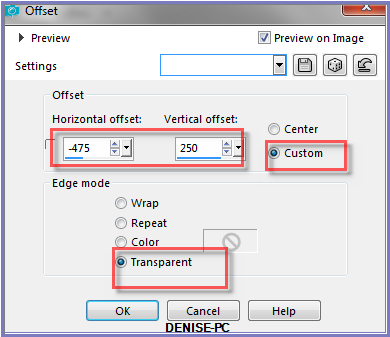
Effects/Image Effects/Offset as follows:
Layers/Duplicate
Image/Mirror/Horizontal OR Image/Mirror
Layers/Merge/Merge Down
Effects/Plugins/EyeCandy 3.0/Drop Shadow
OR
Effects/Plugins/Eye Candy 4000/Shadowlab
Select Copy of Raster 1 Layer
Repeat Drop Shadow/Shadowlab
Step Eight:
Change
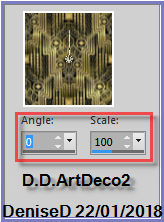
Background Colour to Pattern D.D.Art Deco2 as follows:
Image/Add Borders/5 pixels/White
Select with Magic Wand
Flood Fill with Pattern
Selections/Select None
Image/Add
Borders/15 pixels/White
Select with Magic Wand
Flood Fill with Gradient
Effects/Plugins/Filters
Unlimited 2.0/&<Bkg Designer
sf101>/BlindsVertical/Divisions 4
Effects/Edge Effects/Enhance More
Effects/3D
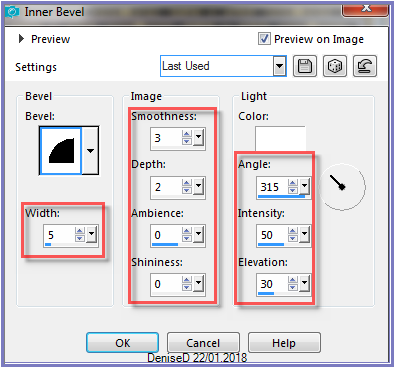
Effects/Inner Bevel as follows:
Effects/Plugins/Eye Candy 3.0/Drop Shadow
OR
Effects/Plugins/Eye Candy 4000/Shadowlab
Repeat Drop Shadow/Shadowlab Direction 135
Selections/Select None
Step Nine:
Image/Add Borders/5 pixels/White
Select with Magic Wand
Flood Fill with Background Pattern
Selections/Select None
Image/Add Borders/50 pixels/White
Select with Magic Wand
Flood Fill with Gradient
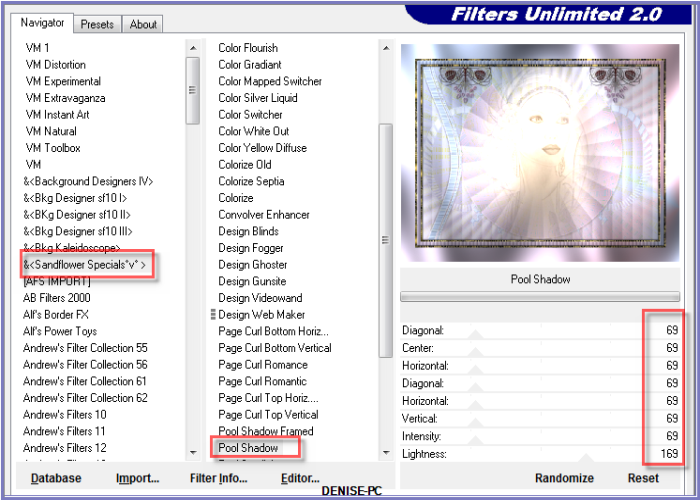
Effects/Plugins/Filters Unlimited 2.0/&<Sandflower
Specials"V">/Poolshadow as follows:
Step Ten:
Image/Add Borders/10 pixels/White
Select with Magic Wand
Flood Fill with Background Pattern
Effects/3D Effects/Inner Bevel
Selections/Select None
Image/Add Borders/10 pixels/White
Select with Magic Wand
Flood Fill with Gradient
Effects/Texture Effects/Texture
Effects/Edge Effects/Enhance
Selections/Select None
Image/Add Borders/10 pixels/White
Select with Magic Wand
Flood Fill with Background Pattern
Effects/3D Effects/Inner Bevel
Selections/Select All
Selections/Modify/Contract 30 pixels
Selections/Invert
Effects/Plugins/Eye
Candy 3.0/Drop Shadow
OR
Effects/Plugins/Eye Candy 4000/Shadowlab
Repeat Drop Shadow/Shadowlab/Direction 135
Selections/Select None
Step 11:
Maximise element deco.png
Edit/Copy Edit/Paste as New Layer
Effects/Image Effects/Offset as follows:
Layers/Duplicate
Image/Mirror/Horizontal OR Image/Mirror
Layers/Merge/Merge Down
Change Blend Mode to Luminance
Effects/Plugins/Eye Candy 3.0/Drop Shadow
OR
Effects/Plugins/Eye Candy 4000/Shadowlab
Step Twelve:
Maximise nicole-fleur-2013.png Edit/Copy
Edit/Paste as New Layer
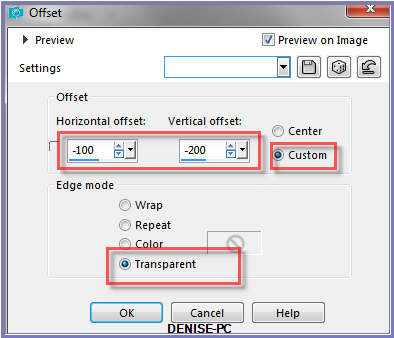
Effects/Image Effects/Offset as follows:
Effects/Plugins/Eye
Candy 3.0/Drop Shadow
OR
Effects/Plugins/Eye Candy 4000/Shadowlab Layers/New Raster Layer
Add
your Watermark
Layers/Merge
All Flatten
Image/Resize/850
pixels wide - height will adjust itself
File/Export/JPEG
Optimiser/Compression Value 20
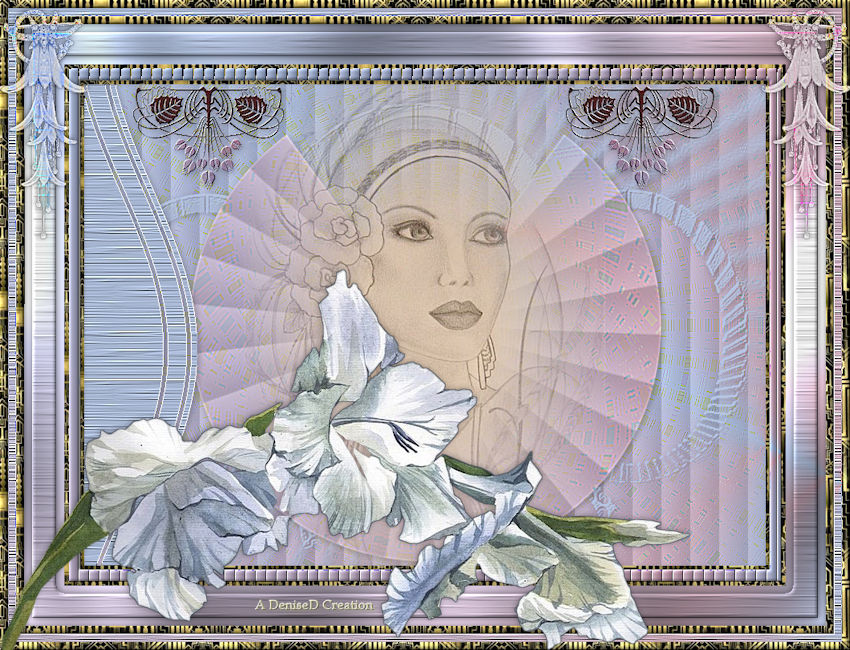
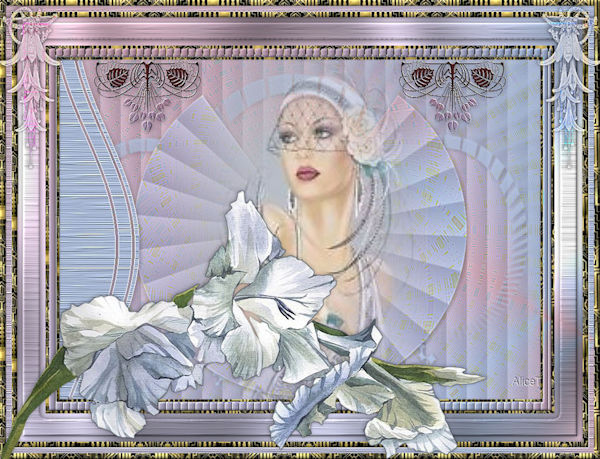
I hope you have enjoyed
this tutorial A
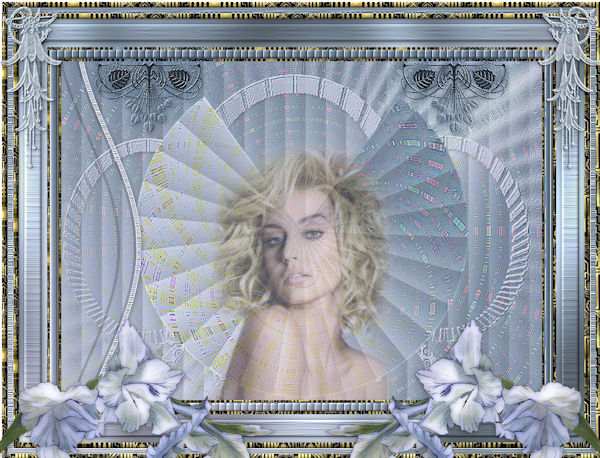
big thank you to the ladies who test my Tutorials TESTERS'
RESULTS