Tutorial 2017
This
tutorial is written by
Denise D. on 17th April, 2014.
from
my own ideas.
Any
resemblance to other tutorials is
co-incidental and unintentional.
You
may share my tutorials with other
groups.
All I ask is that you advise me
and
credit for the tutorial is given to me and linked to
http://escapingtopsp2.altervista.org/Home/homeb.html
Please
do not upload any of my completed Tutorial images onto sites
such as Fotki, Pinterest, Photobucket or similar
ANTIQUE
STILL LIFE
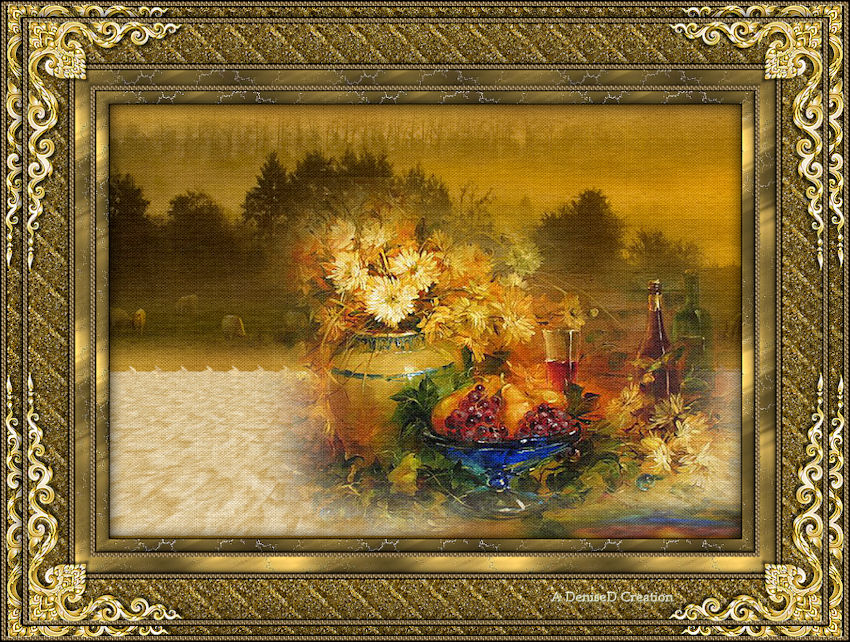
http://escapingtopsp2.altervista.org/AntiqueStillLife/AntiqueStillLife.html

Thank you Inge-Lore for this German translation
Click on the Box to download Supplies

![]()
Supplies
Images:
Still_Life_Tsl8_Montana_Kate_Mist.pspimage
You can join this Group at:
https://groups.yahoo.com/neo/groups/montanakates-mists-only/info
Sorensen_Designs
Mist Feb 151-11.pspimage
You can join this Group at:
https://groups.yahoo.com/neo/groups/SorensenDesignsMistsandTubes/info
032.png
This image was obtained from the Internet
If you are the owner of this
image, please contact me
so that credit can be given to
you
Signature
Selection:
D.D.Antique Still Life
Pattern:
Jeri_Ingalls_LNPaper08.jpg
goldeven.jpg
goldbeads.jpg
gold(202).jpg
Styled Line:
d.d. line.PspStyledLine
Preset:
D.D.AntiqueStillLife.fls
Double Click on the  icon in the Supplies File to install
this Preset in your Plugin. icon in the Supplies File to install
this Preset in your Plugin.
If for some reason this doesn’t work,
I have provided the settings in the Tutorial.
Plugins:
Alien Skin Eye Candy 3.0
OR
Alien Skin Eye Candy 4000
Filters Unlimited 2.0
MuRa's Meister
MuRa's Seamless
Simple
Found here:
 AND AND 
Notes:
This Tutorial was originally created
in PSPX5 and reworked
in Corel Paint Shop Pro 2019.... other
versions may need adjustment
Some of the graphics may be from Free
to Use sites or Share
Groups.
If you are the creator of one of these
please let me know
so that appropriate credit can be given.
No infringement of
copyright is intended or intentional.
Before opening PSP, download plugins
and install
Some
helpful information:
You can change the blend mode, opacity and drop shadow, as
well as colourise
the materials,
according to the tubes/colours you are using.
When applying the Resize with the All Layers option checked, this will
be
informed in the tutorial,
otherwise, apply the resize with this option unchecked.
Remember always to save your work.
Whenever you reduce an image, apply Adjust/Sharpness/Sharpen, to
maintain the
sharpness of the image.
Some tools or features have other names in earlier versions of the PSP.
http://escapingtopsp2.altervista.org/Home/homeb.html

Please
Note: Offset
settings provided in this tutorial may vary according to size of your
image.
Please
adjust to suit.
The
settings remain the same throughout this Tutorial unless otherwise
stated.
Set your Foreground colour to #be9330
Set your Background colour to #925513
Step One:
Place Selection in PSP
Selection Folder
Place Styled Line in PSP
Styled Lines Folder
Place Patterns in PSP
Pattern Folder
Install Preset
Open graphics in PSP, duplicate (Shift
D) and close the original.
File/New/New Image 800 pixels x 550
pixels as follows:
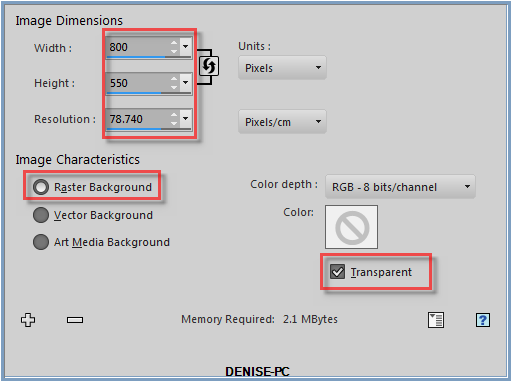
Flood fill with Foreground Colour
Step Two:
Effects/Plugins/MuRa's
Meister/Cloud as follows:
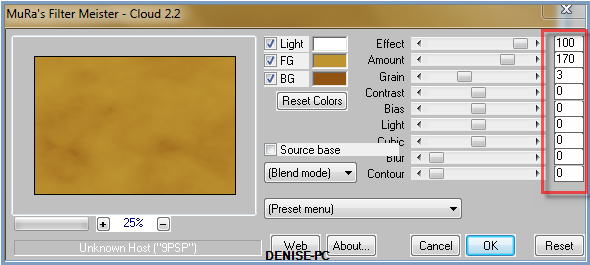
Selections/Load/Save Selection/Load Selection D.D.Antique Still Life
from Disk as follows:
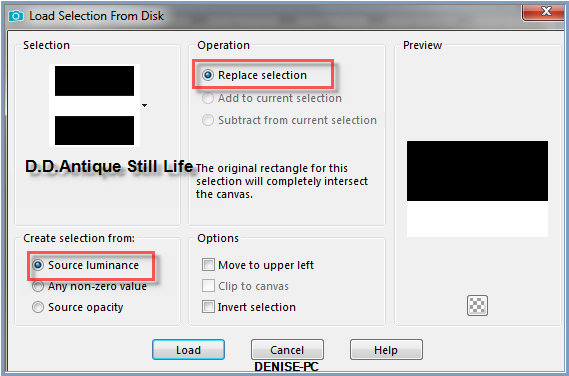
Hit
the Delete Button
Step Three:
Change Foreground Colour to Pattern Jeri_Ingalls_LNPaper08.jpg as
follows:
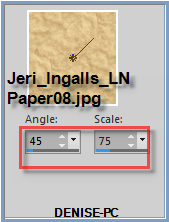
Flood fill Selection with Pattern
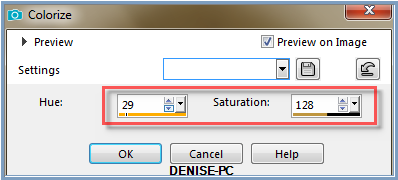
Adjust/Colorize/Hue and Saturation as follows:
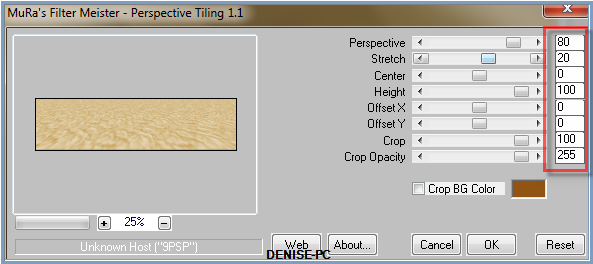
Effects/Plugins/MuRa's Meister/Perspective Tiling as follows:
Selections/Select None
Step Four:
Pen Tool/d.d. line.PspStyledLine with the following
settings:

Starting at the left hand side, draw a line across to the
right side as shown below:

Convert to Raster Layer
Maximise Sorensen_Designs Mist Feb 151-11.pspimage
Edit/Copy Edit/Paste as New Layer
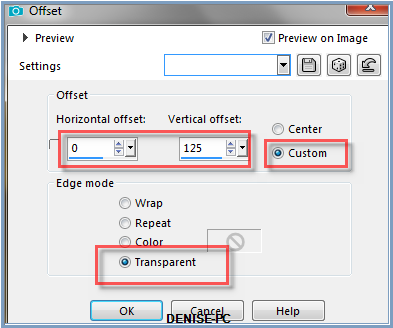
Effects/Image Effects/Offset as follows:
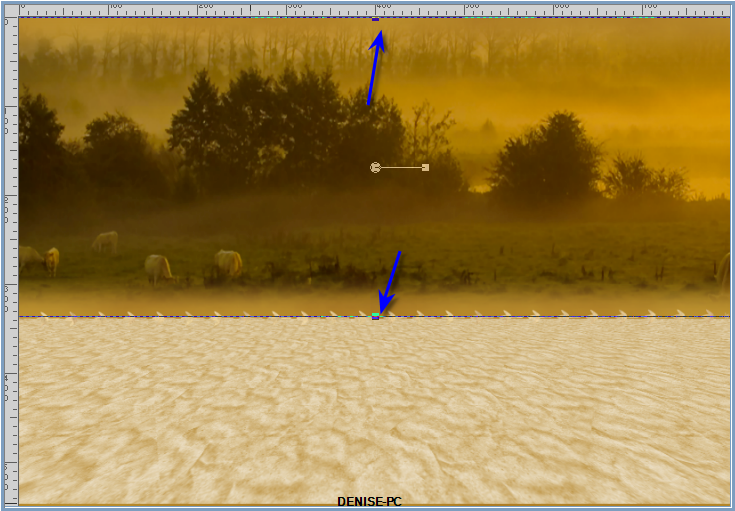
Using the Deform/Pick Tool, drag the image up to the top and down to
the middle line
as shown below:
Deselect Pick/Deform Tool
Adjust/Sharpness/Sharpen
Step Five:
Maximise Still_Life_Tsl8_Montana_Kate_Mist.pspimage
Edit/Copy
Edit/Paste as New Layer
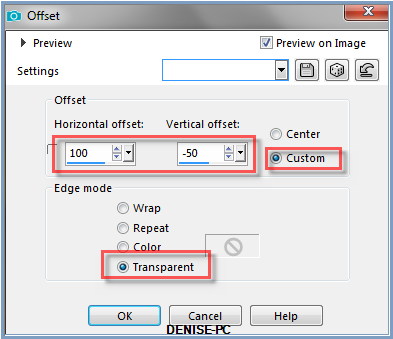
Effects/Image Effects/Offset as follows:
Adjust/Sharpness/Sharpen More
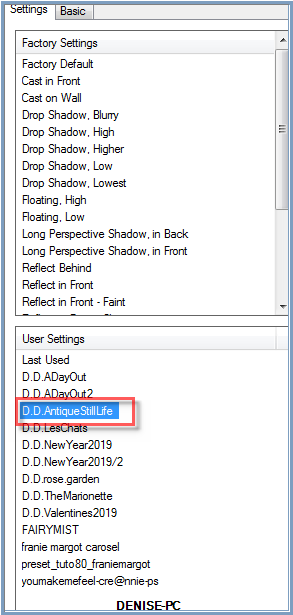
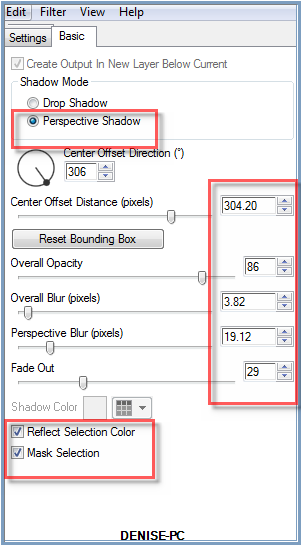
Effects/Plugins/Alien Skin Eye Candy 5/Perspective Shadow/Preset
D.D.AntiqueStillLife OR as follows:
Step Six:
Layers/Merge/Merge
All Flatten
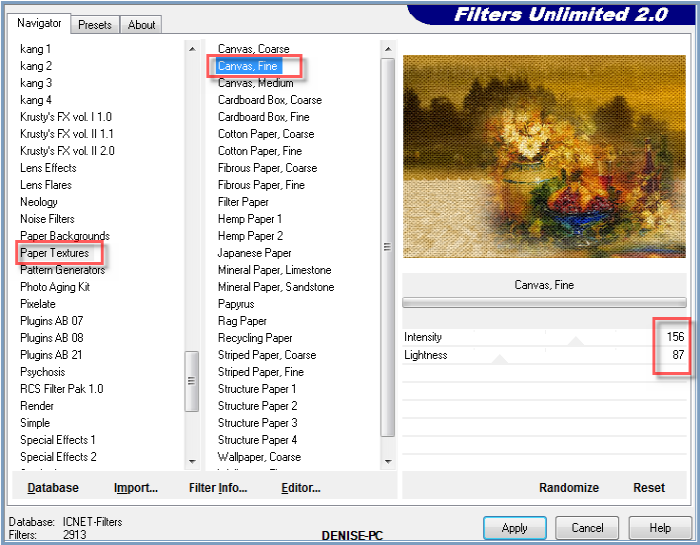
Effects/Plugins/Filters Unlimited/Paper Textures/Canvas, Fine as
follows:
Image/Add Borders/2 pixels/Black
Image/Add Borders/15 pixels/White
Magic Wand with the following settings:

Select Border with Magic Wand
Change Foreground Colour to Pattern goldeven.jpg as follows:
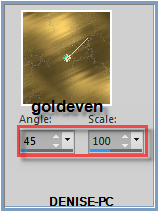
Flood fill with Pattern
Adjust/Sharpness/Sharpen
Effects/3D Effects/Inner Bevel as follows:
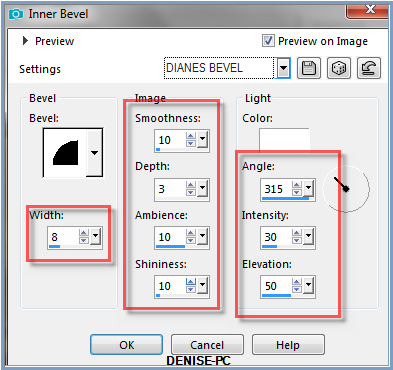
Selections/Invert
Layers/New Raster Layer
Effects/3D Effects/Cut Out as follows:
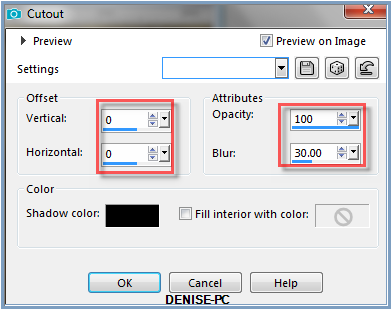
Selections/Select None
Step Seven:
Image/Add Borders/2 pixels/Black
Image/Add Borders/5 pixels/White
Select with Magic Wand
Change Background to Pattern goldbeads.jpg as follows:
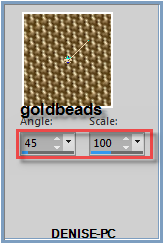
Flood fill with Pattern
Selections/Select None
Image/Add Borders/20 pixels/White
Select with Magic Wand
Flood fill with Foreground Pattern
Adjust/Sharpness/Sharpen
Effects/3D Effects/Inner Bevel
Selections/Select None
Image/Add Borders/2 pixels/Black
Image/Add Borders/5 pixels/White
Select with Magic Wand
Flood fill with Background Pattern
Selections/Select None
Step Eight:
Image/Add
Borders/2 pixels/Black
Image/Add Borders/50 pixels/White
Select with Magic Wand
Change Foreground Pattern to gold(202) as follows;
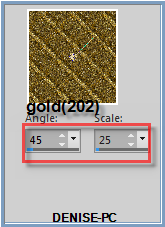
Flood fill with Foreground Pattern
Effects/3D Effects/Inner Bevel BUT change width to 30 pixels
Selections/Select None
Image/Add Borders/2 pixels/Black
Image/Add Borders/5 pixels/White
Select with Magic Wand
Flood fill with Background Pattern
Selections/Select None
Image/Add Borders/2 pixels/Black
Step Nine:
Maximise 032.png
Image/Resize/40% as follows:
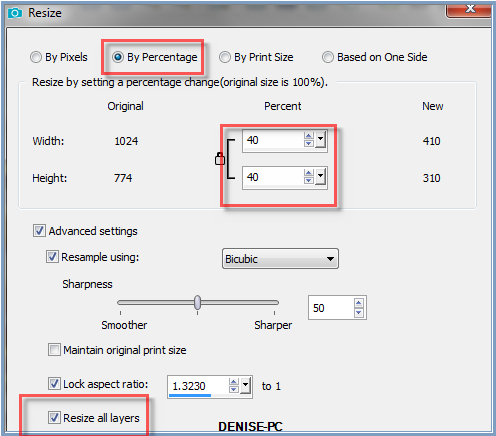
Adjust/Sharpness/Sharpen
Edit/Copy Edit/Paste as New Layer
Effects/Image Effects/Offset as follows:
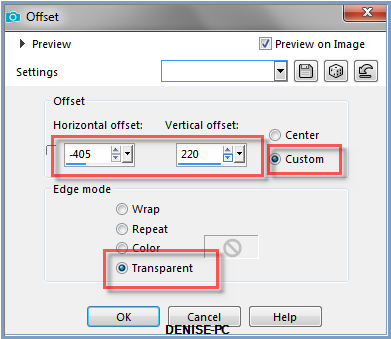
Step Ten:
Change Foreground back to Foreground Colour
Using the Change to Target Tool, wipe over the corner with the
Foreground Colour
Effects/Edge Effects/Enhance
Effects/Plugins/MuRa's Seamless/Emboss at Alpha/Default Settings
Effects/3D Effects/Drop Shadow as follows:
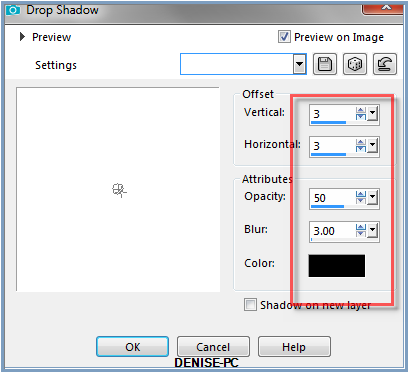
Effects/Plugins/Simple/Top Left Mirror
Layers/Merge/Merge All Flatten
Step Eleven:
Layers/Duplicate
Image/Resize 95% (resize all layers box unticked)
Adjust/Sharpness/Sharpen
Effects/Plugins/Eye Candy 3.0/Drop Shadow as follows:
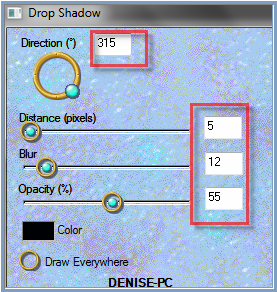
OR
Effects/Plugins/Eye Candy 4000/Shadowlab as follows:
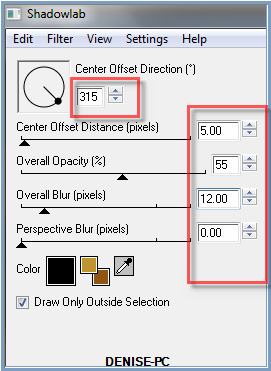
Repeat Drop Shadow/Shadowlab/Direction 135
Step Twelve:
Maximise Signature.png
Edit/Copy Edit/Paste as New Layer
Place at bottom of Layer
Layers/New
Raster Layer
Add
your Watermark
Layers/Merge
All Flatten
Image/Resize/850
pixels wide - height will adjust itself
File/Export/JPEG
Optimiser/Compression Value 20
I hope you have enjoyed
this tutorial
A
big thank you to the ladies who test my Tutorials
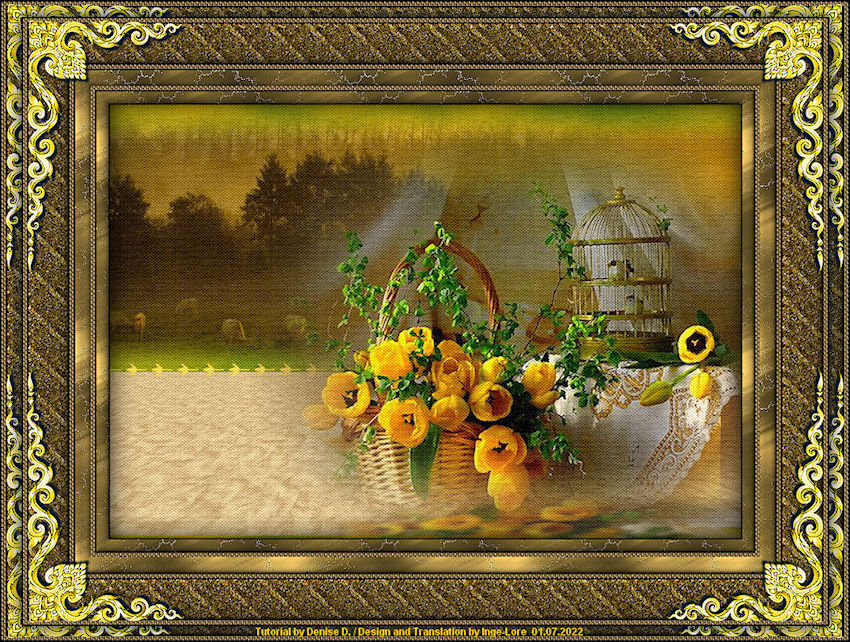
INGE-LORE

| | | |