Tutorial 2017
This
tutorial is written by
Denise D. on 19th October, 2018
from
my own ideas.
Any
resemblance to other tutorials is
co-incidental and unintentional.
You
may share my tutorials with other
groups.
All I ask is that you advise me
and
credit for the tutorial is given to me and linked to
http://escapingtopsp2.altervista.org/Home/homeb.html
Please
do not upload any of my completed Tutorial images onto sites
such as Fotki, Pinterest, Photobucket or similar
A
WALK IN THE PARK
To print click on Printer

Supplies
Images:
DaisyWeb_CHWhite_TheParkBench.pspimage
(http://groups.yahoo.com/group/StudioCreationsGoodies/
is the link on the tube but I don't think this group exists now)
2345 - girl
umbrella - LB TUBES.pspimage
You can join this Group at:
http://lbtubesandmists.blogspot.com/
FloralBranch.pspimage
This image was obtained from the
Internet
If you are the owner of this
image, please contact me
so that credit can be given to
you
Signature.png
Frame:
Stitched Frame.png
Mask:
creation.tine_masque003
sg-double-floral-grungeframe2
Selections:
D.D.AWalkInThePark
D.D.AWalkInThePark2
Font:
HipsterScriptPro
Plugins:
Alien Skin Eye Candy 3.0
OR
Alien Skin Eye Candy 4000
&<Sandflower
Specials "v"> (Import into
Filters Unlimited 2.0)
&BKgDesigner sf1011> (Import into
Filters Unlimited 2.0)
<&Bkg
Designer sf10111> (Import into
Filters Unlimited 2.0)
&<Background
Designers IV> (Import into Filters Unlimited 2.0)
MuRa's Meister
Found here:
 And And 
Notes:
This Tutorial was created in PSP
X9.... other
versions may need adjustment
Some of the graphics may be from Free
to Use sites or Share
Groups.
If you are the creator of one of these
please let me know
so that appropriate credit can be given.
No infringement of
copyright is intended or intentional.
Before opening PSP, download plugins
and install
Some
helpful information:
You can change the blend mode, opacity and drop shadow, as
well as colourise
the materials,
according to the tubes/colours you are using.
When applying the Resize with the All Layers option checked, this will
be
informed in the tutorial,
otherwise, apply the resize with this option unchecked.
Remember always to save your work.
Whenever you reduce an image, apply Adjust/Sharpness/Sharpen, to
maintain the
sharpness of the image.
Some tools or features have other names in earlier versions of the PSP.

Please
Note: Offset
settings provided in this tutorial may vary according to size of your
image.
Please
adjust to suit.
The
settings remain the same throughout this Tutorial unless otherwise
stated.
Set your Foreground colour to #e5b9c2
Set your Background colour to #6b70a7
Step One:
File/Export/Picture Frame
Place Masks in PSP Mask Folder
Place Selections in PSP Selection Folder
Install Font
Open graphics in PSP, duplicate (Shift
D) and close the original.
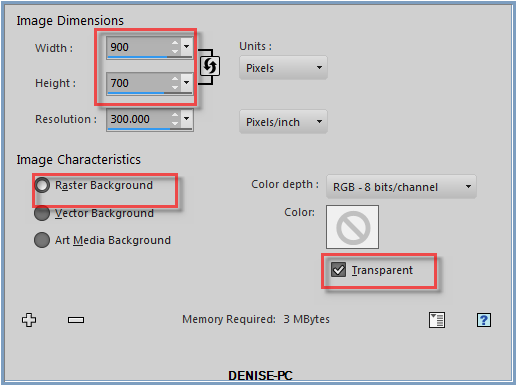
File/New/New Image 900 pixels x 700
pixels as follows:
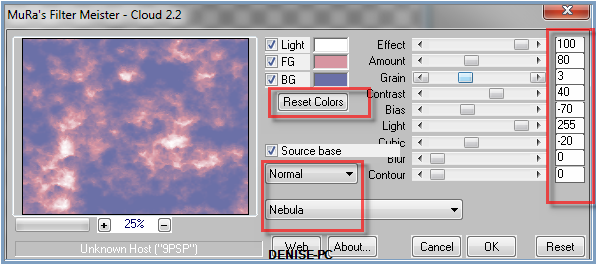
Effects/Plugins/MuRa's
Meister/Cloud as follows:
Step Two:
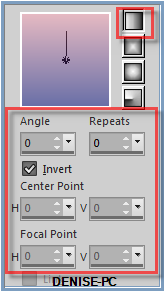
Change Foreground Colour to Foreground/Background/Linear Gradient as
follows:
Layers/New Raster Layer
Flood fill with Gradient
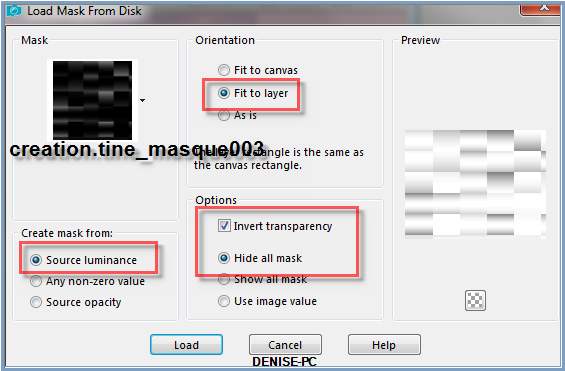
Layers/Load/Save Mask from Disk/Load Mask creation.tine_masque003 as
follows:
Layers/Merge/Merge Group
Effects/Plugins/Filters
Unlimited 2.0/Convolution Filters/Sharpen as follows:
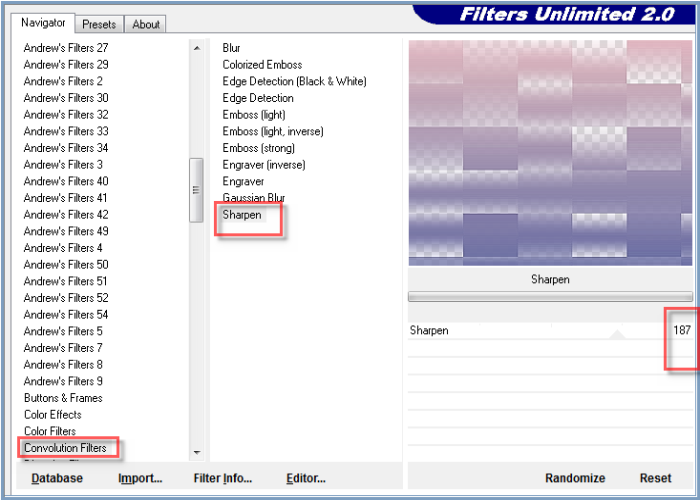
Step Three:
Layers/New
Raster Layer
Flood fill with Background Colour
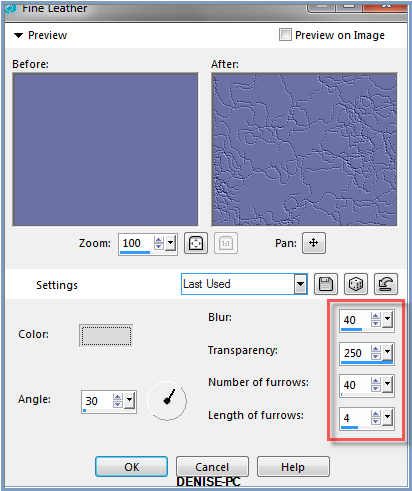
Effects/Texture Effects/Fine Leather as follows:
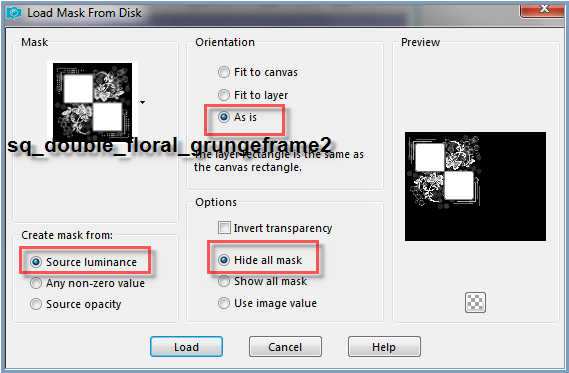
Layers/Load/Save Mask/Load Mask sq-double-floral-grungeframe2 as
follows:
Effects/Edge Effects/Enhance More
Layers/Merge/Merge Group
Step Four:
Image/Resize/85%
as follows:

Move into the top left hand corner
Settings 2 pixels x 2 pixels as shown in the image below for exact
placing
Adjust/Sharpness/Sharpen
Step Five:
Layers/Duplicate
Image/Resize/80%
Adjust/Sharpness/Sharpen
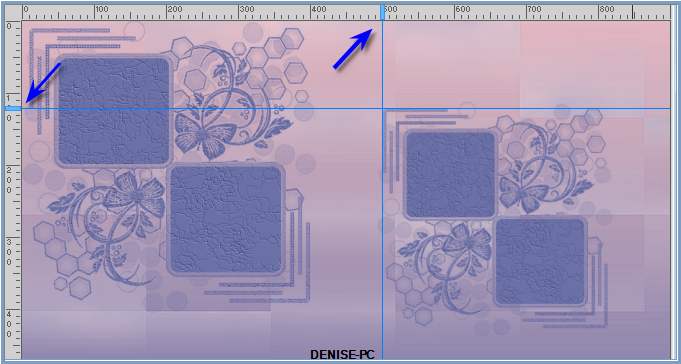
Move image over to the top right corner
Use your Guide
Lines to place this image see below:
Adjust/Sharpness/Sharpen
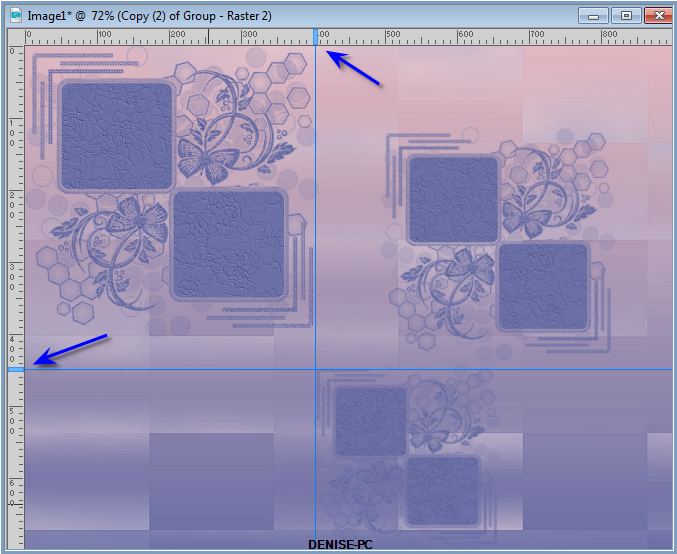
Layers/Duplicate
Image/Resize/80%
Adjust/Sharpness/Sharpen
Move image down to the bottom of the Layer
Use your Guide Lines to place the image as shown below:
Remove Guide Lines
Step Six:
Layers/Merge/Merge Down
Repeat Once
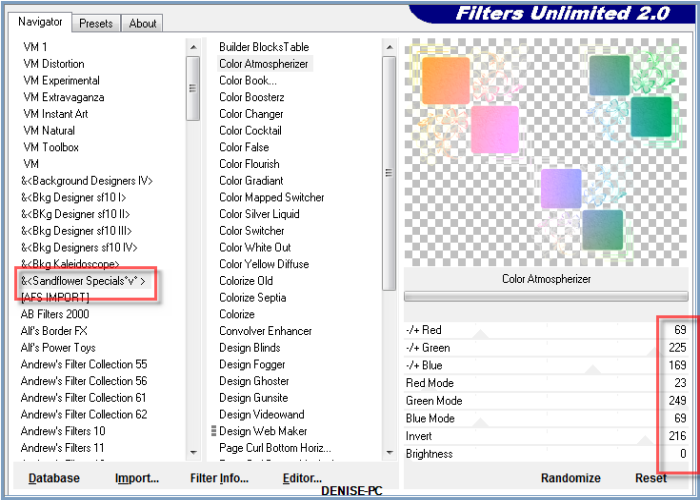
Effects/Plugins/Filters Unlimited 2.0/&<Sandflower
Specials "v">/Color Atmospherizer as follows:
Step Seven:
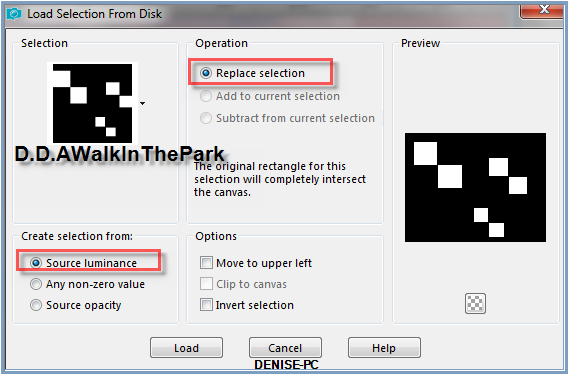
Selections/Load/Save Selection/Load Selection D.D.AWalkInThePark from
Disk as follows:
Effects/Plugins/Filters Unlimited 2.0/<&Bkg Designer
sf10111>SE Shiver as follows:
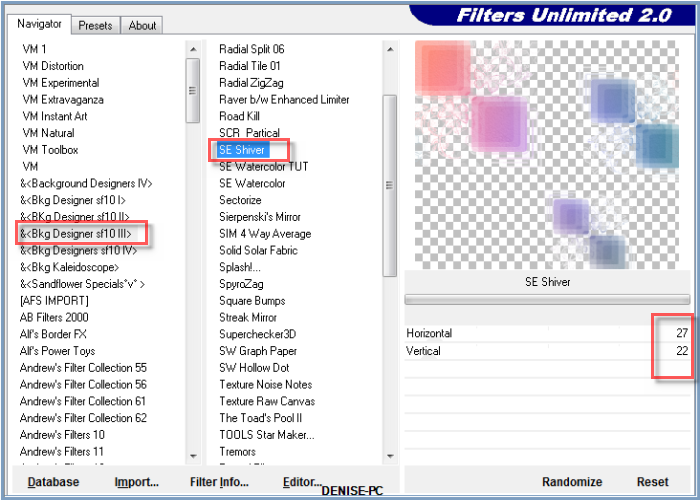
Effects/Plugins/Filters Unlimited 2.0/Convolution Filters/Sharpen
Selections/Select None
Step Eight:
Layers/New Raster Layer
Layers/Arrange/Move Down
Selections/Load/Save Selection D.D.AWalkInThePark2 from Disk
Maximise DaisyWeb_CHWhite_TheParkBench.pspimage
Edit/Copy Edit/Paste into Selection
Selections/Select
None
Change Opacity to 65%
Image/Add Borders/5 pixels/White
Image/Add
Borders/50 pixels/Foreground Colour
Magic Wand with the following settings:

Select Border with Magic Wand
Flood fill with Foreground Gradient but change settings to Angle 135
Repeats 3
Effects/Plugins/Filters
Unlimited 2.0/<&Bkg Designer sf10111>/Splash! as
follows:
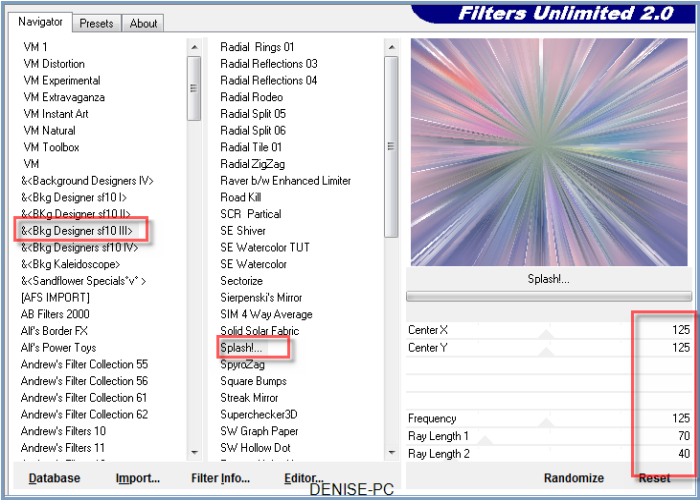
Selections/Select None
Step Nine:
Image/Picture
Frame as follows:
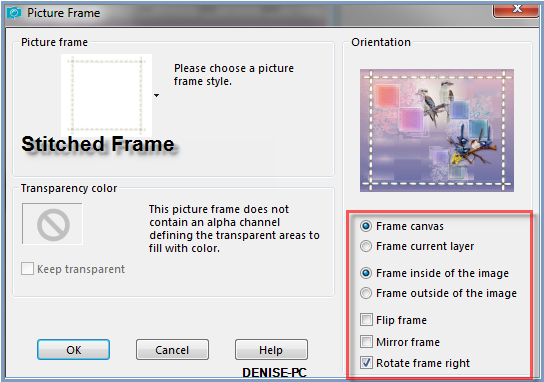
Using the Pick/Deform Tool, move the right and left sides
over to the white line as shown below:
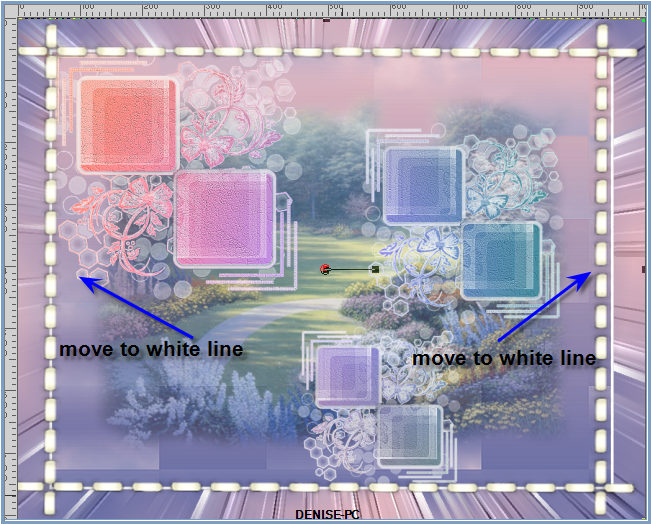
Deselect Pick/Deform Tool
Step Ten:
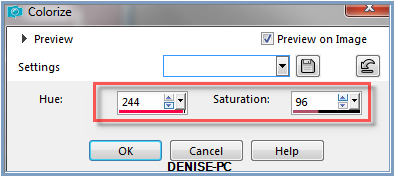
Adjust/Hue and Saturation/Colorize as follows:
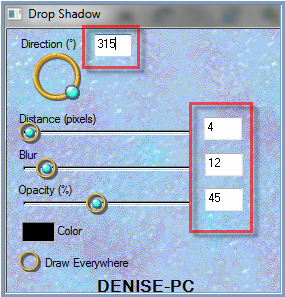
Effects/Plugins/Eye Candy 3.0/Drop Shadow as follows:
OR
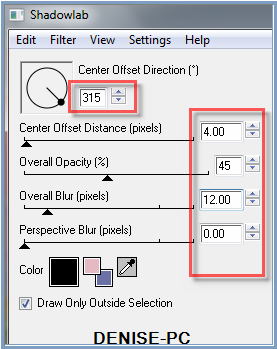
Effects/Plugins/Eye Candy 4000/Shadowlab as follows:
Step Eleven:
Image/Add
Borders/5 pixels/Background Colour
Image/Add Borders/40 pixels/White
Select with Magic Wand
Flood fill with Gradient
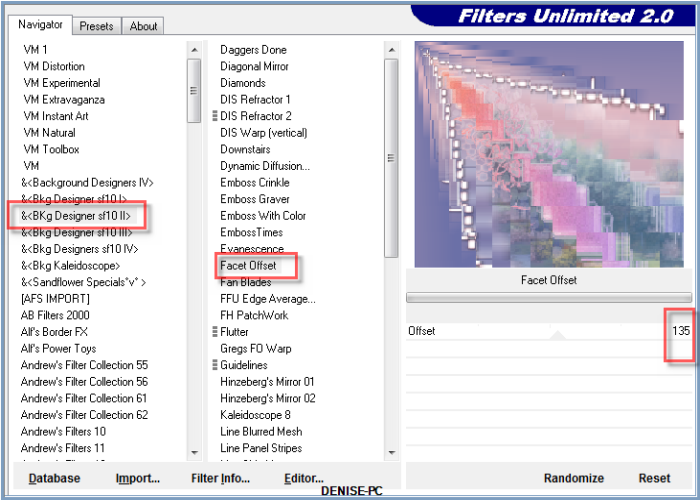
Effects/Plugins/Filters Unlimited 2.0/&BKgDesigner
sf1011>/Facet Offset as follows:
Effects/Edge Effects/Enhance
Step Twelve:
Selections/Select None
Effects/Plugins/&<Background Designers IV>/@Frame
AFH Beveler 2.0a as follows:
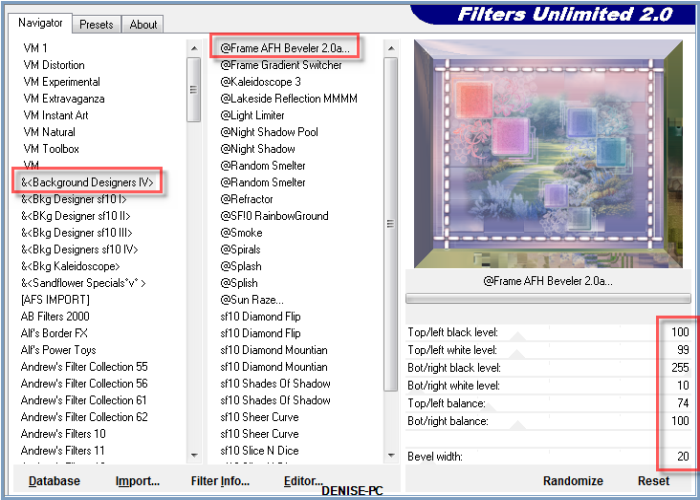
You may need to
play with the settings to suit your version of this tutorial
Step Thirteen:
Maximise 2345 - girl umbrella - LB TUBES.pspimage
Edit/Copy Edit/Paste as New Layer
Effects/Image Effects/Offset as follows:
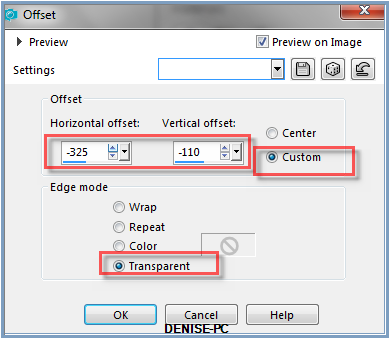
Effects/Plugins/Eye
Candy 3.0/Drop Shadow
OR
Effects/Plugins/Eye Candy 4000/Shadowlab
Step Fourteen:
Maximise FloralBranch.pspimage
Image/Resize/80%
Adjust/Sharpness/Sharpen
Effects/Image Effects/Offset as follows:
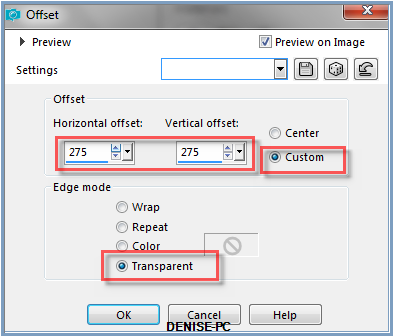
Effects/Plugins/Eye
Candy 3.0/Drop Shadow
OR
Effects/Plugins/Eye Candy 4000/Shadowlab
Step Fifteen:
Text Tool with the following settings:


Settings may vary according to your version of PSP
Swap Foreground Colour and the Background Colour and write
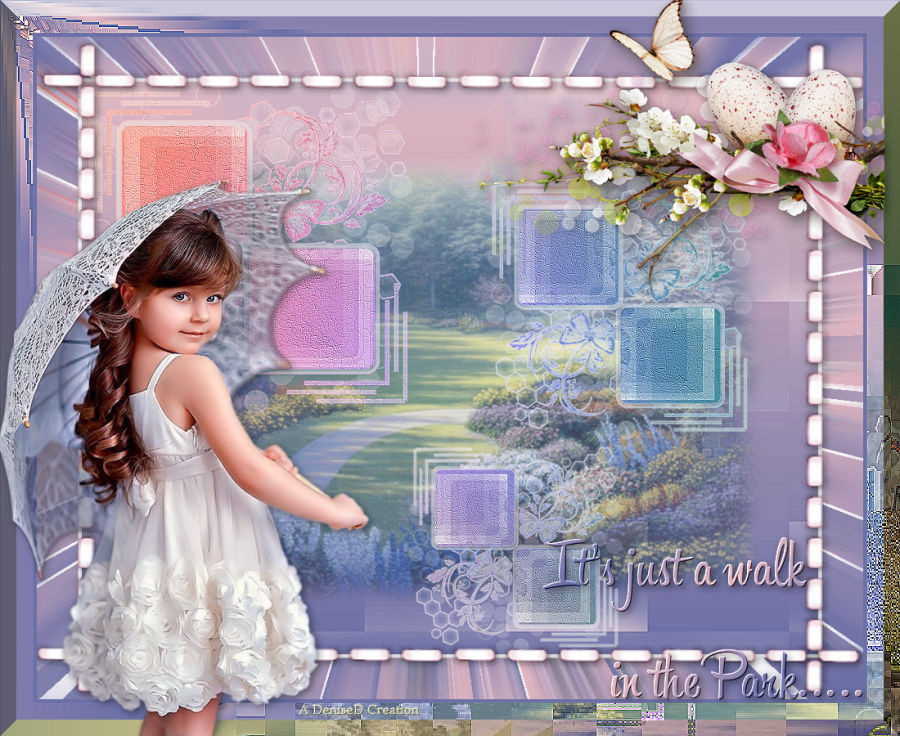
It's just a walk
in the Park.....
Convert to Raster Layer
See my image for placement
Effects/Plugins/MuRa's Seamless/Emboss At Alpha/Default Settings
Effects/Plugins/Eye Candy 3.0/Drop Shadow
OR
Effects/Plugins/Eye Candy 4000/Shadowlab
Maximise Signature.png
Edit/Copy Edit/Paste as New Layer
Place at bottom of Layer
Layers/New Raster Layer
Add
your Watermark
Layers/Merge
All Flatten
Image/Resize/900
pixels wide - height will adjust itself
File/Export/JPEG
Optimiser/Compression Value 20
I hope you have enjoyed
this tutorial
A
big thank you to the ladies who test my Tutorials
TESTERS'
RESULTS
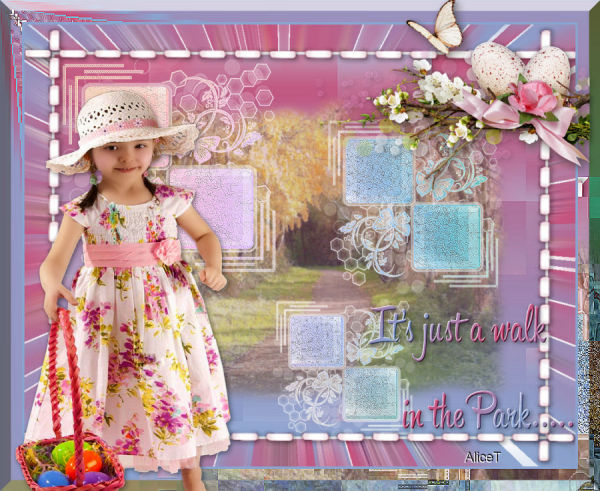
ALICE T.
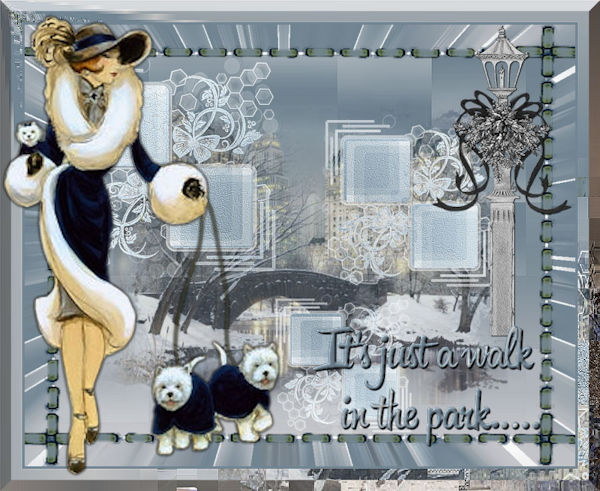
BETTY

FRAN
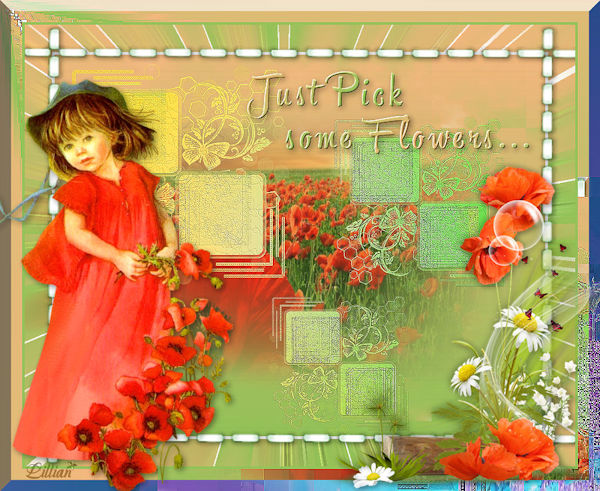
LILLIAN
FOR
OTHER VERSIONS OF THE TUTORIAL
PLEASE
GO TO:
http://escapingtopsp2.altervista.org/AWalkInTheParkVersions/AWalkInTheParkVersions.html
| | | |